2021年12月18日星期六

How to Install JCB ServiceMaster 4 on Win7/Win10

 What is JCB ServiceMaster 4?

JCB ServiceMaster 4 is diagnostic software, which contains complete information for diagnostics and calibration of agricultural machinery and engines company JCB.Setting a diagnostic program JCB ServiceMaster 4 on personal computer users have access to view a variety of information, including information that is stored on one DVD.

JCB Service Master 4 Support Language:
English, Italian, German, French

JCB ServiceMaster 4 Functions List:
– Troubleshooting;
– Standard Test service;
– View and edit generated data;
– ECU Flash files with the correct data

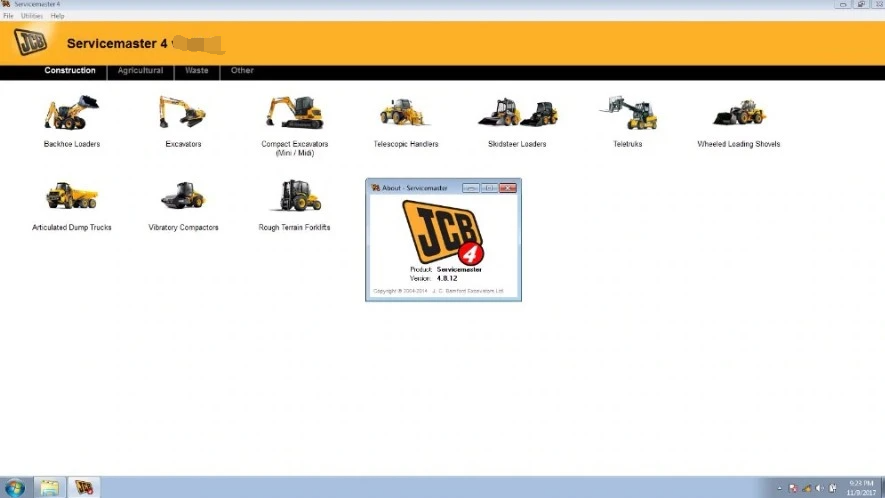
JCB ServiceMaster 4 Support Constructions & Agricultural:
Construction:
Backhoe Loaders
Compact Backhoe Loaders
Excavators
Compact Excavators (Mini / Midi)
Telescopic Handlers (2007-, 2007+, Tier4, 525-60 Compacr Loadall)
Skid Steer Loaders (Robot, Skid Steer Loaders and Compacr Track Loaders, Skid Steer Loaders India)
Teletruk (Tier4)
Wheeled Loading Shovels (Compact, Medium, Large, Telemasters)
Articulated Dump Trucks
Vibratory Compactors (Tier3, Interim Tier4, VMT380/430)
Rough Terrain Forklifts (Tier2/3 RTFL, Tier4 RTFL)

Agricultural:
Fastrac Tractors (2000-3000, 3000 Series 2, 3000 Series 3, 3000 Series 4, 4000 Series, 7000 Series, 8250 Series 1, 8250 Series 2, 8000 Series 3)
Telescopic Handlers (2007-, 2007+, Tier4, 525-60 Compacr Loadall)
Wheeled Loading Shovels (Compact, Medium, Large, Telemasters)

Waste:
Telescopic Handlers (Tier3, Tier4)
Wheeled Loading Shovels (427/437/435S T4F, 457 T4F)

Other:
JS Range, JZ70, Backhoe Loader, Loadall 2007-, Loadall 2007+, Loadall Agri Extras, Loadall Construction extras, Robot, Teletruk, Midi Excavator 801-8065, 8080-8085, Dump Truck, Large Wheel Loading Shovels, Compact Wheel Loading Shovels, Fastrac 2000-3000 Series, Fastrac 3000 Series 2, Fastrac 8250 Series 1, Fastrac 8250 Series 2, Fastrac 7000 Series 1, Vibromax, JCB Dieselmax Engine, JCB Engine (IPU OEM), JCB Engine (Base Engine OEM), JCB Generators, LiveLink I, LiveLink II.

JCB ServiceMaser 4 Requirements:
Windows XP 32 bit, Windows 7 32 bit, Wnidows 7 64 bit, Windows 8/8.1 32 bit, Windows 8/8.1 64 bit, Windows 10 32 bit, Windows 10 64 bit
– CPU: Pentium/Athlon 2 GHz or higher
– RAM: 512 MB of system memory
– Hard Drive: 25 GB of available space
– Optical Drive: DVD-ROM

How to Install JCB ServiceMaster 4 on Win7/Win10

Procedures:

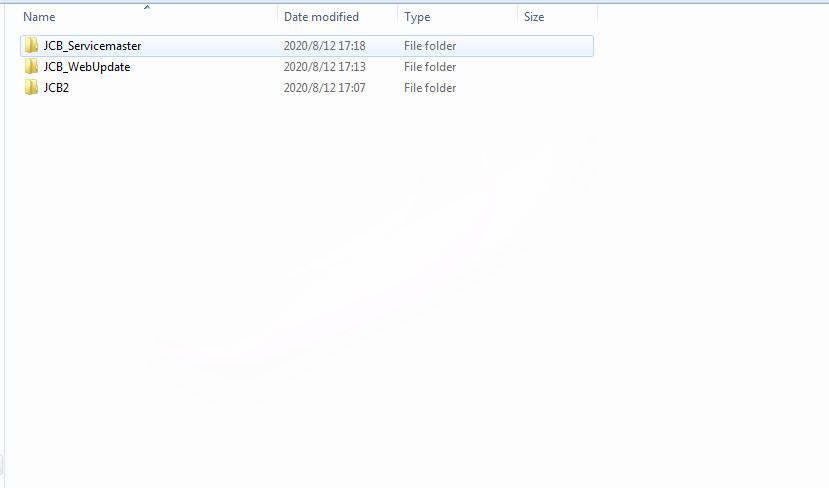
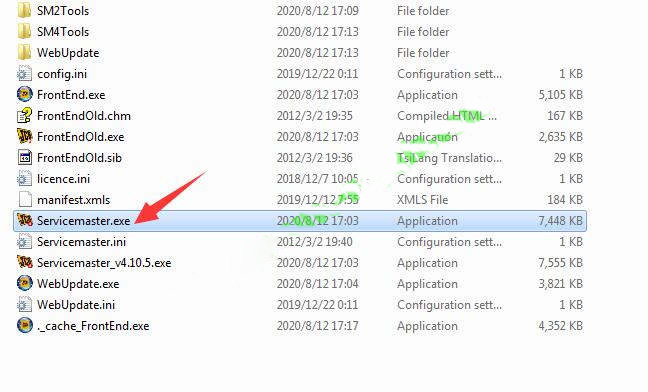
After downloading and extracting you will get below JCB ServiceMaster 4 installation files.

How-to-Install-JCB-ServiceMaster-4-on-Win7-Win10-0 How-to-Install-JCB-ServiceMaster-4-on-Win7-Win10-1

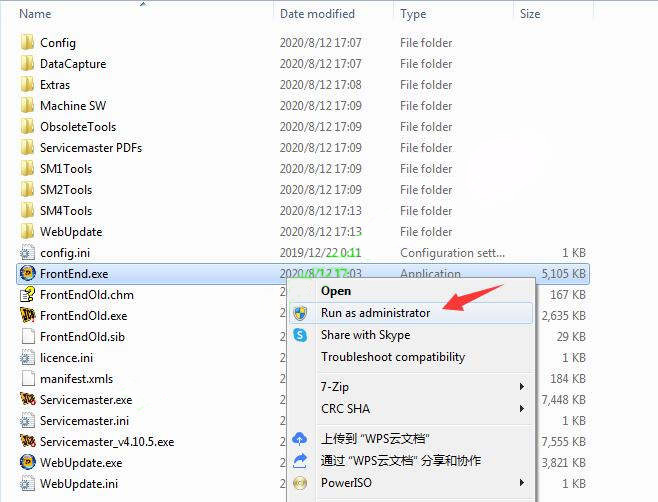
Open “JCB_Servicemaster” folder,then right click “FrontEnd.exe” to run it as administrator

How-to-Install-JCB-ServiceMaster-4-on-Win7-Win10-2

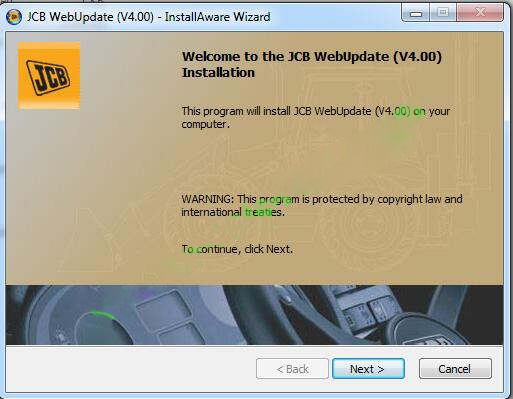
This program will install JCB WebUpdate(V4.00) on your computer,click “Next”

How-to-Install-JCB-ServiceMaster-4-on-Win7-Win10-3

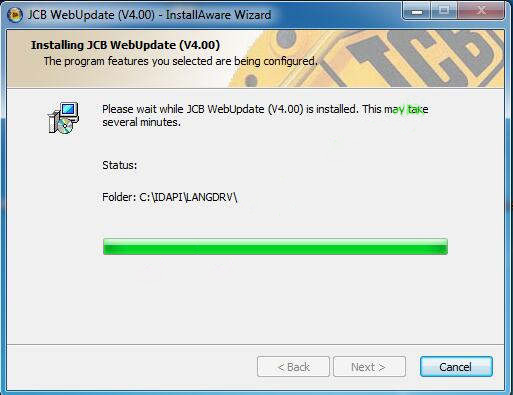
Please wait while WebUpdate (v4.00) is installed.This may take several minutes.

How-to-Install-JCB-ServiceMaster-4-on-Win7-Win10-4

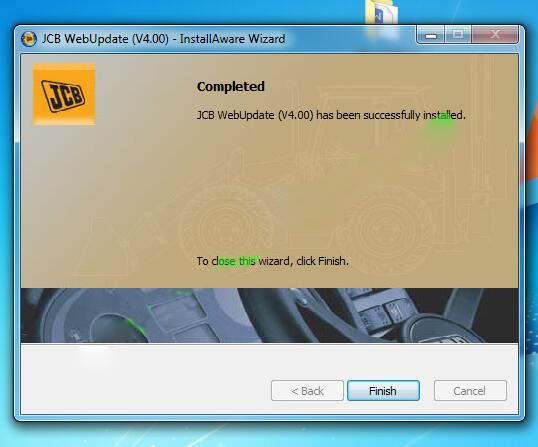
JCB WebUpdate(v4.00) has been successfully installed,click “Finish”

How-to-Install-JCB-ServiceMaster-4-on-Win7-Win10-5

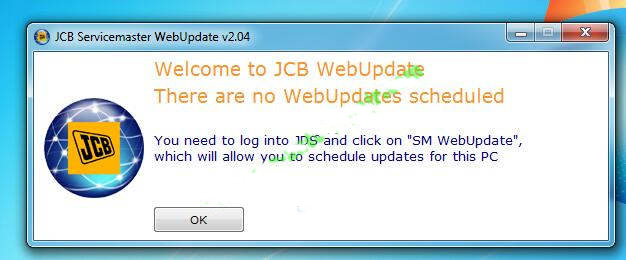
After then it will show you a welcome to JCB message,just click “OK”

How-to-Install-JCB-ServiceMaster-4-on-Win7-Win10-6

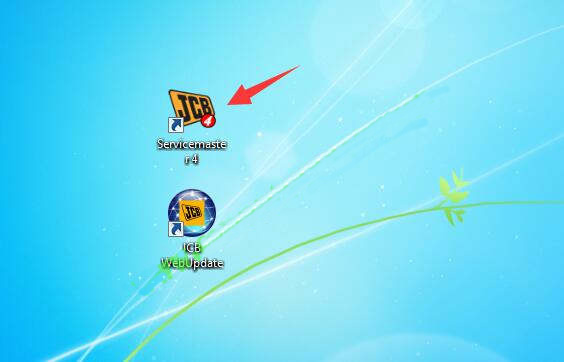
Now back to your desktop,delete the Servicemaster4 shortcut

How-to-Install-JCB-ServiceMaster-4-on-Win7-Win10-7

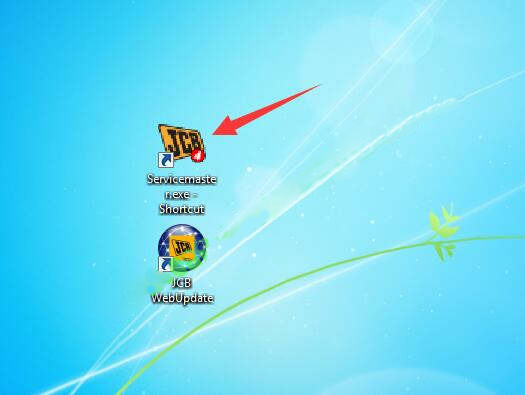
Then back to “JCB_Servicemaster” folder to select “Servicemaster.exe” and sent it to desktop as shortcut.

How-to-Install-JCB-ServiceMaster-4-on-Win7-Win10-8

Now run “Servicemaster.exe – Shortcut” on desktop as administrator.

How-to-Install-JCB-ServiceMaster-4-on-Win7-Win10-9

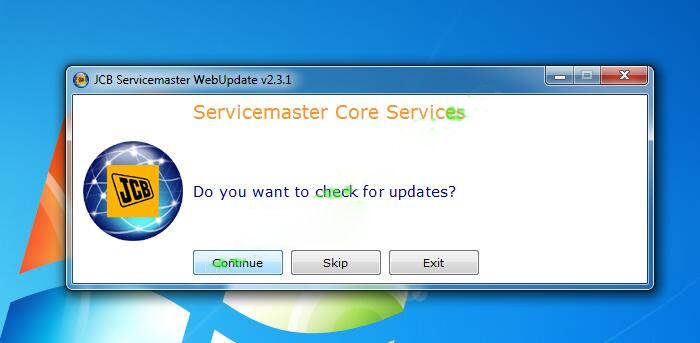
It will ask you to check update,click “Skip”

How-to-Install-JCB-ServiceMaster-4-on-Win7-Win10-10

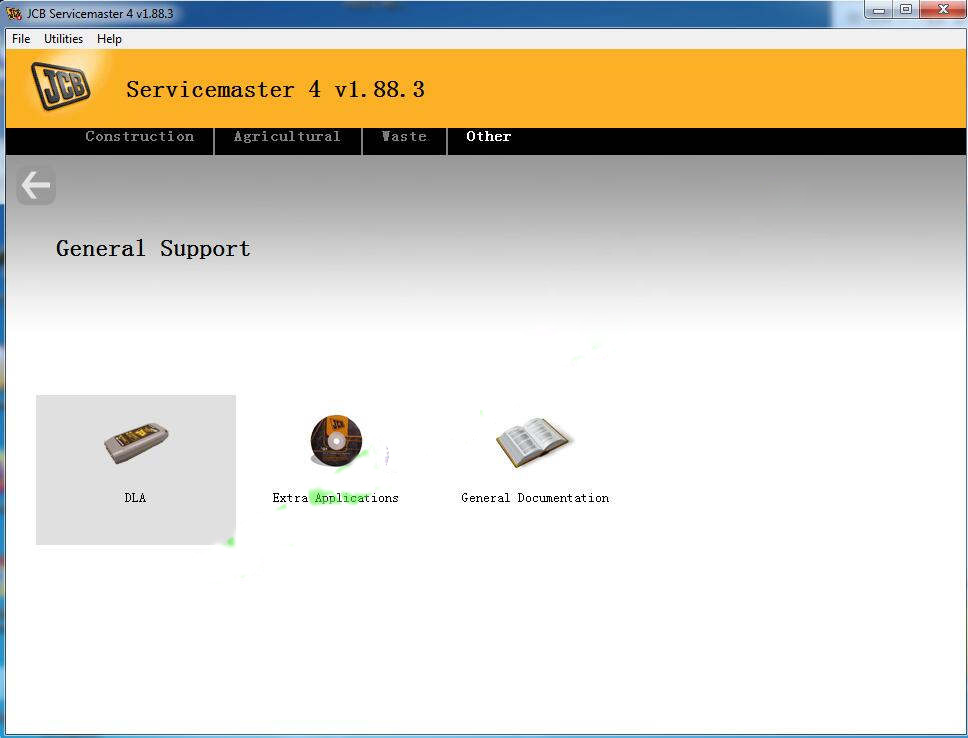
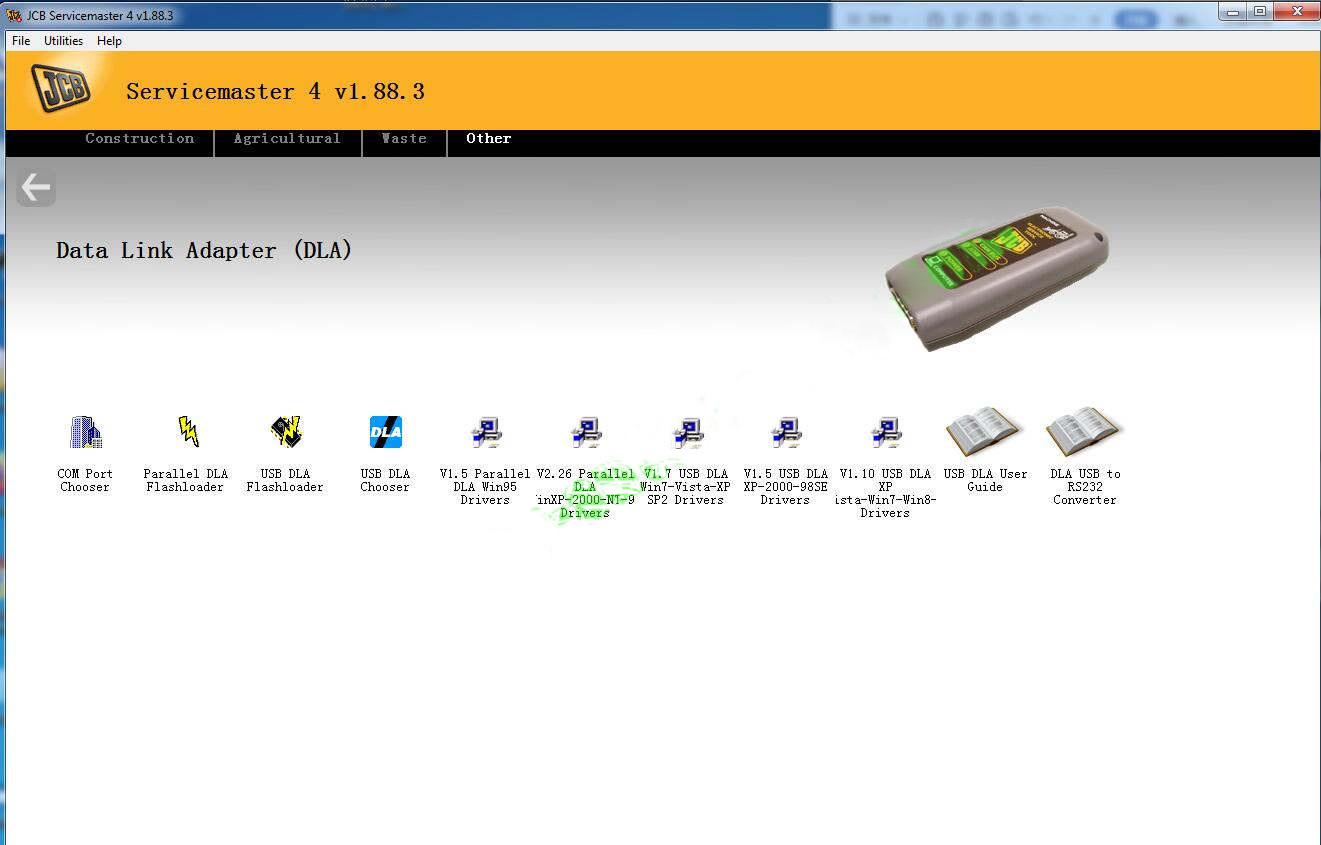
For first time running,it will ask to your update DLA driver

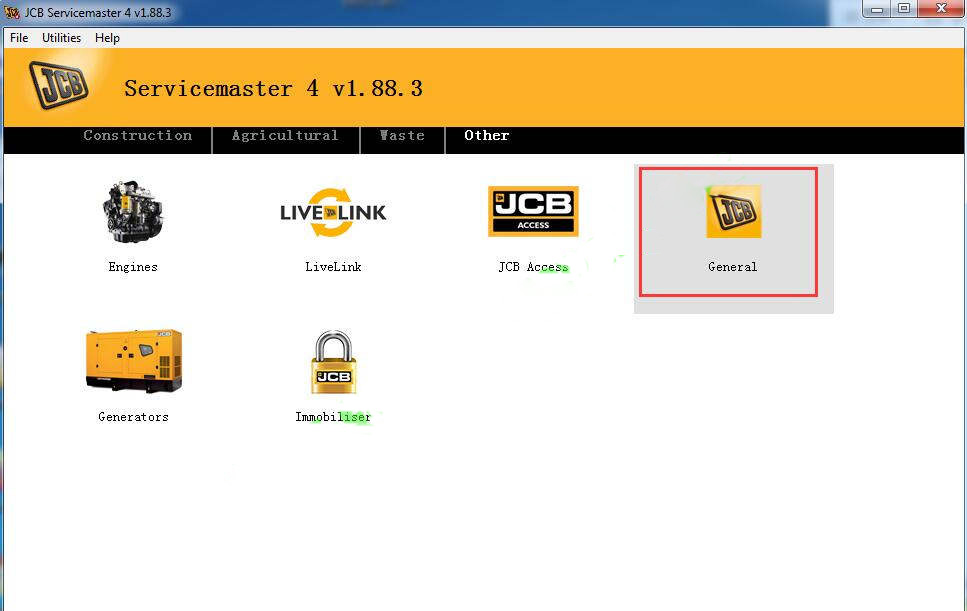
Go “Other”–>”General”–>”DLA”

Please update driver you need

How-to-Install-JCB-ServiceMaster-4-on-Win7-Win10-11
How-to-Install-JCB-ServiceMaster-4-on-Win7-Win10-12
How-to-Install-JCB-ServiceMaster-4-on-Win7-Win10-13

Done!

How to use Launch BST-360 Bluetooth battery tester

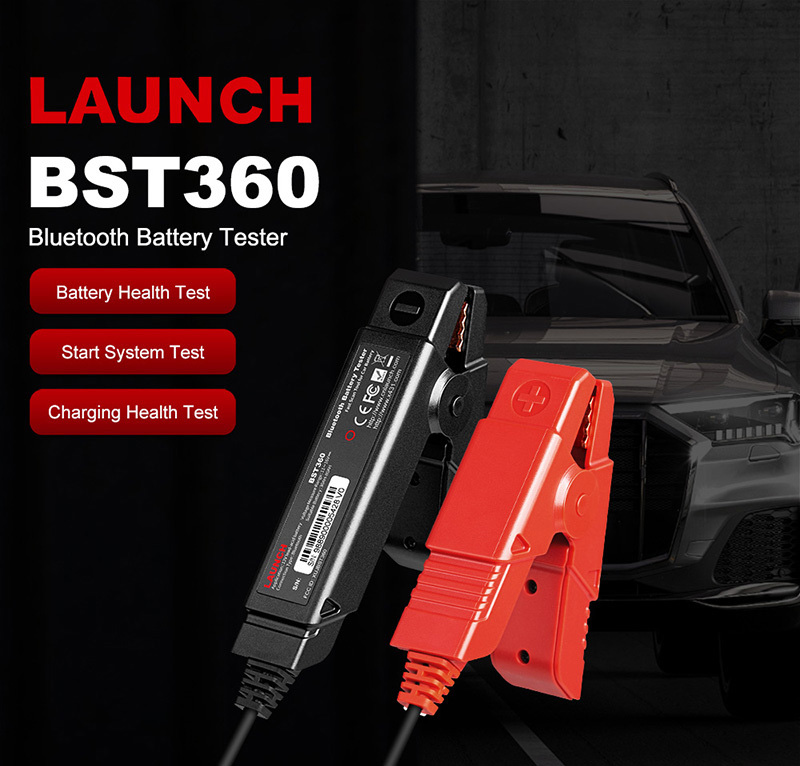
 BST360, suitable for technicians and on the go consumers, is safe to use with its anti-heat characteristics and prevention against backfire electrical sparks that can occur during electrical system diagnosis.

Features
1. Real-time monitor the battery health status include.
2. Staring and charging system analysis to determine related faults/issues.
3. Allow the user to download test reports on their smartphones and diagnostic scan tools by Bluetooth wireless technology
4. Portable and lightweight with compact and practical usability

How-to-use-Launch-BST-360-Bluetooth-battery-tester-1

How to use Launch BST-360 Bluetooth battery tester

Here we take a Jeep Liberty as an example to illustrate this process.
First go to Google Play (Android) or App Store (IOS) to search for “BST360″ to download the application.
Connect it to the positive and negative terminals.
Open the application.

How-to-use-Launch-BST-360-Bluetooth-battery-tester-2

1) Battery health test
After the connection is successful, a floating voltage prompt is displayed.

How-to-use-Launch-BST-360-Bluetooth-battery-tester-3

Click “I know” and we will have “Universal Battery”, “AGM Start/Stop Battery”, “Gel Battery” and “EFB Battery”.
Here we choose “ordinary battery”, and then do the BCI standard.
Enter the battery capacity (here 800cc).
Then press “Next” to proceed to the next test.

2) Start system test
After confirmation, turn off all electrical components such as car lights, radios, air conditioners, etc. according to the prompts.
Start the car to perform a “start system test” to check the CCA lottery.

3) Charging health test
Follow the prompts to test the charging system to check the alternator output.
The test then required the engine speed to be increased to 2,500 rpm.
The test is complete and the report is ready to be viewed on the app.

How-to-use-Launch-BST-360-Bluetooth-battery-tester-4

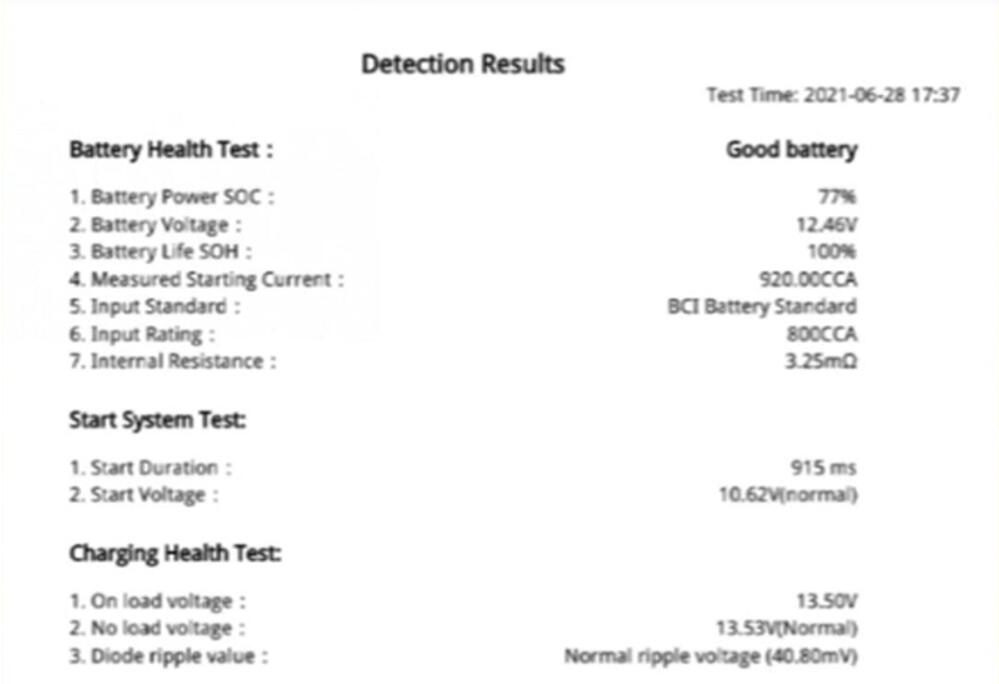
In this case, the battery health test tells us that this is a good battery.
In the start-up system test, there is a start-up duration, and the start-up voltage is normal, as is the charging system.
Then we can save it and email it to ourselves or our customers.

2021年10月6日星期三

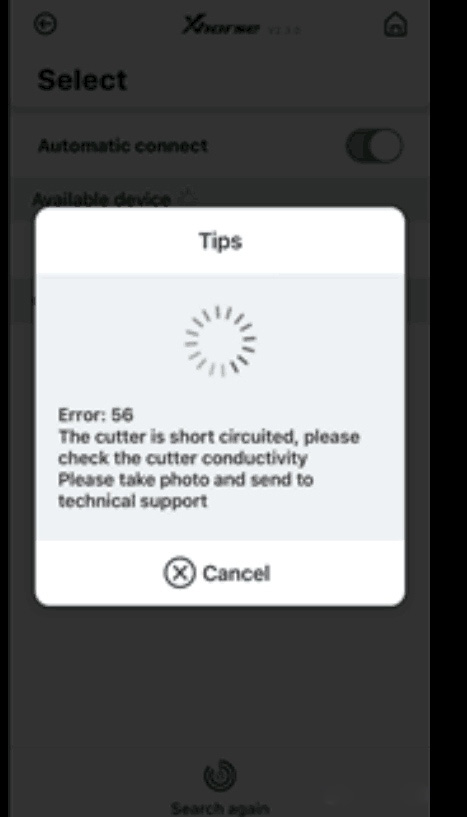
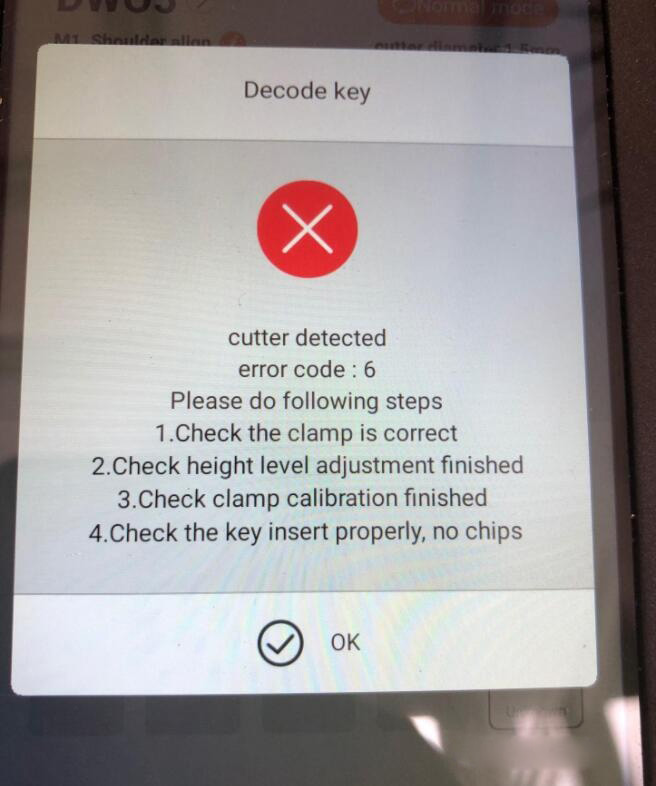
Xhorse Dolphin XP-005 “Error 56” “error code 6” Solutions

 Question:

Xhorse Dolphin XP005 prompts “Error: 56” and “error code: 6”. Have shot and sent the video of electrical conductivity measurement, please check.


Solutions:
Check the steps as the prompts. (height level adjustment, clamp calibration etc.)
Do the electrical conductivity measurement.
If the cutter and the probe don’t conduct, disassemble the machine and test abnormal conductivity of the cutter/probe.

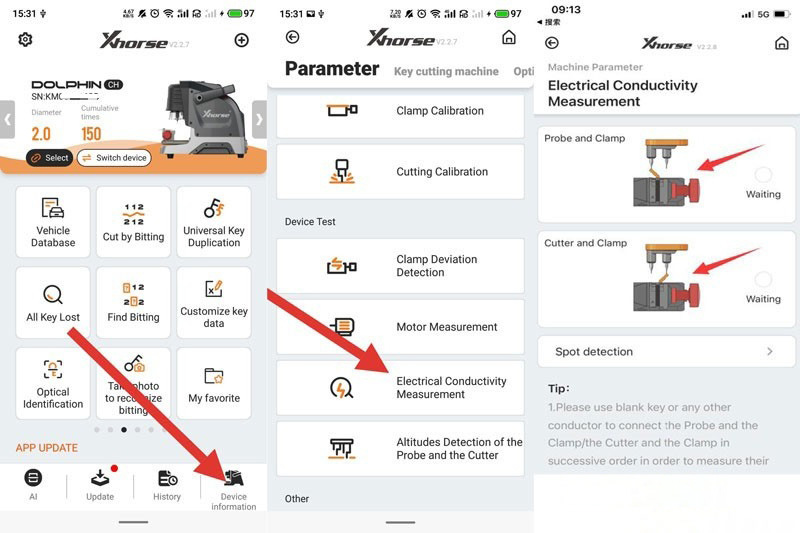
How to do electrical conductivity measurement?

Go to Xhorse app.
Device information>>Electrical Conductivity Measurement
1)Probe and clamp
2)Cutter and clamp

Use a blank key or a conductor to short-circuit the clamp and the probe/cutter as the prompt.

How to test abnormal conductivity of the cutter/probe?

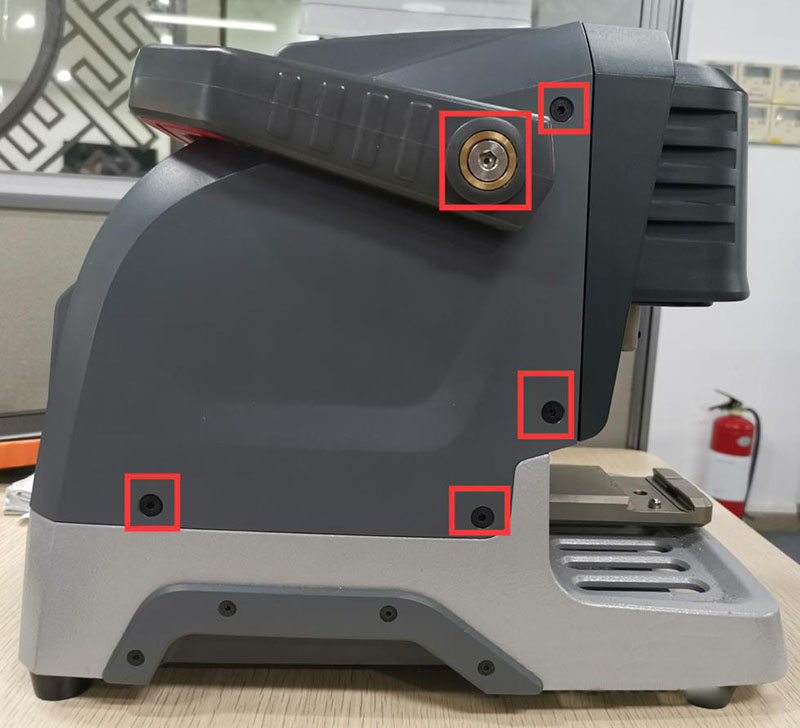
Step 1
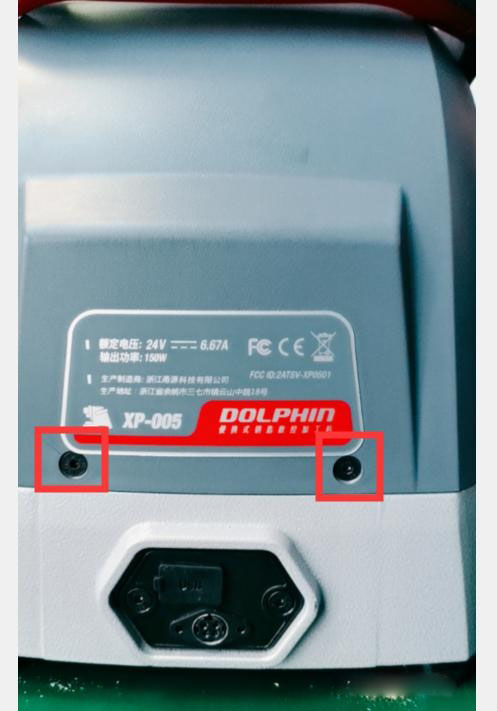
Unscrew the back of Dolphin XP-005, and watch the cables inside.

Step 2
Remove the back.
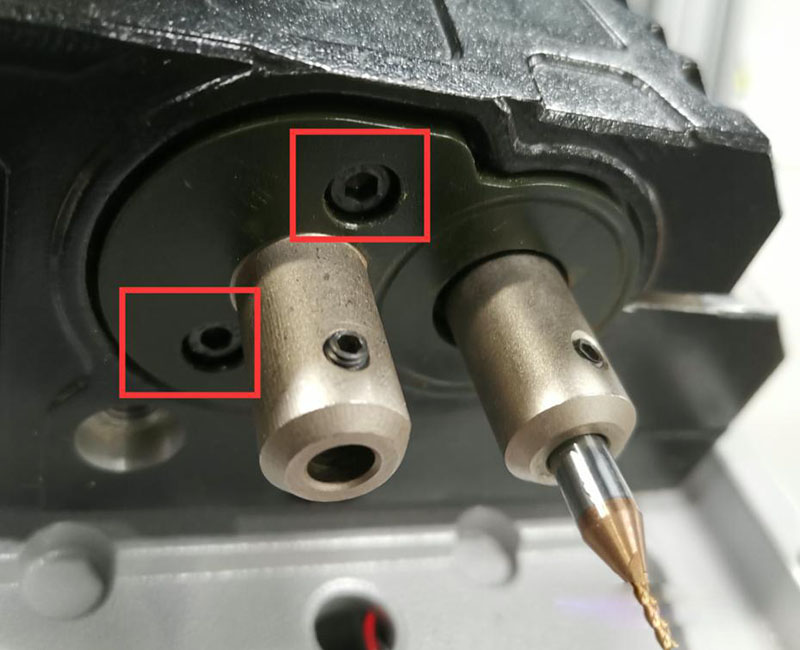
Unscrew the cable and the two Phillips screws.

Turn to the front side.
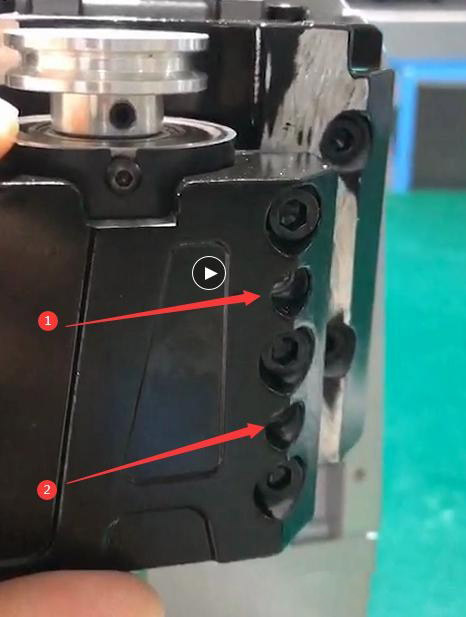
Unscrew the little rubber cover, and behind are screwed.
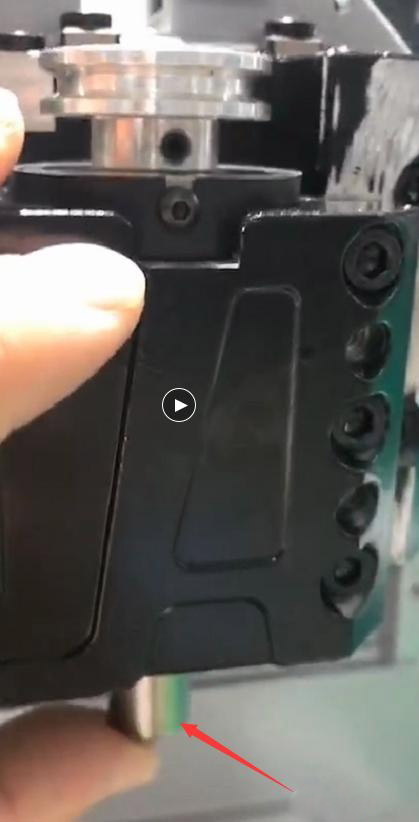
Then unscrew the long metal by a hexagon bar wrench.

Step 3
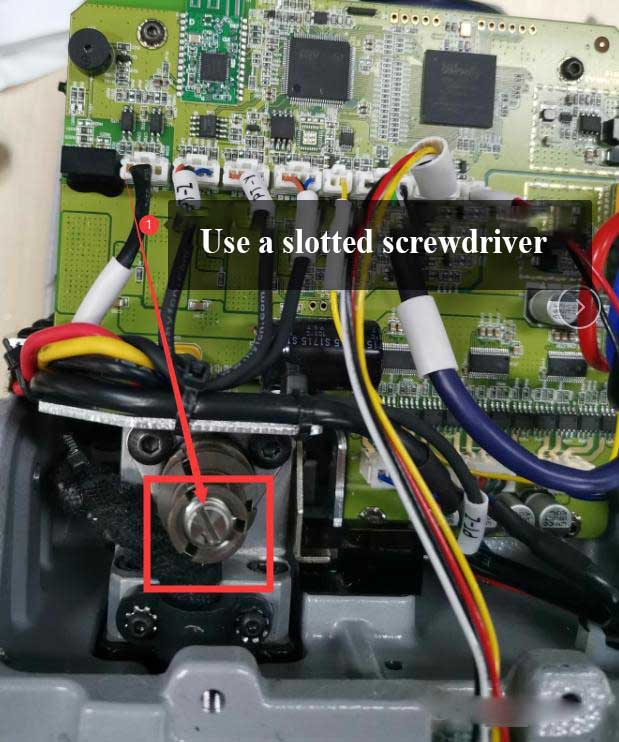
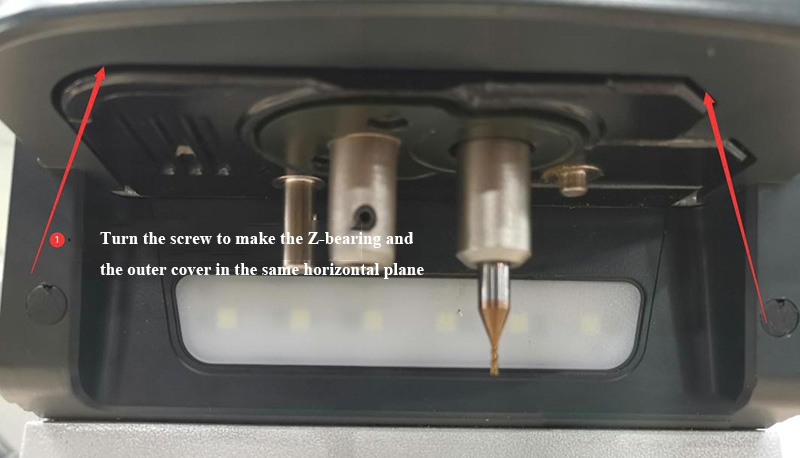
Use a slotted screwdriver to turn the screw so that the Z-bearing and the outer cover are in the same horizontal plane.


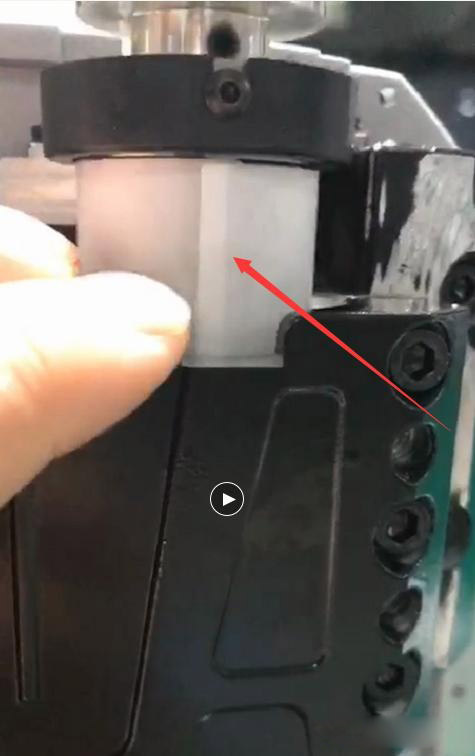
Take down the outer cover of the Z-bearing after the adjustment.
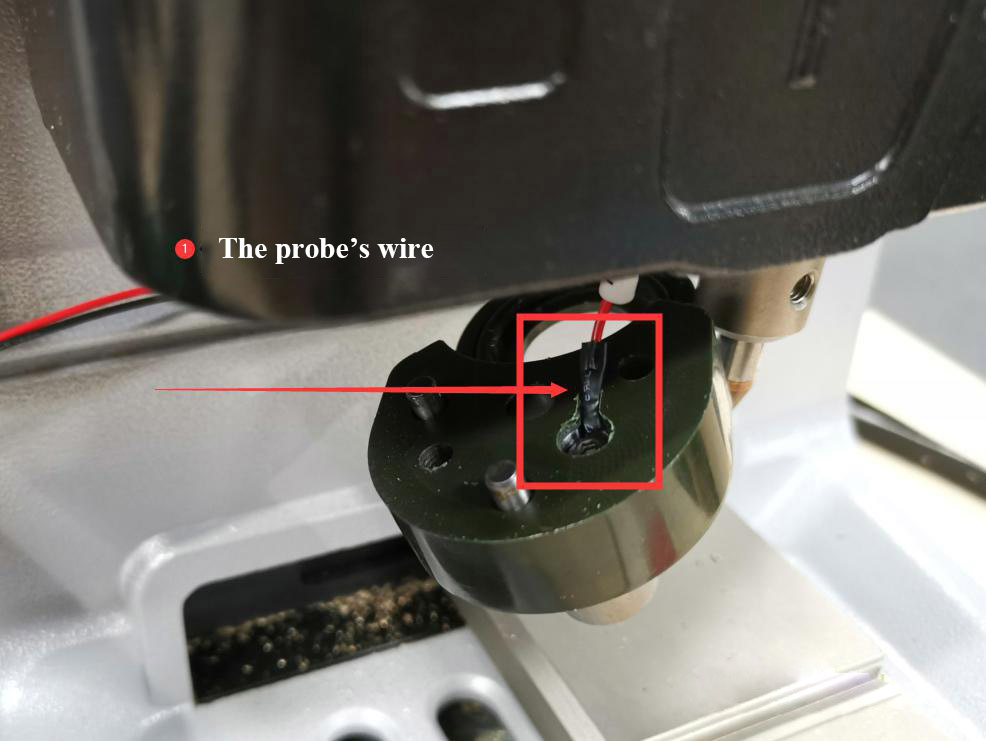
Unscrew the screws beside the probe.

Care the wire inside when removing the base.

Step 4
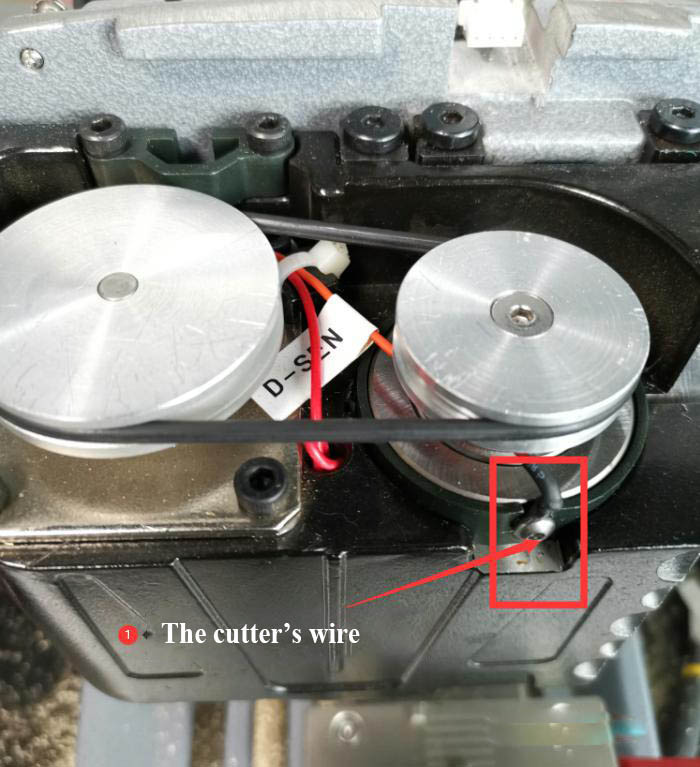
When the above steps are complete, now we can test whether the cutter’s wire and the probe’s wire are circuited or short-circuited.
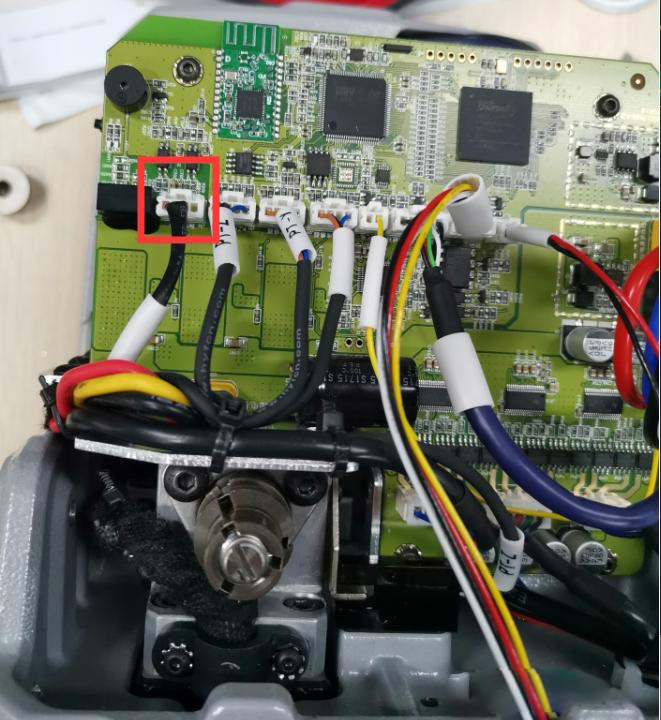
The wires should be tested together with wires in the power board.
Unplug and plug the wire in the power board again before we test if the conductivity is normal.

Step 5
This step is to test the cutter’s conductivity.
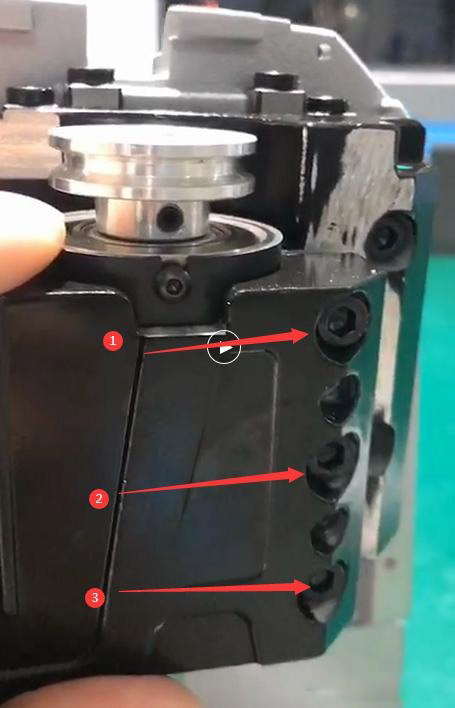
Unscrew the three screws on the Z-bearing,

and fasten the two screws until we get a gap to take down the Z-bearing.


Press the cutter’s hole and push the bearing up.
Check if the white paper is broken.

If so, replace it.
If not, check if there are some iron filings inside the bearing hole.

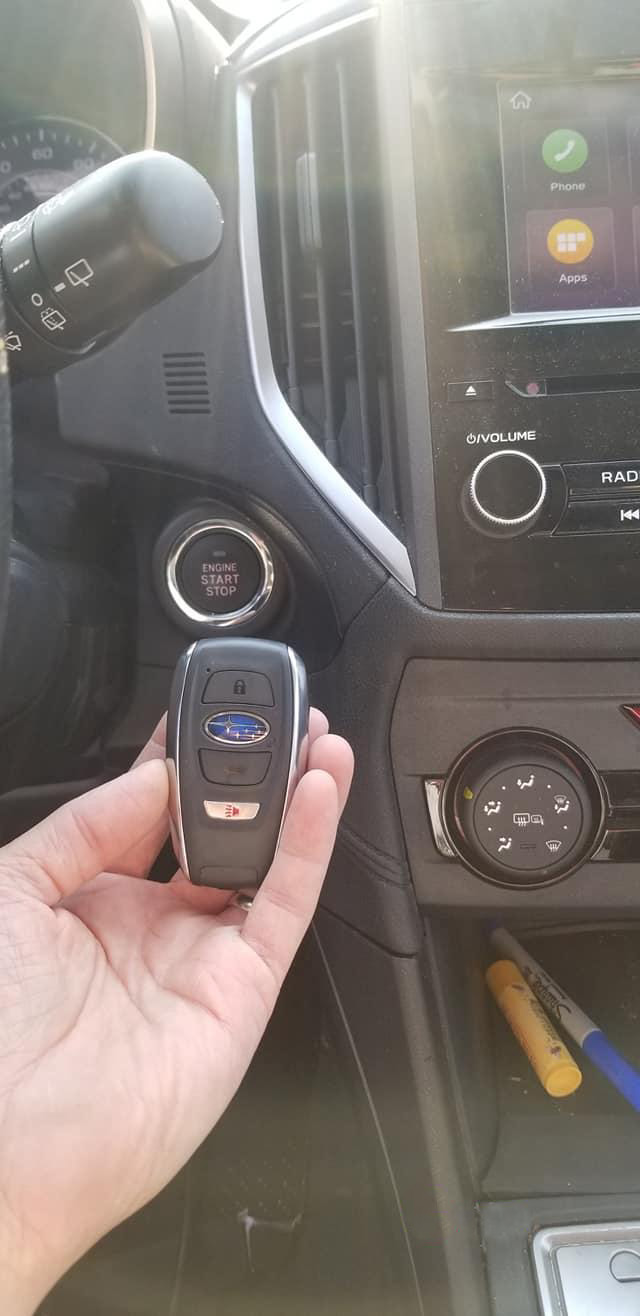
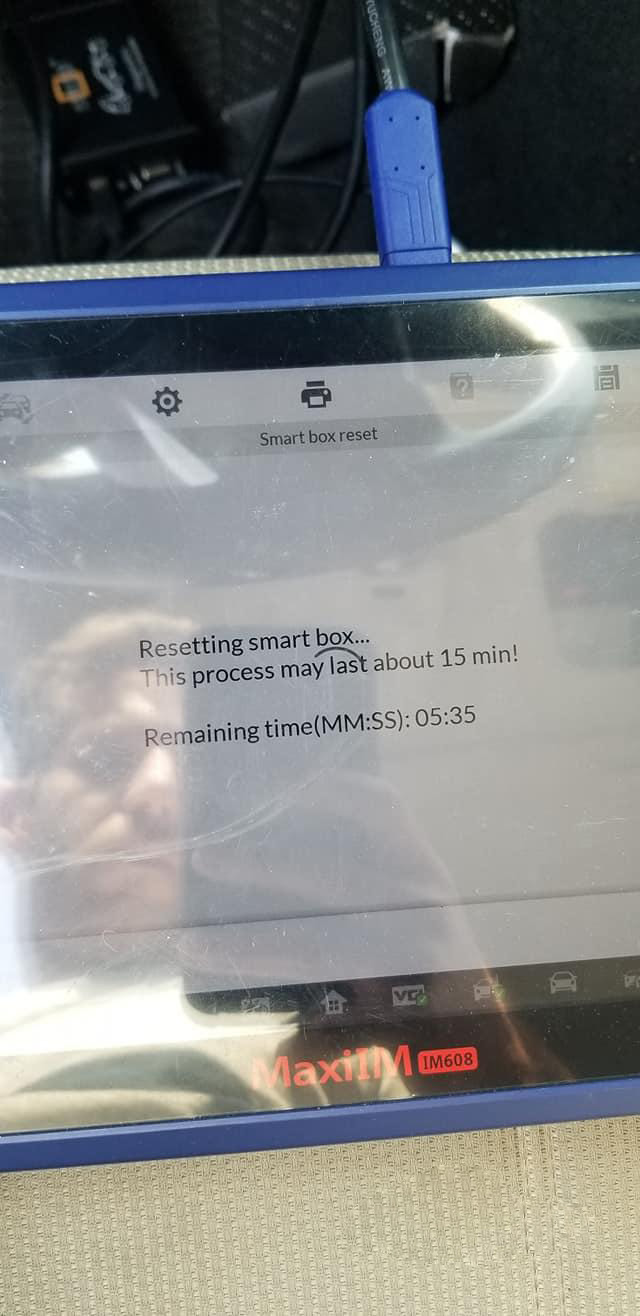
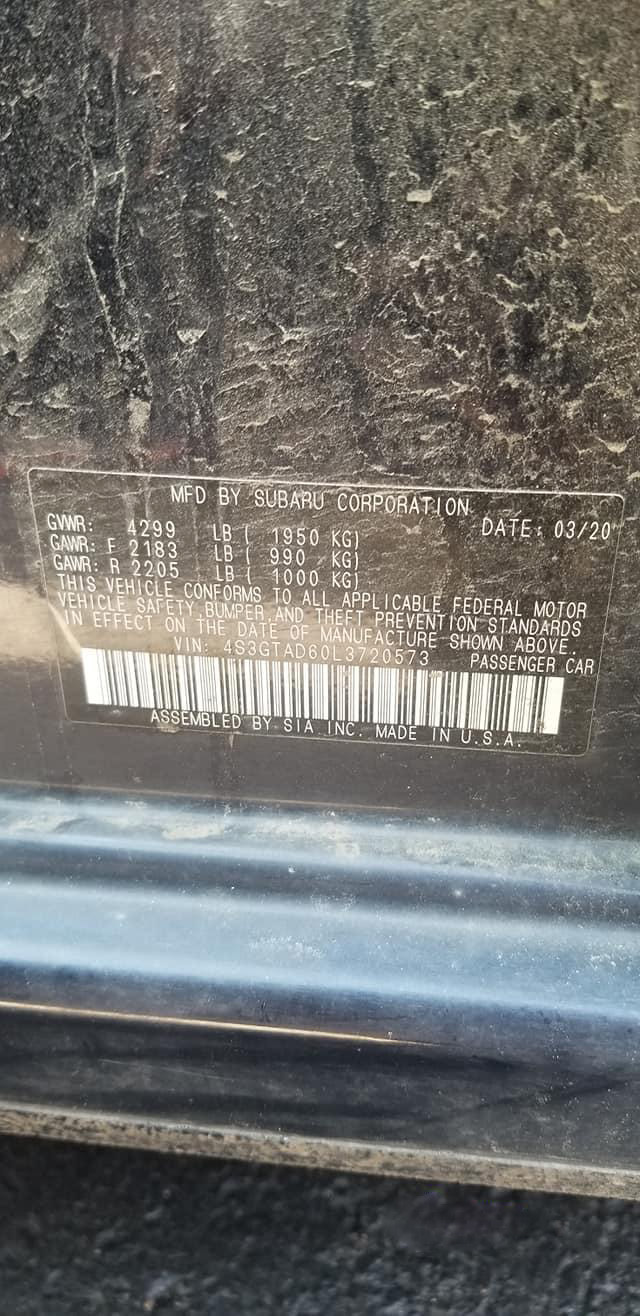
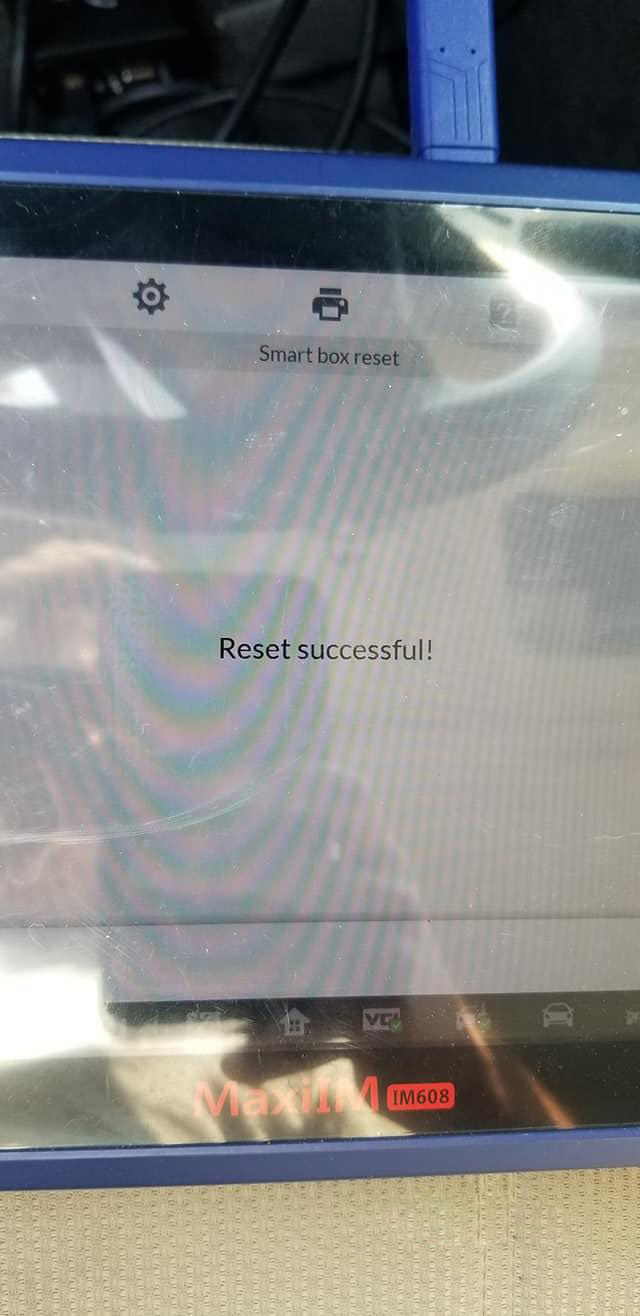
How to program 2020 Subaru Impreza by Autel IM608


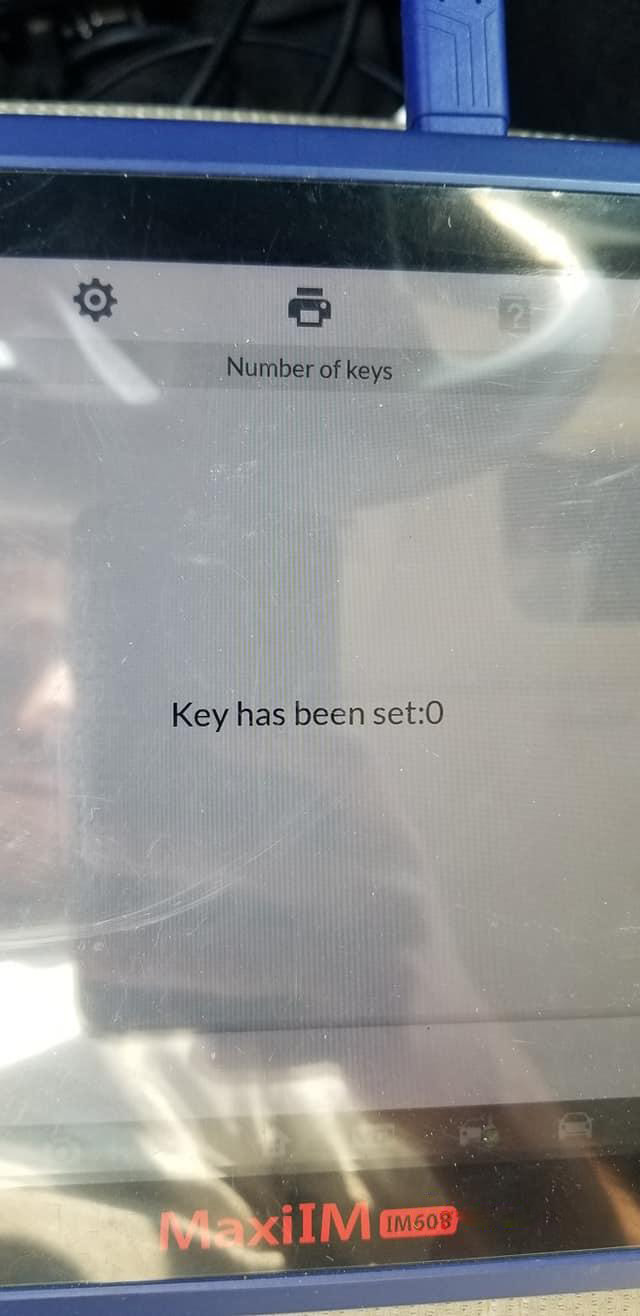
Autel IM608 Success: 2020 Subaru Impreza push start ign all keys lost 16 min in and out with 2 new smart keys


Don’t you think is it is like a 2k job at the dealer and they rest

2021年10月1日星期五

Launch X431 Frequently Asked Questions and Solutions

Launch X431 diagnostic tools are generally based on the Android operating system, and the tablet models and menu names of different devices may be inconsistent, but the functions are similar. In this article, there are 5 points of Launch X431 Frequently Asked Questions and Solutions, they are about software upgrade, factory resetting and reinstall app, clear app cache, application’s cache and data clearance, deleting software, Bluetooth connector’s firmware recovery.

1. Software Upgrade Instructions:

Every time there is a new version of a software update, mostly it means new features or new vehicles available, or software functionality problems have been solved with modifications. So, in the daily use of software, it’s better to keep all software updated.

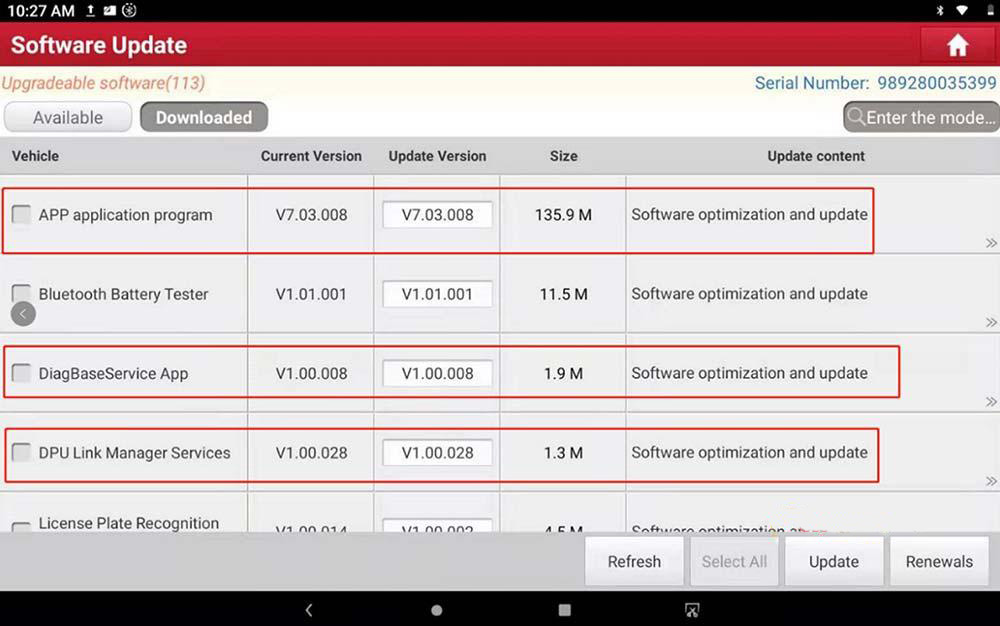
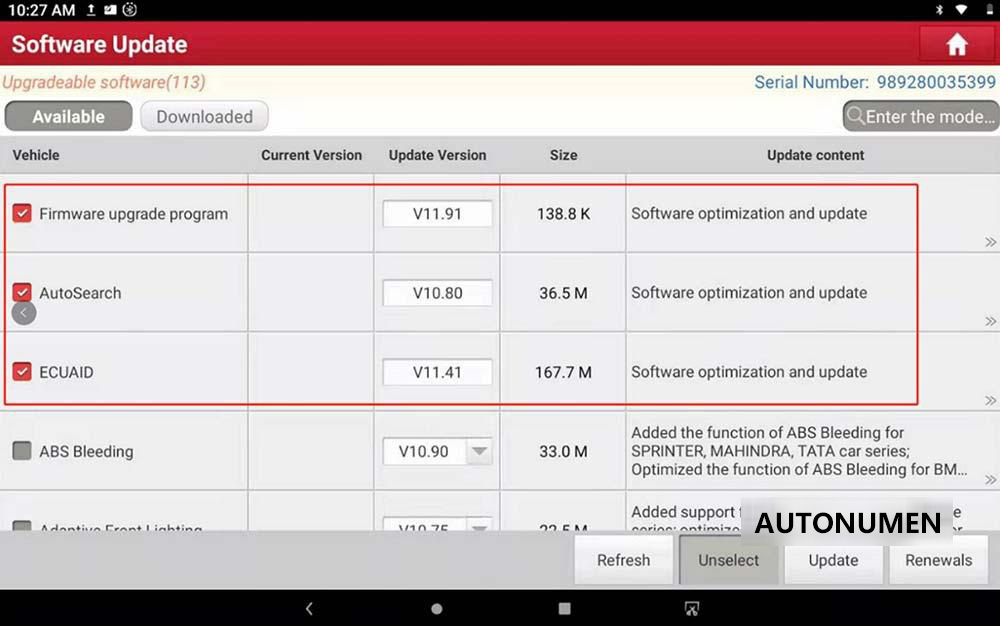
Due to lack of memory in some tablets, resulting in many customers only update the diagnose software, but not update other common software, such as “APP application program”, “DiagBaseService App”, “DPU Link Manager Services”, “Firmware upgrade program”, “ECU AID”, and “Autosearch”, which may generate unsynchronized conflict and lead to abnormal diagnosis problems.

Failure to synchronize software upgrades may result in the following problems:

Some models or systems cannot diagnose and enter.

The software will break down when testing the car.

Some new Chinese car model cannot do oil reset.

Fault codes appear code not defined.

No channel list display for VW and Audi.

No long code display for VW and Audi.

It may lead to the failure of special functions such as matching and resetting

The following pictures within APP, must be update to latest version, if there is a new version available, click “update” in “software update” module will automatically update them to the latest version, please don’t stop those software update process.

APP application program

DiagBaseService App

DPU Link Manager Services

Firmware upgrade program

ECU AID

Autosearch

Launch-X431-Frequently-Asked-Questions-and-Solutions-1
Launch-X431-Frequently-Asked-Questions-and-Solutions-2

2. Factory Resetting and Reinstall App

This procedure is applicable to X431 PRO series products, because the tablet is Android system, after a period will appear failure. The following failure phenomena can be fixed by factory resetting the tablet.

1) System is running too slow

2) Insufficient memory

3) Exit automatically when you open X431 App

4) X431 App break up when you open it.

Restore factory settings and reinstall system steps:

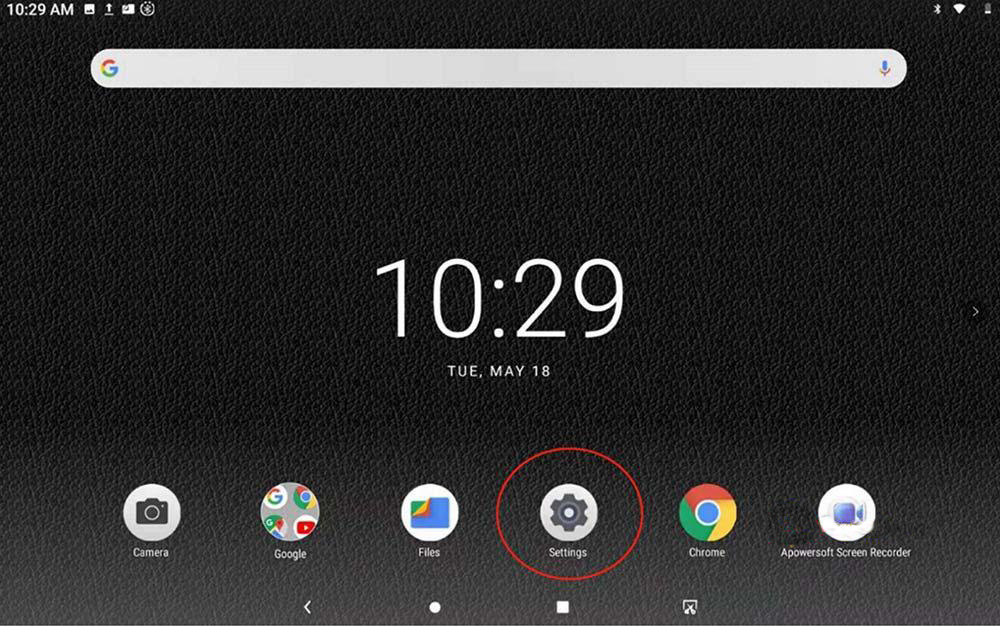
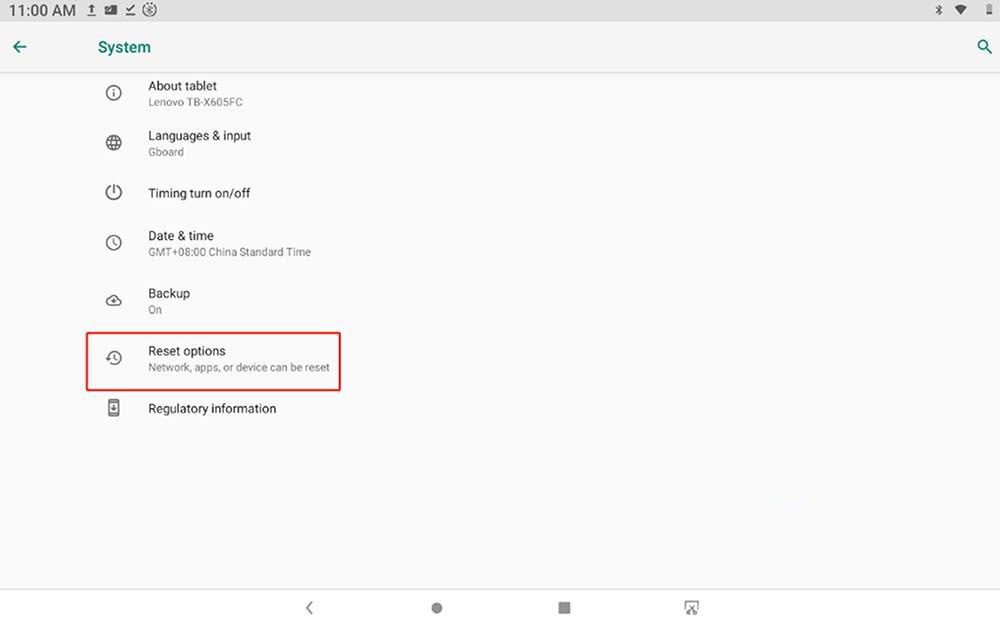
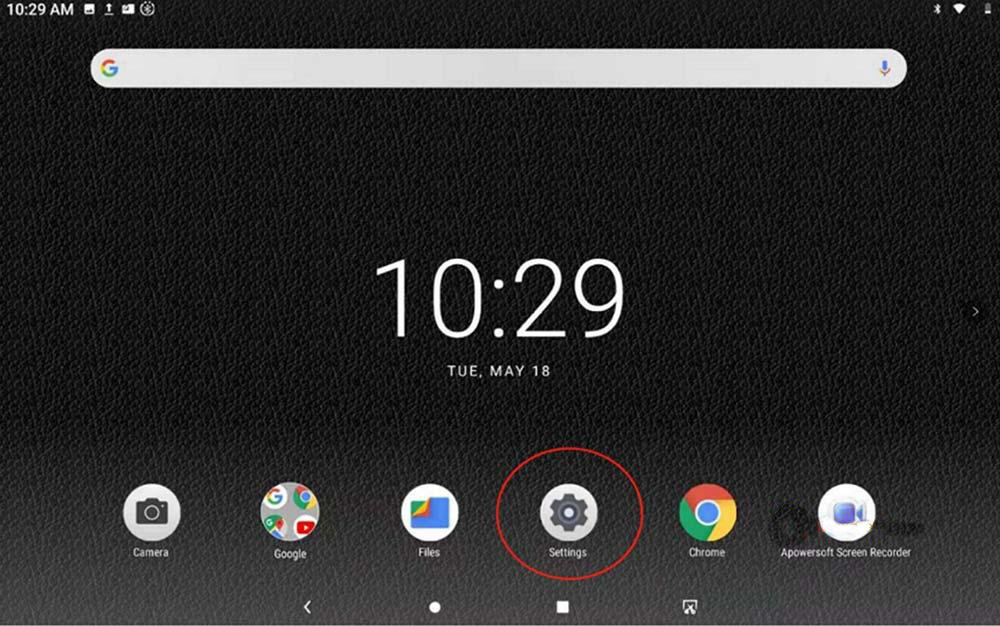
1). In the tablet desktop select settings (Note: you must remember the username and password of the X431 App, different tablet models may have different steps, but are generally the same):

Launch-X431-Frequently-Asked-Questions-and-Solutions-3

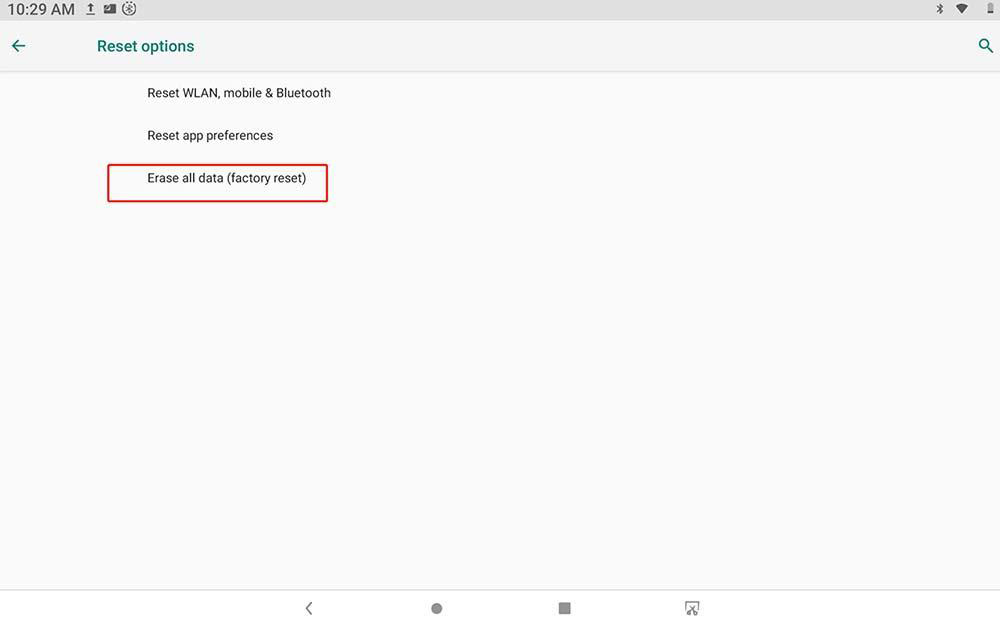
2). Click on the reset options:

Launch-X431-Frequently-Asked-Questions-and-Solutions-4

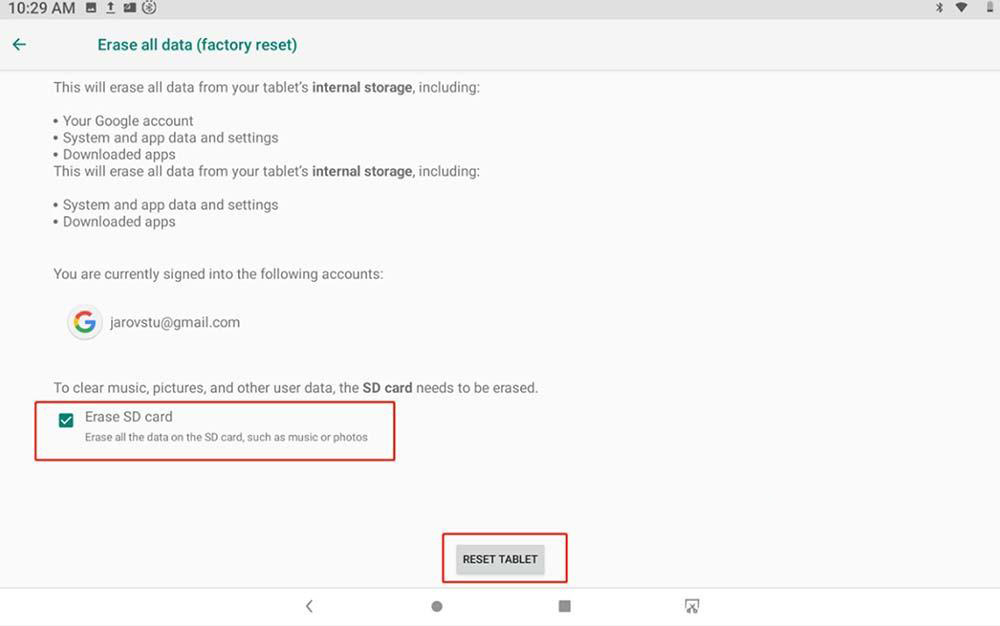
3) Click factory reset.

Launch-X431-Frequently-Asked-Questions-and-Solutions-5

4)Select Erase SD card, make sure there is no useful data on the tablet and click below to restore the factory settings of the tablet, after completing the tablet reboot, first set the date and time to automatically obtain by internet, and then download APP to install.

Launch-X431-Frequently-Asked-Questions-and-Solutions-6

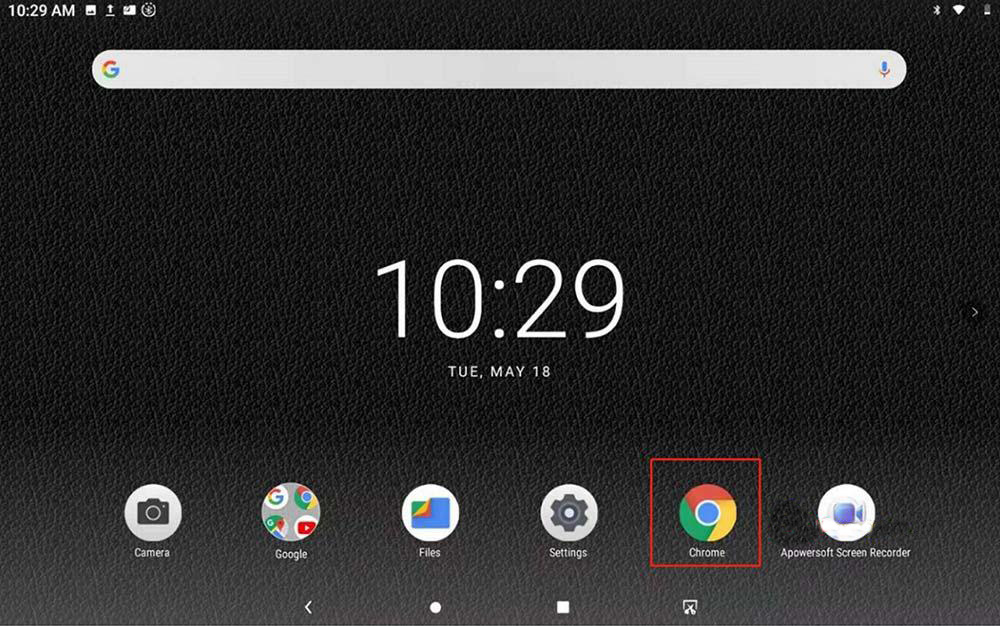
5)Go back to your desktop and click on your browser.

Launch-X431-Frequently-Asked-Questions-and-Solutions-7

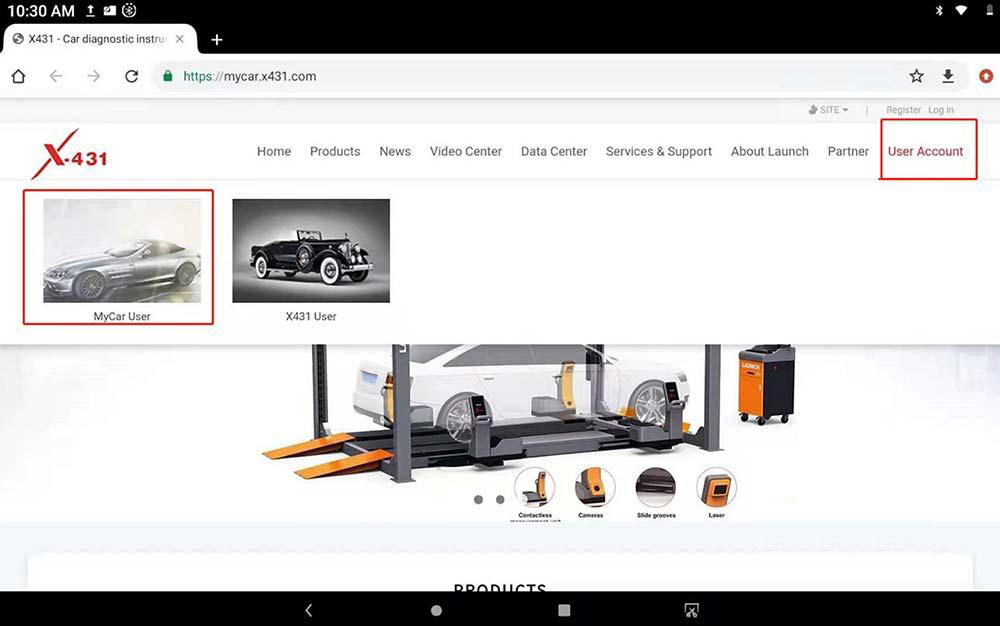
6)Generally, LAUNCH official website will be defaulted, if not, enter www.x431.com website and select “User Account”>>”MyCar User” after entering.

Launch-X431-Frequently-Asked-Questions-and-Solutions-8

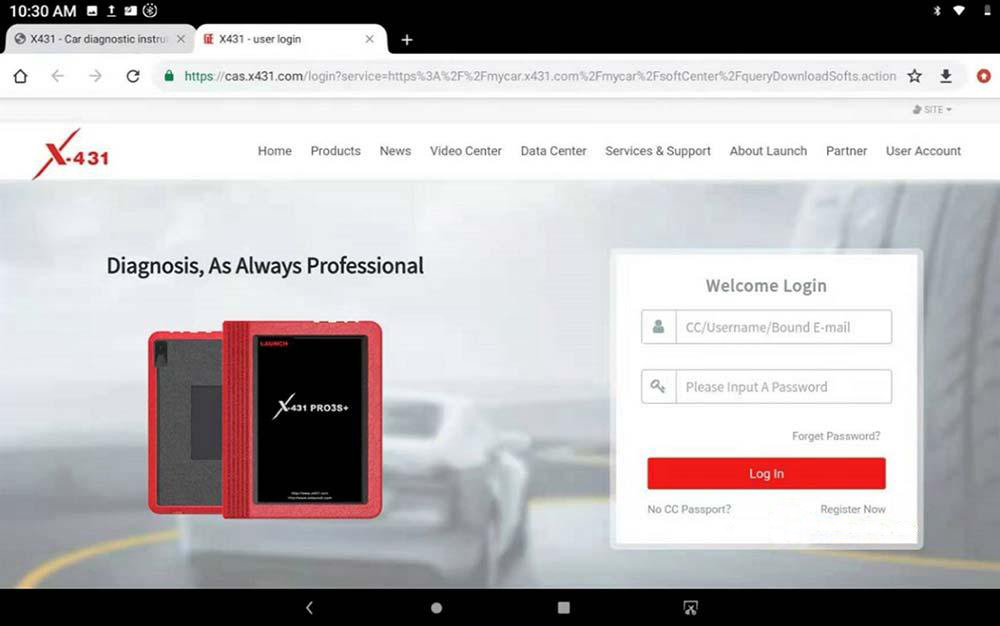
7)fill your device’s username and password to log in.

Launch-X431-Frequently-Asked-Questions-and-Solutions-9

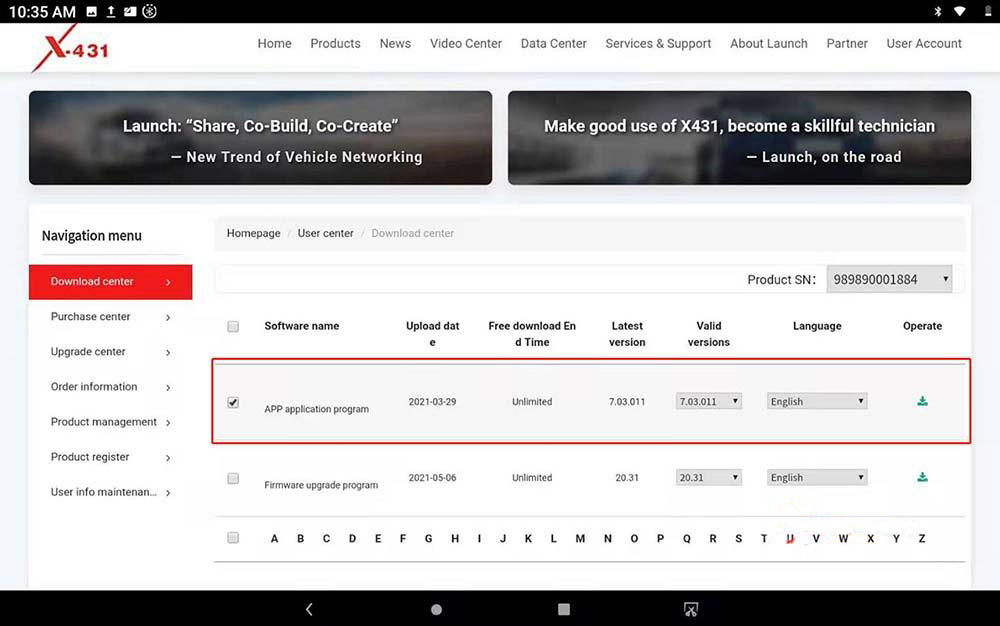
8) Select the APP application program, click the download button on the right, download and install it.

Launch-X431-Frequently-Asked-Questions-and-Solutions-10

3. Clear APP Cache Instructions

This procedure applies to X431 full series products, because the tablet is Android system, after a period there will be failures. The following failure phenomena can be done to clear the APP cache to try to solve the problem.

System is running too slow

Flashback when diagnosing

An error in diagnostic service when diagnosing

The diagnosis appears to stop running

Clear APP Cache Steps:

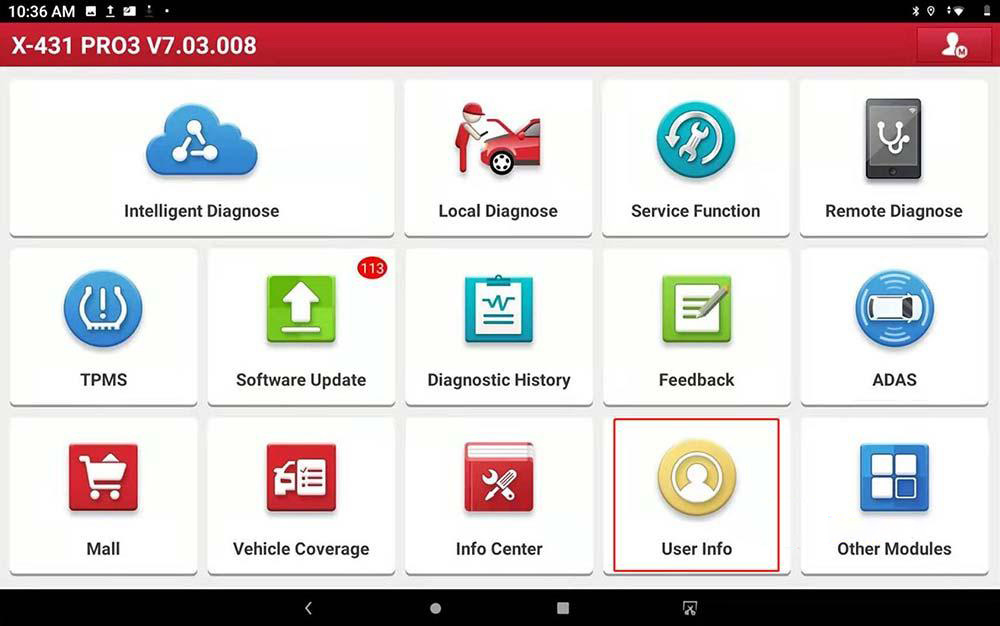
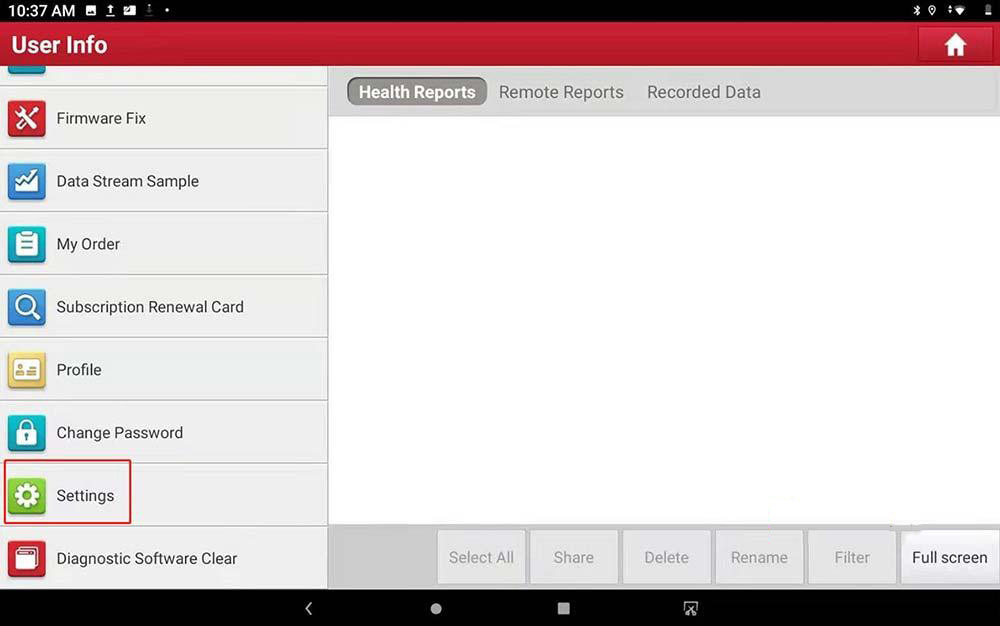
1)Enter the APP, Select “User Info”. (Note: you must remember the username and

password of your device; different tablet models may have different steps, but are generally the same):

Launch-X431-Frequently-Asked-Questions-and-Solutions-11

2)Click “Settings”:

Launch-X431-Frequently-Asked-Questions-and-Solutions-12

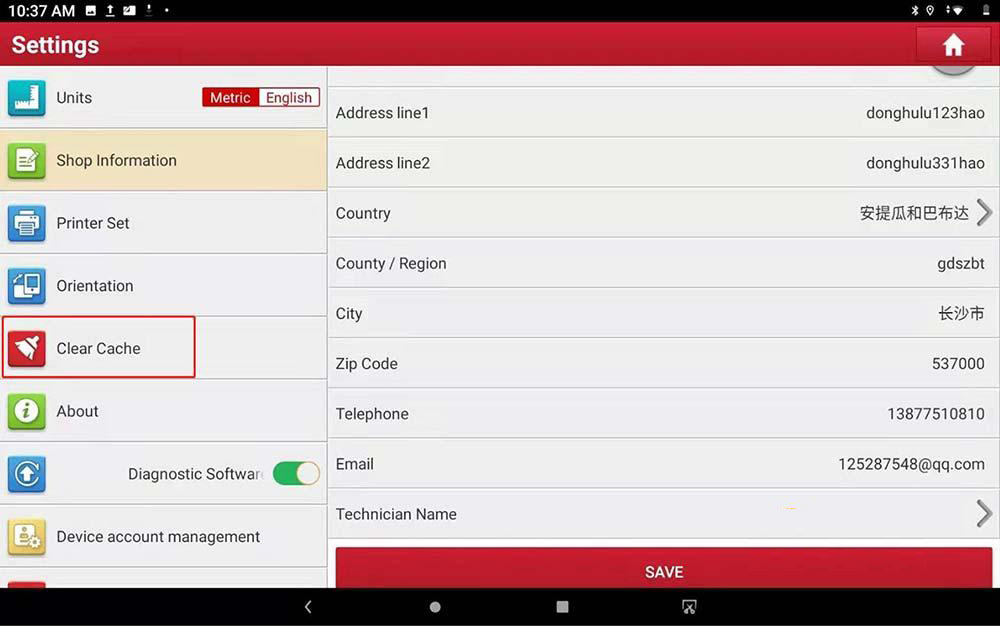
3)Click “Clear Cache”:

Launch-X431-Frequently-Asked-Questions-and-Solutions-13

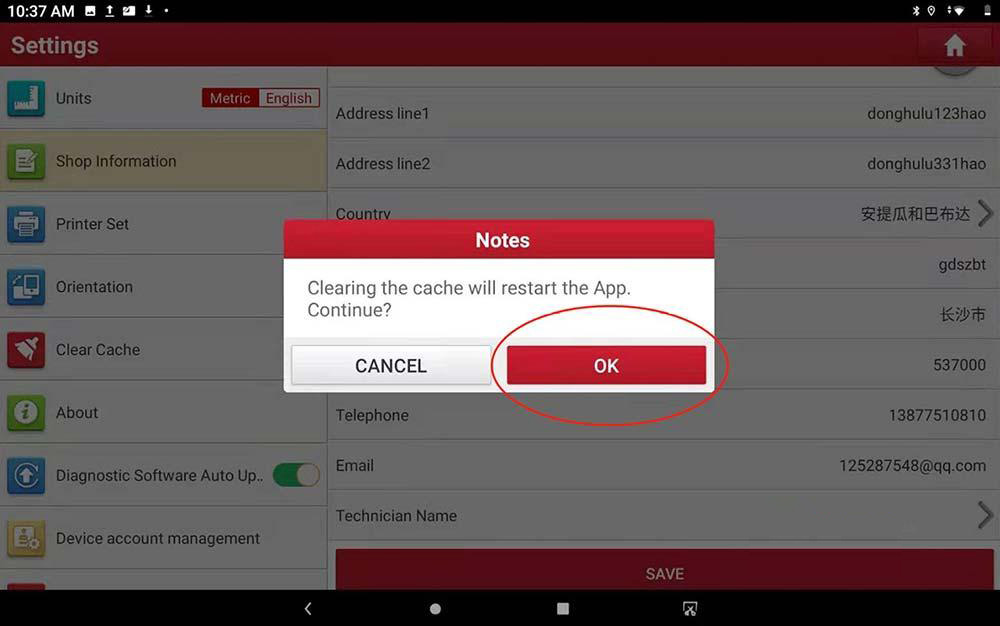
4)Click OK to clear, the APP will restart after clearing, fill your account and password to log in again to test if the problem is solved, if the problem is not solved, you should factory resetting the tablet to have a try.

Launch-X431-Frequently-Asked-Questions-and-Solutions-14

4. Instruction for Application’s Cache And Data Clearance

These steps are suitable for the whole X431 series. As the operating system is Android, there might be some issues which cause the device unusable. If below issues appear, we could try to fix them through cache and data clearance:

1) App crash when opening the X431.

2) Message shows the diagnosis service has been stopped running.

3) App crash when proceeding the diagnosis service.

4) Popped out message shows the App has been stopped running.

Steps to clear the cache and data:

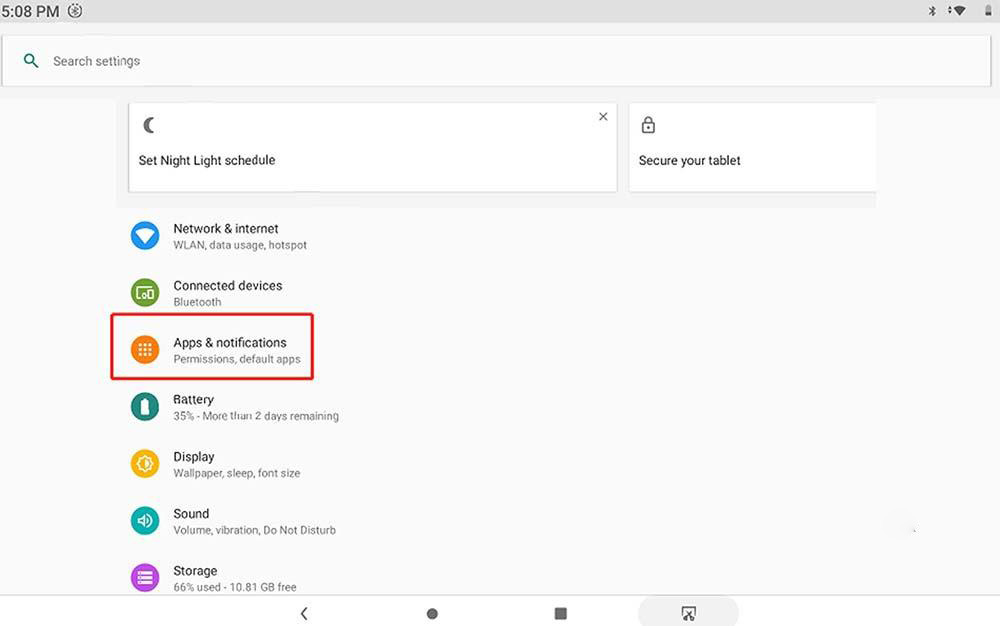
1)Click setting in the desktop to enter:

Launch-X431-Frequently-Asked-Questions-and-Solutions-15

2)Choose “App & notifications” and enter:

Launch-X431-Frequently-Asked-Questions-and-Solutions-16

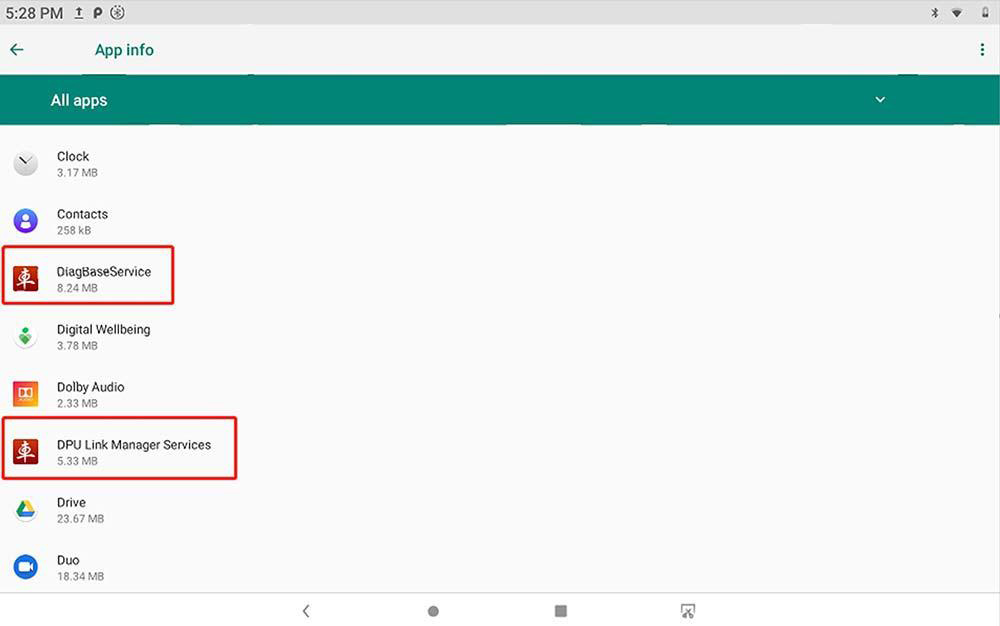
3)Software service related to X431: “DPU Link Manager Service”, “DiagBaseService” and “X-431 PRO3” (These 3 names might be different from App to App), we will need to clear individually one by one.

Launch-X431-Frequently-Asked-Questions-and-Solutions-17

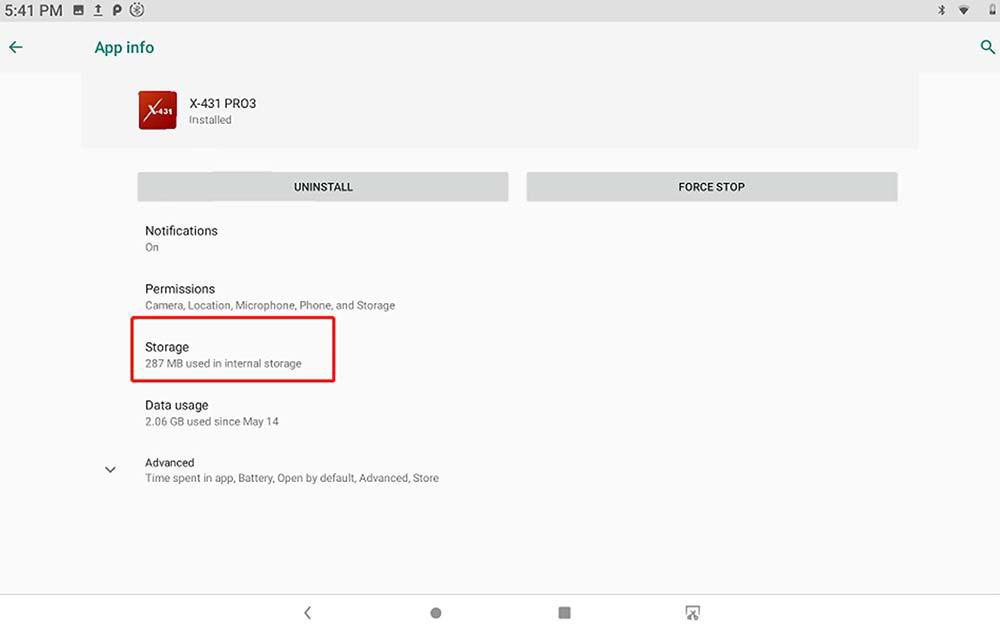
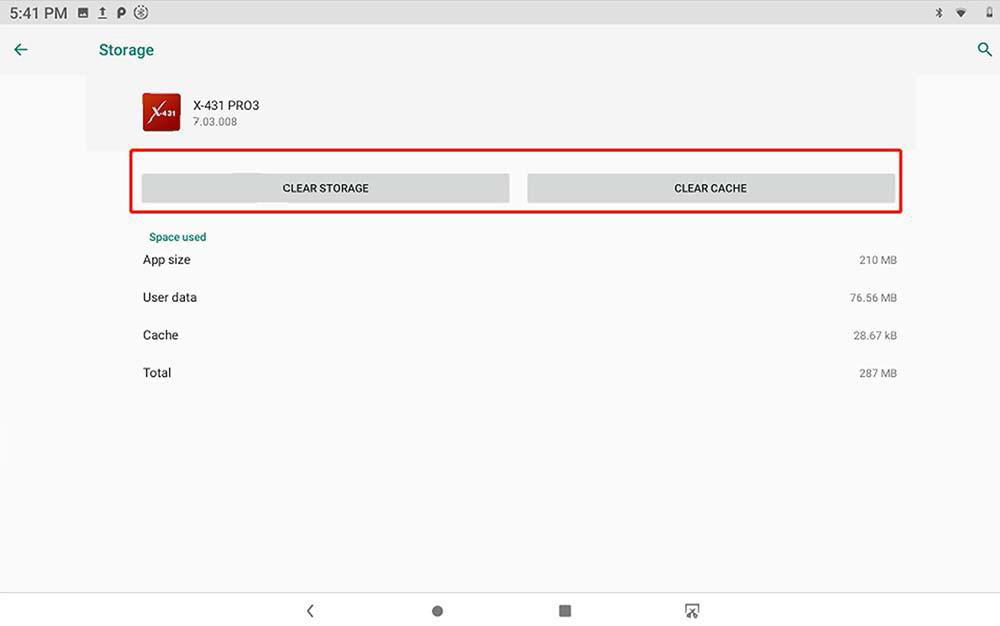
4)Enter Storage first, then click to clear the storage(data) and the cache one by one. Once it’s done, close and reopen 431 App again to check if the issue has been fixed. If still not, we will need to proceed a factory reset to resolve.

Launch-X431-Frequently-Asked-Questions-and-Solutions-18
Launch-X431-Frequently-Asked-Questions-and-Solutions-19 Launch-X431-Frequently-Asked-Questions-and-Solutions-20

5. Instruction for Deleting Software

When we face the below issues, we could delete the software and update again to fix the issues.

RAM is full.

Diagnosis service stop running when diagnosing by car type.

App crash when diagnosing by car type.

Disaccording between the software serial No. and smartbox serial No., please download and upgrade again or contact local dealer.

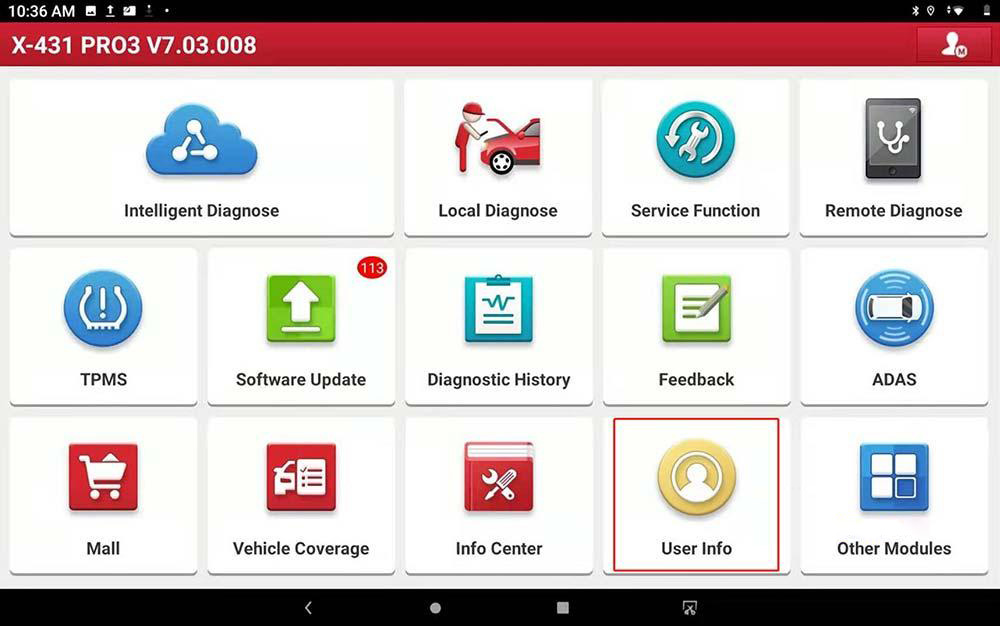
Open 431 App and click into User Info:

Launch-X431-Frequently-Asked-Questions-and-Solutions-20

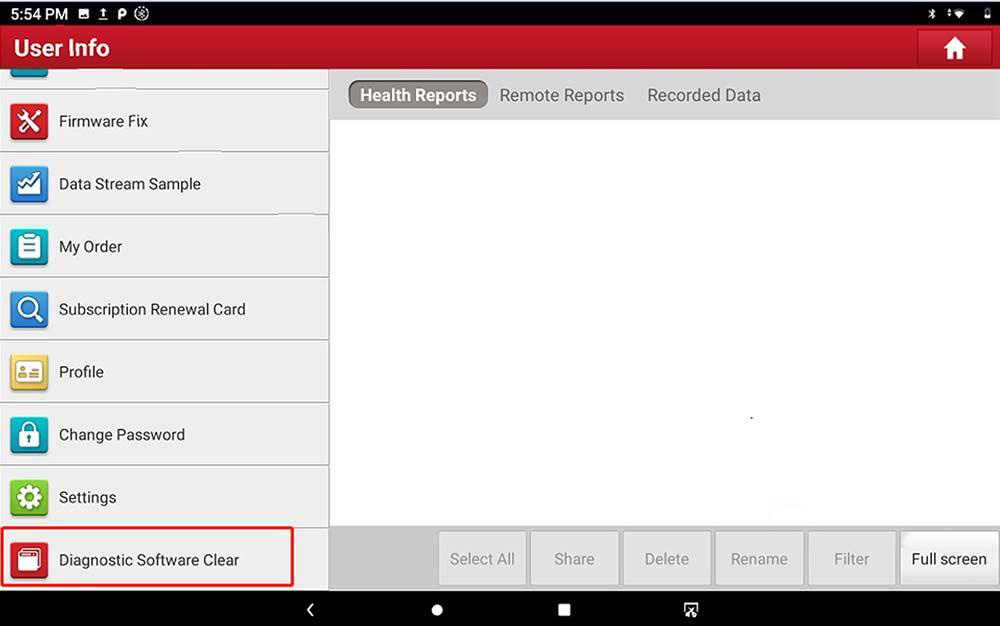
In the left pull-down menu, choose diagnosis software clear:

Launch-X431-Frequently-Asked-Questions-and-Solutions-21

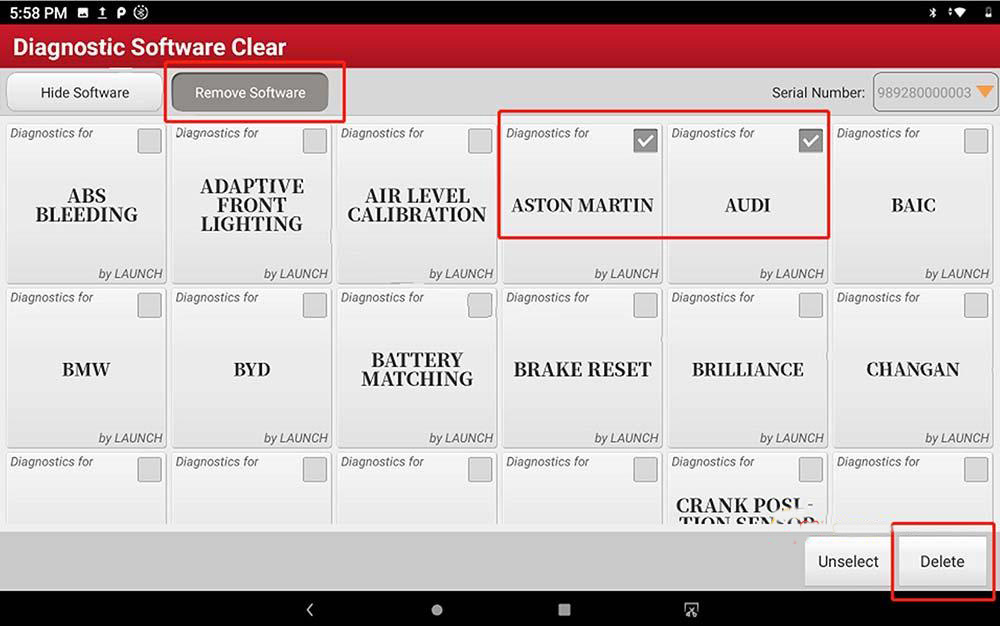
Click to check the software that you wish to delete, then click the delete button to proceed. If there are several issues and needs to delete ECUAID, then just delete and update it again. If the issue still exists, please contact Launch service engineer for help:

Launch-X431-Frequently-Asked-Questions-and-Solutions-22

6. Instruction for Bluetooth Connector’s Firmware Recovery

When we face the below issues, we could proceed Bluetooth connector’s firmware recovery to fix the issue.

1)Could not search for Bluetooth.

2)Could not connect to Bluetooth.

3)Part of systems could not be read or enter when diagnosing.

4)Majority part of systems could not be read or enter when diagnosing.

Steps for firmware recovery:

Bluetooth connector Powered, X-431 tablet connected to network, then opens X431 App and enter “User Info”.

Launch-X431-Frequently-Asked-Questions-and-Solutions-23

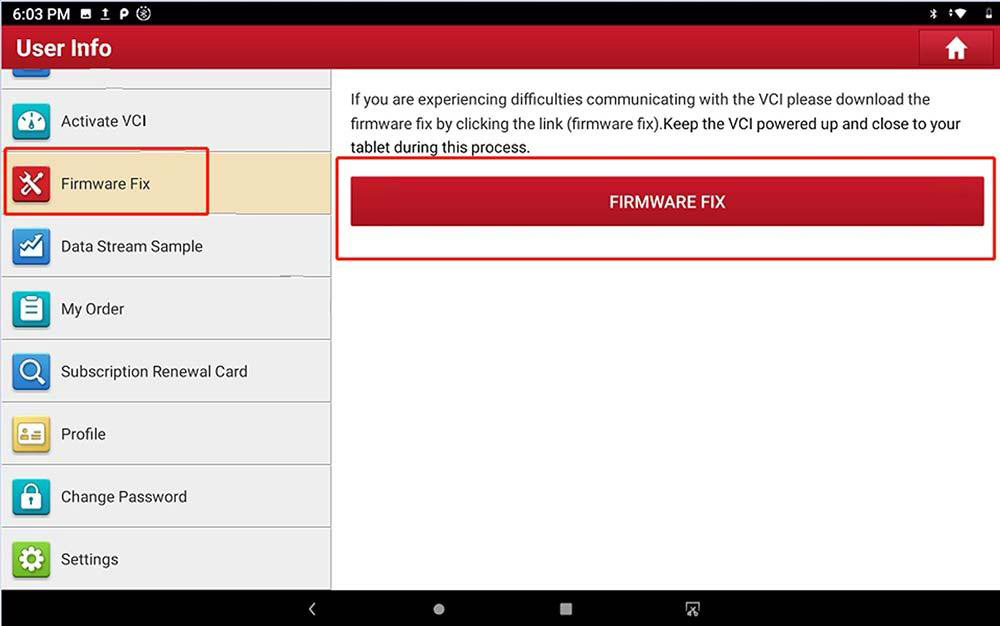
Click Firmware Fix on the left, and system will automatically connect to the server to download software update to upgrade. Exit when it shows upgrade successfully, please contact Launch service engineer for help if the issue still exists:

Launch-X431-Frequently-Asked-Questions-and-Solutions-24

Explanation for Diagnosis Units:

When we meet British system units in reading diagnosis code, we could follow the below steps to set it to metric.

Example: temperature change between Celsius and Fahrenheit.

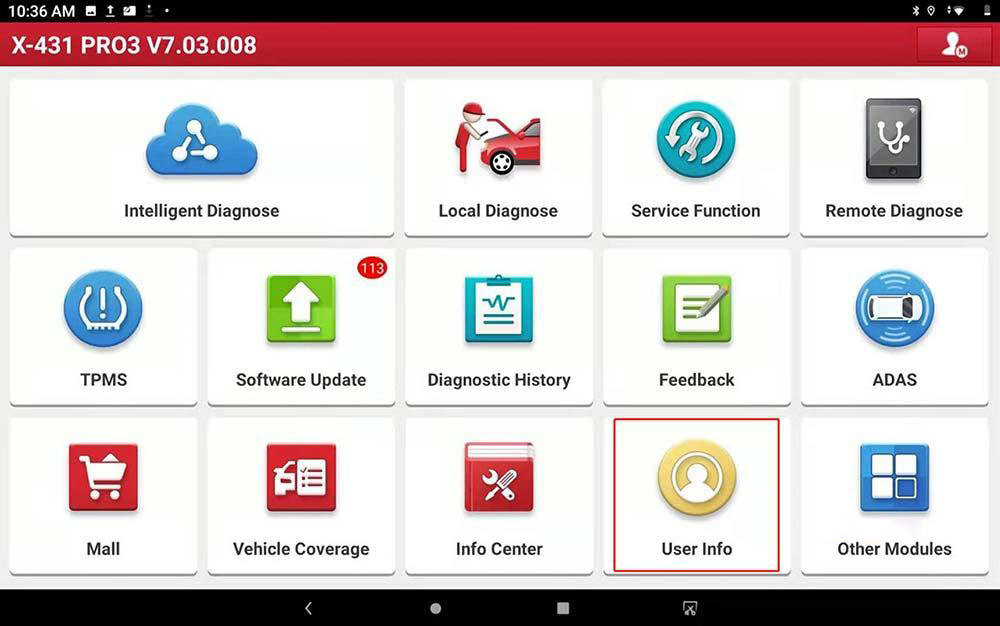
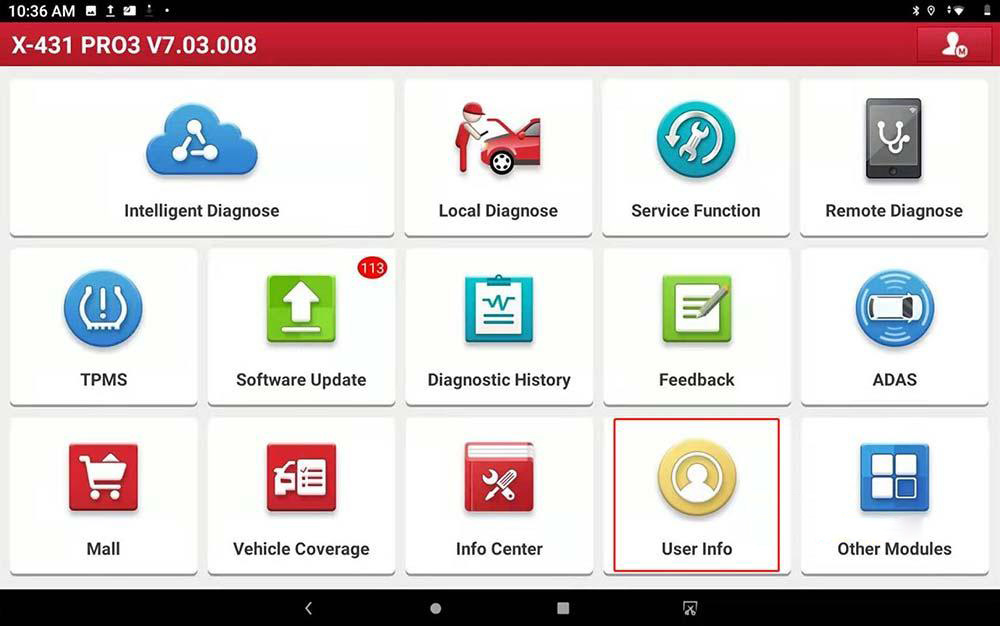
Open 431 App and click into “User Info”:

Launch-X431-Frequently-Asked-Questions-and-Solutions-25

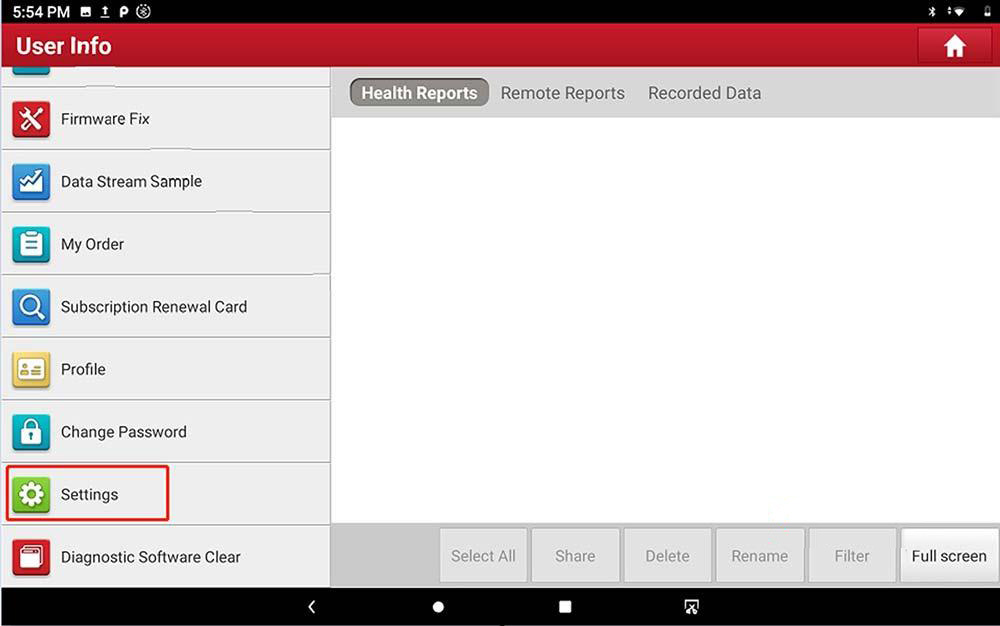
Choose “Settings” in the left menu:

Launch-X431-Frequently-Asked-Questions-and-Solutions-26

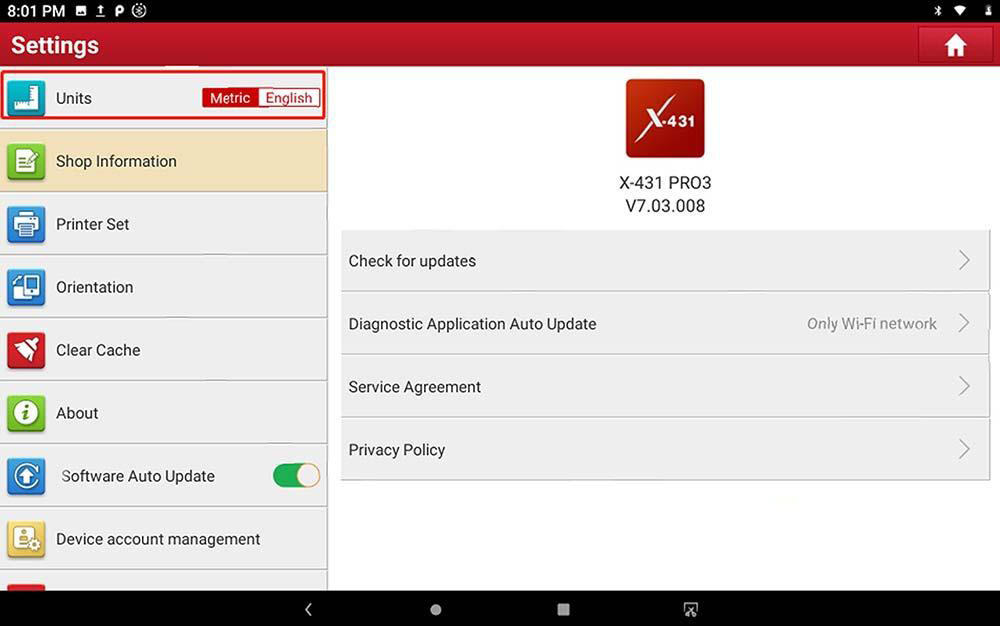
Left click and switch to Metric system units, then restart the device:

Launch-X431-Frequently-Asked-Questions-and-Solutions-27