2021年10月1日星期五

GDS2 Core Software Update Increases Efficiency

 The latest update to the GDS2 core software (Version 21.3.06900) in TIS2Web recently released includes changes for Diagnostics over Internet Protocol (DoIP) diagnostics, new messaging for MDI 2/MDI usage on DoIP and dropped connection messaging.

In addition, changes to the Vehicle Wide DTC screen will include a check mark to allow the sweep to run continuously or only one time (the new default). The updated Vehicle Wide DTC sweep will reduce the amount of memory that GDS2 uses and the size of session files. These changes will be made to the CAN Bus Ping Test as well.

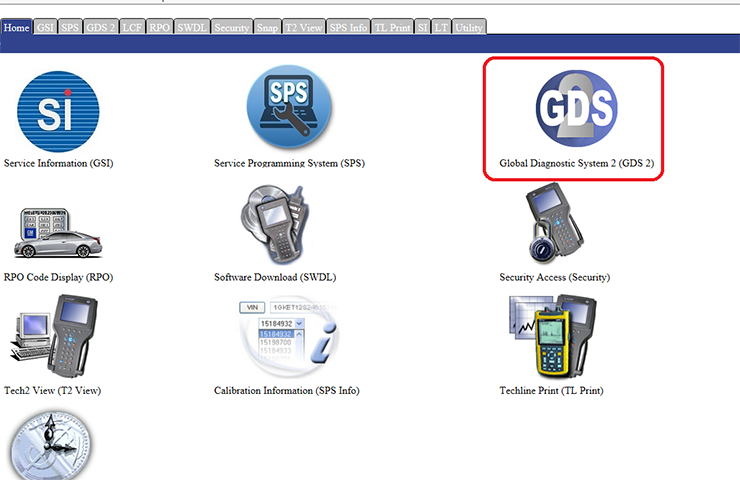
The GDS2 software update is available by selecting the GDS 2 icon in TIS2Web. (Fig. 36)

GDS2-Core-Software-Update-Increases-Efficiency

Updating Software

When updating to a new core version, many firewalls/antivirus programs will recognize it as a new application. It may be necessary to engage your local IT support to ensure GDS 2 is entered as an exception in these programs to allow normal functionality. GDS2 users also need full administrative rights to install the update. If issues are encountered with GDS2 not functioning properly, right click on the GDS2 icon on the desktop and select “Run as administrator.”

2021年9月16日星期四

FAQ SD C4 PLUS WIFI

 How to solve Chinese cloned SD Connect C4 DoIP : there is NO WiFi card inside, therefore wireless connection is not possible no ! There is NO 6 batteries holder/compartment no . Batteries are necessary for firmware upgrade if needed

In fact:
1. SD Connect C4 DOIP supports WIFI setting.ste
Take obdexpress.co.uk for example, the engineer made a operation guide on how to set SD Connect C4 DOIP WIFI on WIN10 & WIN7.

2.Mercedes Star Diagnostic SD connect C4 Plus firmware update does not require battery installation as the older sd c4.
Take this user’s feedback for example: I take a risk from here, only the battery pack is missing but work ok. I have it over an year and have no problems.

How to upgrade SD C4 Plus Xentry without battery?
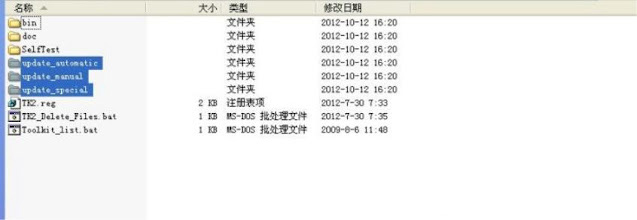
1. Open DAS software, enter the folder “C:\programm files\SDconnect
Toolkit”, check if there are the following three folders: Update_automatic, Update_manual
; Update_Special.. As shown in the figure below. If the name is wrong, please correct it.

How-to-upgrade-SD-C4-Plus-Xentry-without-battery-1
How-to-upgrade-SD-C4-Plus-Xentry-without-battery-2

2. Reboot the computer.

3. Start to upgrade the SD C4 Plus firmware, please follow the procedure below:
1) Closing Xentry Diagnostics/Xentry DAS diagnostics application
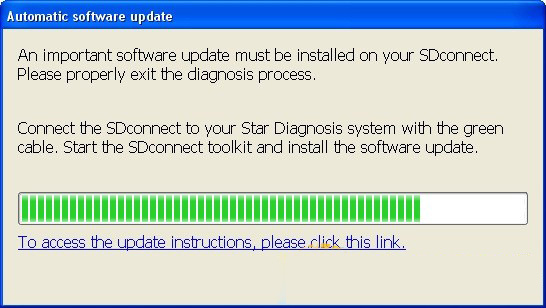
When accessing a vehicle in Xentry Diagnostics or Xentry DAS, the following message appears:

How-to-upgrade-SD-C4-Plus-Xentry-without-battery-3

Please exit the diagnostic application Xentry Diagnostics or Xentry DAS correctly and follow the next steps.

2) Connecting the SDconnect to the Star Diagnosis system
Connect the SDconnect to the Star Diagnosis system with the green LAN cable.
The SDconnect will be automatically selected and appear in the deskband on the Star Diagnosis system:

How-to-upgrade-SD-C4-Plus-Xentry-without-battery-4

3)SDnetControl
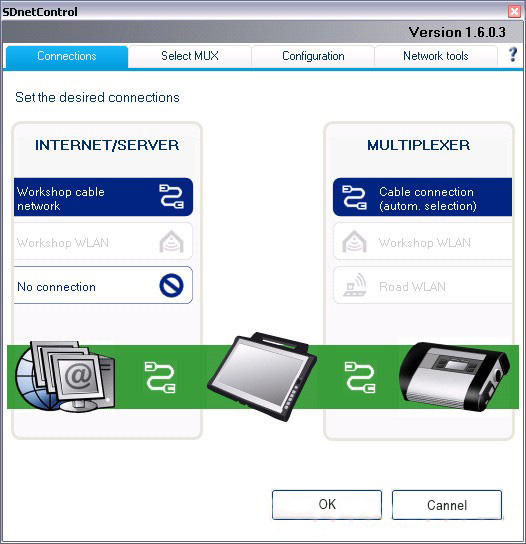
A) Start SDnetControl by clicking the deskband
Go to the “Connections” tab.
B)  Check whether automatic selection via the cable connection is active:

How-to-upgrade-SD-C4-Plus-Xentry-without-battery-5

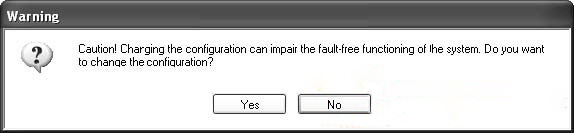
Go to the “Configuration” tab, and confirm the warning with “Yes”:
How-to-upgrade-SD-C4-Plus-Xentry-without-battery-6

4). Software update
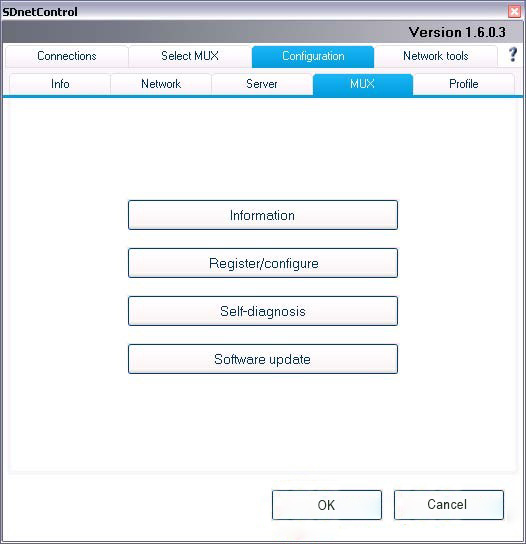
Go to the “MUX” tab in SDnetControl.
Click on the “Software update” button.

How-to-upgrade-SD-C4-Plus-Xentry-without-battery-7

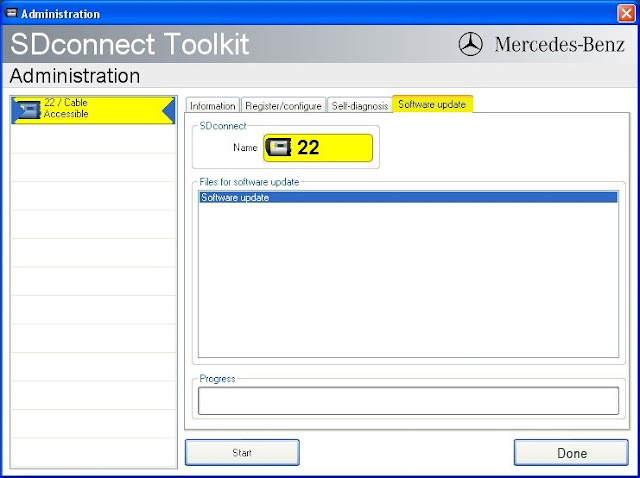
The “SDconnect Toolkit Administration” program will start.

Go to the “Software update” tab in the SDconnect Toolkit.
Your SDconnect is already selected on the left-hand side.
Select the “Software update” packet under “Files for software update”.
Click “Start” to start the process.

How-to-upgrade-SD-C4-Plus-Xentry-without-battery-8

The update process will start. This takes approx. 4 minutes.

5) Complete the installation
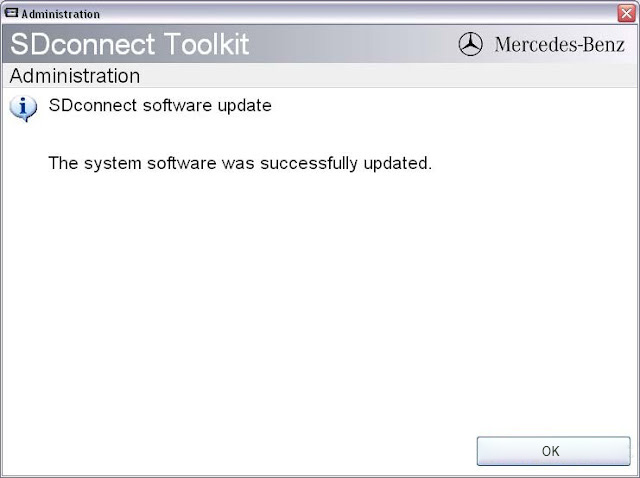
Confirm the successful completion of the update.
After a successful update, a message indicating the successful update completion appears.
Confirm the message by clicking “OK”.

How-to-upgrade-SD-C4-Plus-Xentry-without-battery-9

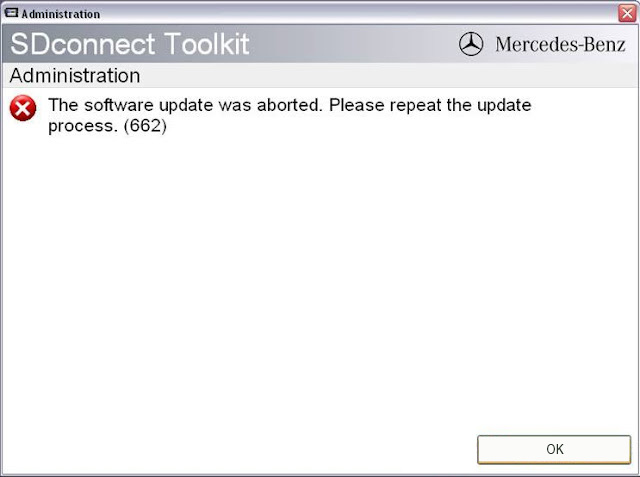
Update not successful
If the update was not successful, the message “The software update was aborted. Please repeat the update process” will appear.

Confirm this message by clicking “OK”. Check the SDconnect batteries if necessary and repeat the update process.

How-to-upgrade-SD-C4-Plus-Xentry-without-battery-10

6) Check the installed software
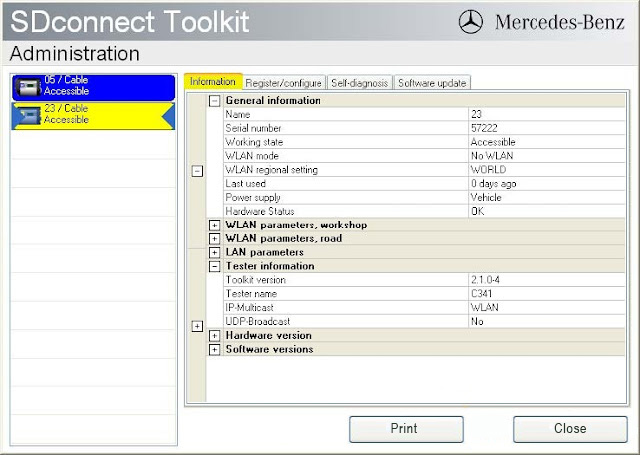
Go to the “Information” tab in SDconnect Toolkit
Select your SDconnect on the left-hand side.
• Check the information under “Software versions” at the right:
The versions of the Linux OS and the CommandServer must be at least 2:0:xxxxxx.

How-to-upgrade-SD-C4-Plus-Xentry-without-battery-11


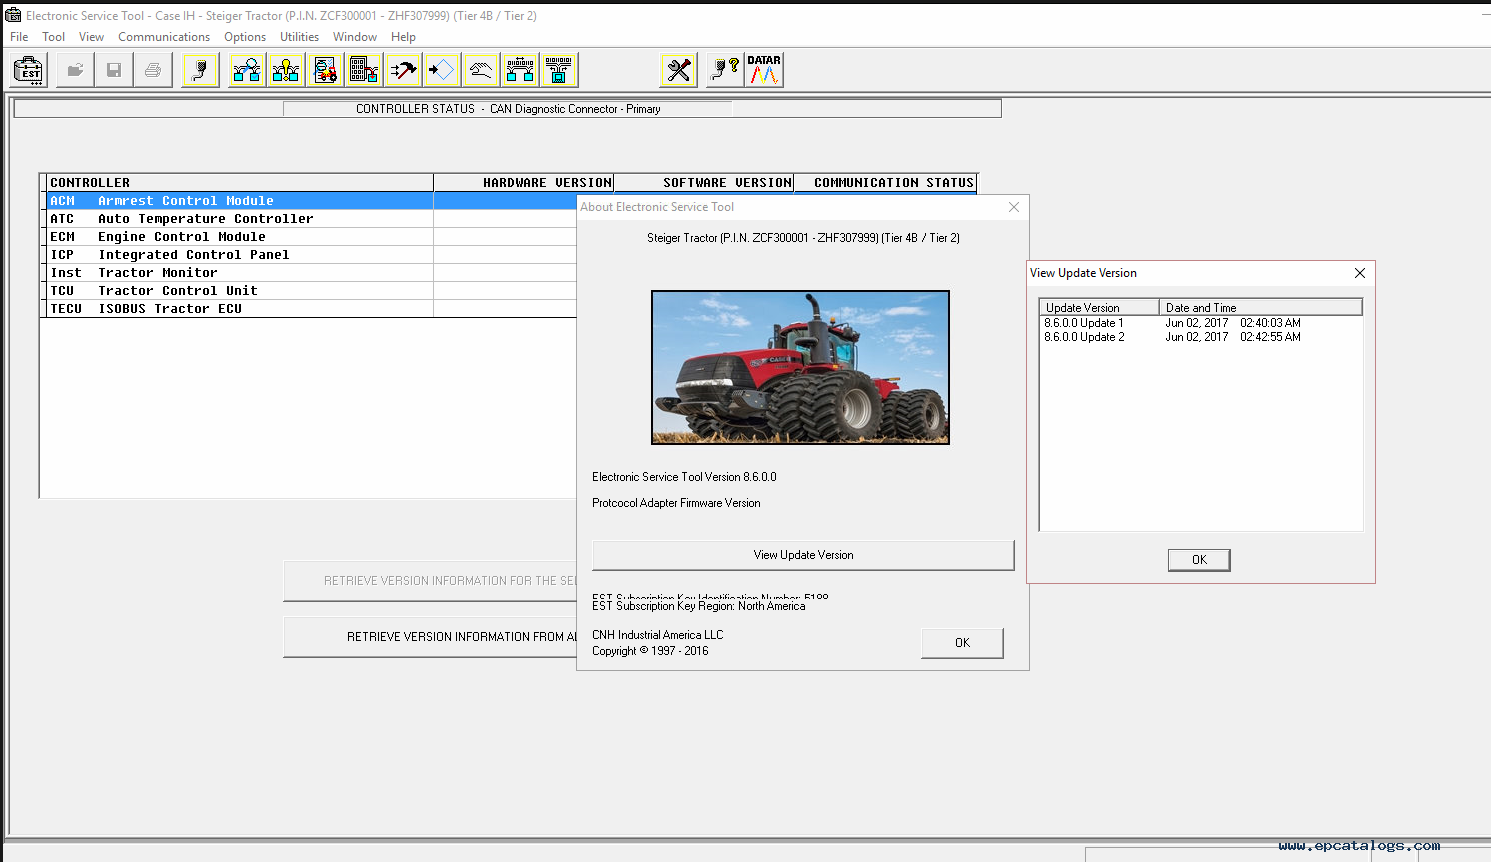
New Holland Electronic Service Tools CNH EST Software Free Download

 What is New Holland Electronic Service Tool?

Electronic Service Tool (EST) Engineering Level* (software only) – used by New Holland dealer technicians to connect with vehicles that have a Controller Area Network (CAN) BUS.

New-Holland-Electronic-Service-Tools-CNH-EST-software

New Holland Electronic Service Tool Function List:

Check the status of parameters;
• Retrieve faults;
• Run diagnostic tests;
• Make ECU and parameter programming;
• Monitor active and logged diagnostics;
• View and change ECU configuration;
• View diagnostic procedures and schematics.
• Troubleshoot problems;
• Use assist database;
• Run scope diagnostics;

New Holland Electronic Service Tool Support OS:

Windows 7 32 bit, Windows 7 64 bit, Windows 8/8.1 32 bit, Windows 8/8.1 64 bit, Windows 10 32 bit, Windows 10 64 bit

New Holland Electronic Service Tool Support Languages:
English, Spanish, Italian, Mexican, German, Norwegian, Russian, French

New Holland Electronic Service Tool Supported Brands:
New Holland (Agriculture and Construction);
New Holland FK (Fi at-Kobelco);
New Holland O&K (Orenstein & Koppel);
CASE (Agriculture and Construction);
STEYR;
KOBE-LCO;
Iveco (Astra) (articulated dump trucks only);
Flexi-Coil;
Sumitomo (S.H.I.)

New Holland Electronic Service Tool 9.1 Download:
https://mega.nz/#F!WVghzKwY!anc22uzd2t41QLiGgAt88Q

New Holland Electronic Service Tools 9.2(CNH EST 9.2) software
https://mega.nz/#F!2UpnhLSL!b7ptTfnUtQzjRdcef2_z3Q

New Holland Electronic Service Tool 9.2 Update:
Case IH AG:
-New Engine Datasets for the following Machines with FPT engines
oEDC17C49 Engine Controller Datasets
•5802804074 -FARMALL 55A (Tier 4A)
•5802804075 -FARMALL 65A (Tier 4A)
•5802804076 -FARMALL 75A (Tier 4A)

Heavy Duty Truck diagnostic Scanner New Holland Electronic Service Tool 9.4 Update
https://www.obd2tool.com/goods-10452-New-Holland-Electronic-Service-Tools-CNH-EST-Diagnostic-Software.html

New Holland AG:
-New Engine Datasets for the following Machines with FPT engines
oEDC17C49 Engine Controller Datasets
•5802804074 -T4S.55 / WORKMASTER55 / T3.60F (Tier 4A)
•5802804075 -T4S.65 / WORKMASTER 65 / T3.70F (Tier 4A)
•5802804076 -T4S.75 / WORKMASTER 75 / T3.80F(Tier 4A)

Case CE Heavy:
-Wheel Loaders (Models 521G, 621G, 721G, 821G, 921G, 1021G, 1121G) (Tier 4B / Tier 2)
oColor Display-Vehicle Support (GDSP) software version 1.11.0.0; part number 51447685

New Holland CE Heavy:
-Wheel Loaders (Models W110D, W130D, W170D, W190D, W230D, W270D, W300D) (Stage V)
oColor Display-Vehicle Support (GDSP) software version 1.11.0.0; part number 51447685
New Holland CE Light:
-Wheel Loaders (Models W110D, W130D, W170D, W190D, W230D, W270D, W300D) (Stage V)
oColor Display-Vehicle Support (GDSP) software version 1.11.0.0; part number 51447685
2021年7月31日星期六

Autel IM508 plus XP400 Pro Practical Vehicle Test

 1.How to Use Autel IM508 & XP400 Pro to Add New Mercedes Benz Key?

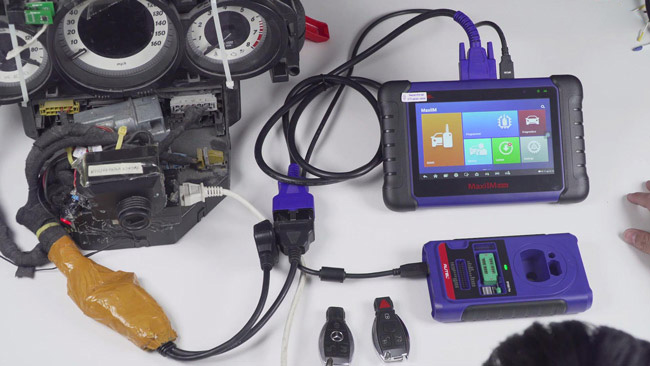
Autel IM508 plus XP400 Pro are incredibly powerful in key programming and adding a new key for your car. So the content below will, from the perspective of vehicle practical test, share every single step specially of using Autel IM508 & XP400 Pro to Generate Mercedes Benz Car Key.

How-to-Use-Autel-IM508-&-XP400-Pro-to-Add-New-Mercedes-Benz-Key-1

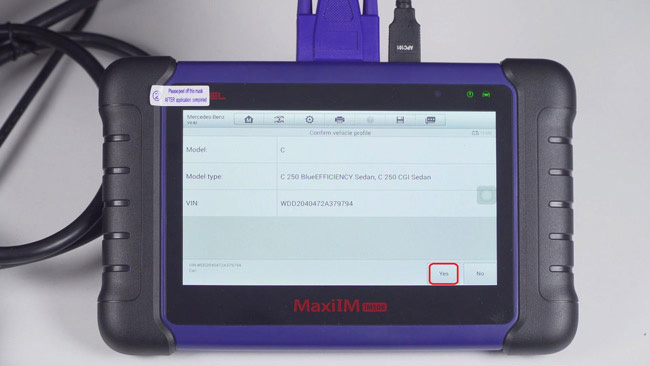
Tap “IMMO” on the Home screen>> “Mercedes Benz>> “Auto VIN Scan”, the IM508 unit will automatically read the VIN code. Wait a few seconds, it will ask you to confirm vehicle profile like below:

How-to-Use-Autel-IM508-&-XP400-Pro-to-Add-New-Mercedes-Benz-Key-2

The vehicle information has already been read out, click “Yes” to the next interface.
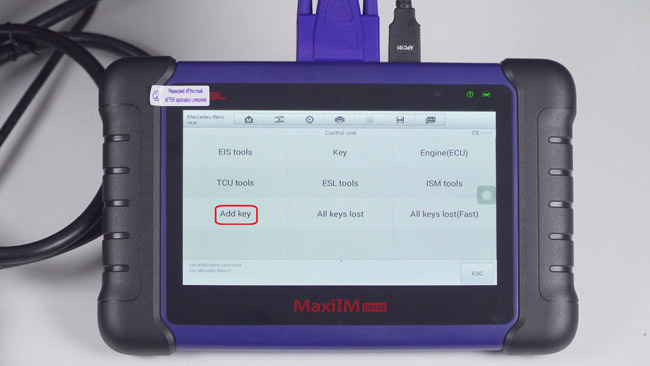
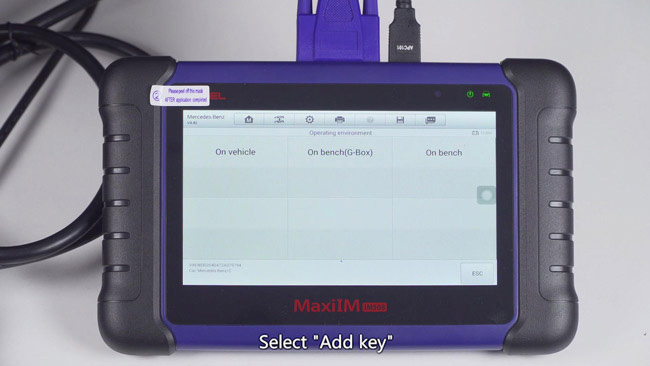
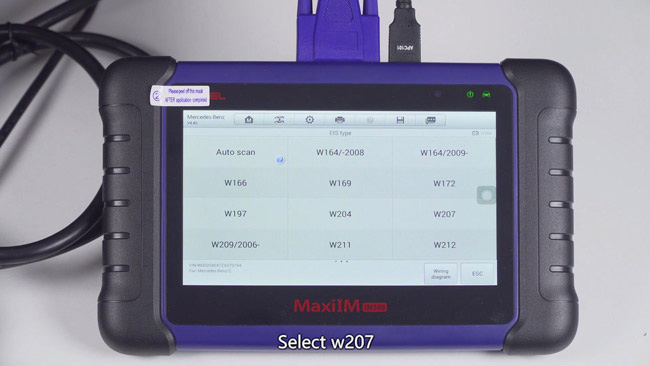
Tap “2008-2014”<< “Control unit”<< “Add key”<< “On bench”<< “W207”

How-to-Use-Autel-IM508-&-XP400-Pro-to-Add-New-Mercedes-Benz-Key-3
How-to-Use-Autel-IM508-&-XP400-Pro-to-Add-New-Mercedes-Benz-Key-4
How-to-Use-Autel-IM508-&-XP400-Pro-to-Add-New-Mercedes-Benz-Key-5
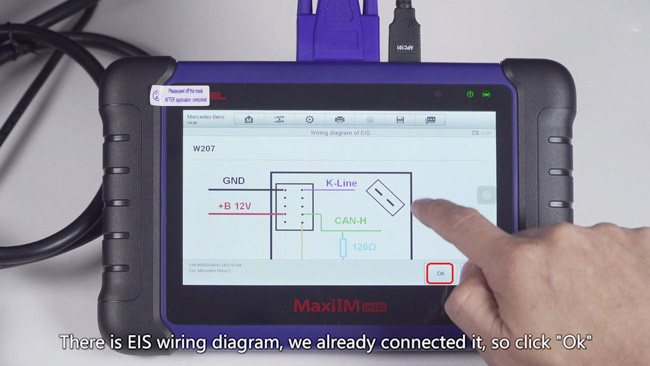
We’ve already connected well according to the EIS wiring diagram, so click “OK”.
The unit will start establishing vehicle communication…
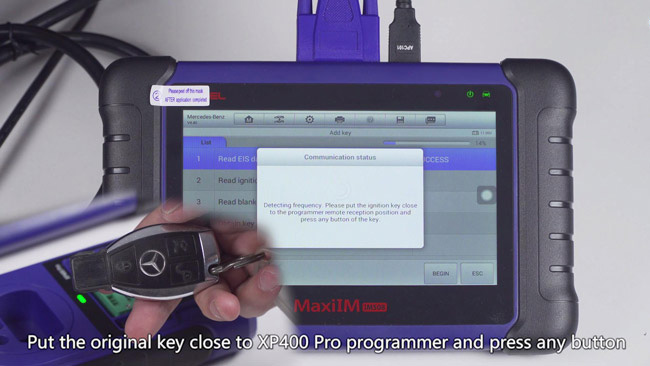
Tap “Begin” button and put the original key close to XP400 Pro programmer and press any button of the key to continue.
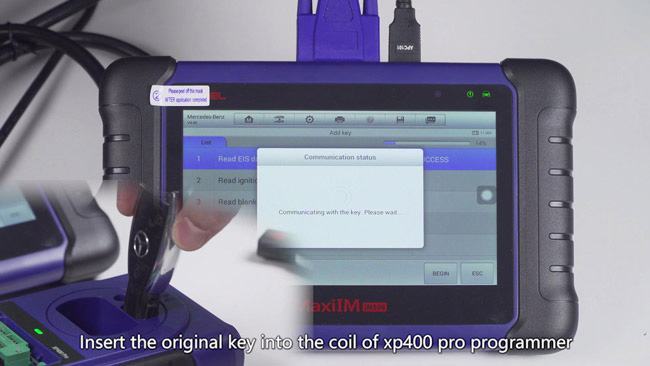
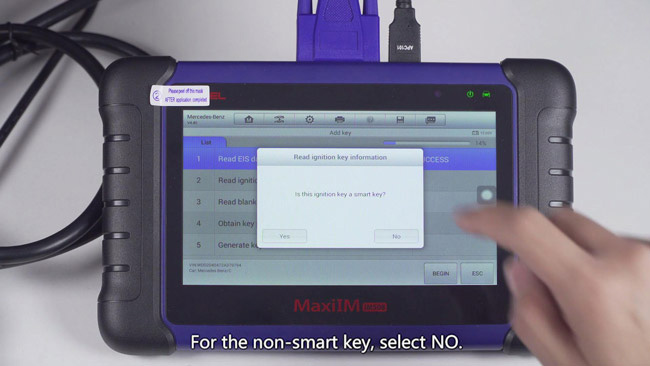
Then, insert the original key into the coil of XP400 Pro programmer. The unit’s screen will prompt the message of “Is this ignition key a smart key”. You have to confirm very carefully, for the non-smart key, Click ‘No”.

How-to-Use-Autel-IM508-&-XP400-Pro-to-Add-New-Mercedes-Benz-Key-6
How-to-Use-Autel-IM508-&-XP400-Pro-to-Add-New-Mercedes-Benz-Key-7
How-to-Use-Autel-IM508-&-XP400-Pro-to-Add-New-Mercedes-Benz-Key-8
How-to-Use-Autel-IM508-&-XP400-Pro-to-Add-New-Mercedes-Benz-Key-9

An “IMMO status” chart will be waiting for you to confirm. Click “OK” to continue.
Read ignition key information–Success!

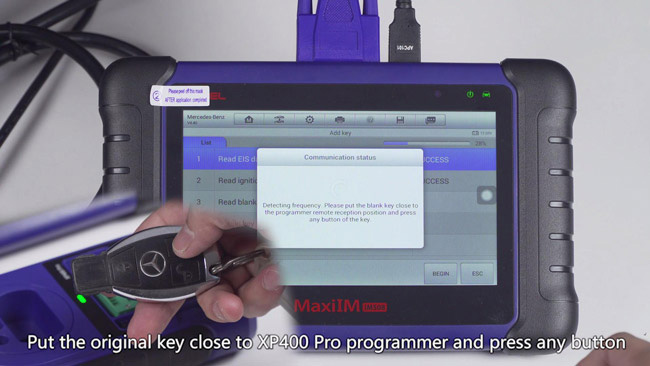
Click “Begin” button and put the original key close to Autel Scanner XP400 Pro programmer and press any button of the key.
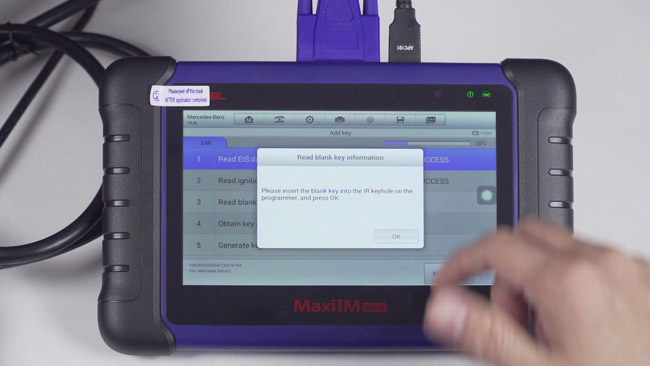
We will start reading blank key information, follow the instruction on the screen.
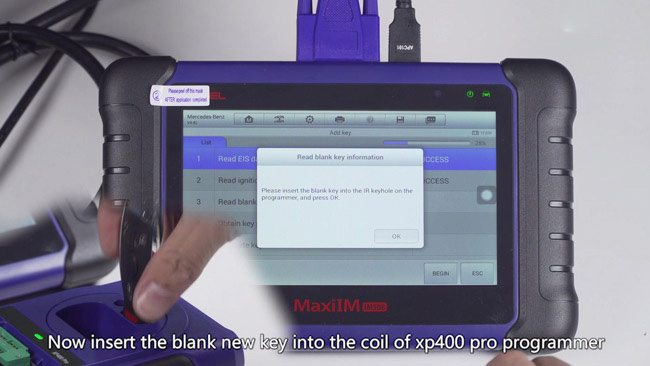
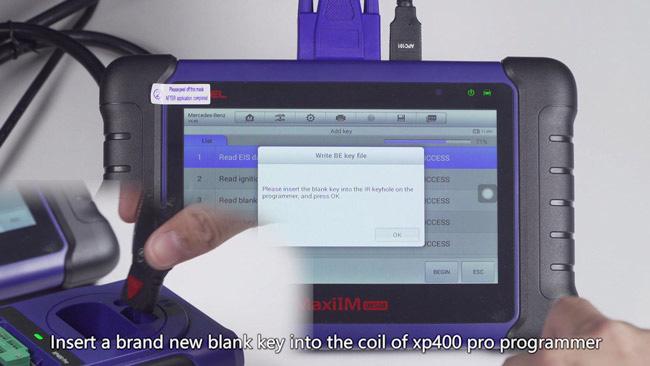
See what it tells us to do next? Yes, now, it’s time for us to insert the blank new key into the coil of XP400 Pro programmer. Click “OK” to confirm.

How-to-Use-Autel-IM508-&-XP400-Pro-to-Add-New-Mercedes-Benz-Key-10
How-to-Use-Autel-IM508-&-XP400-Pro-to-Add-New-Mercedes-Benz-Key-11
How-to-Use-Autel-IM508-&-XP400-Pro-to-Add-New-Mercedes-Benz-Key-12

Communicating with the key. Please wait…
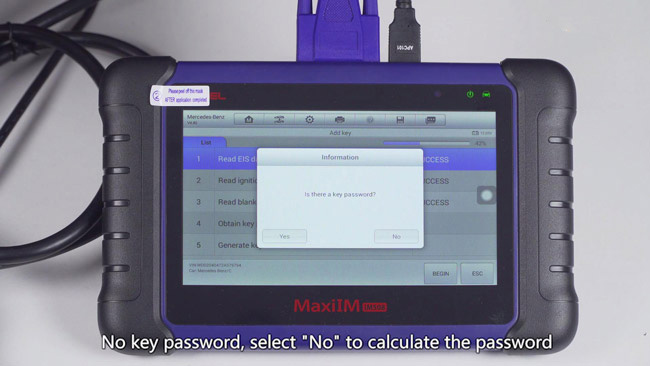
Prompted message: Is there a key password? If no key password, select “No” to calculate the password. Press “OK” to enter PASSWORD CALCULATION process.
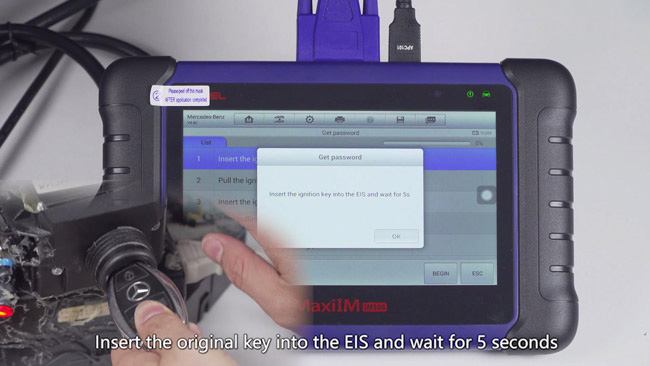
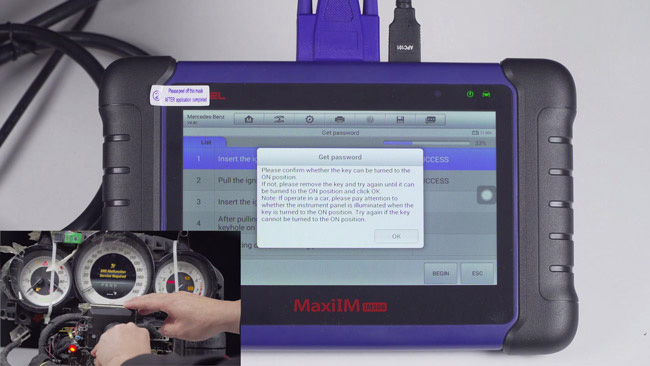
Insert the ignition key into the EIS and wait for 5 seconds.
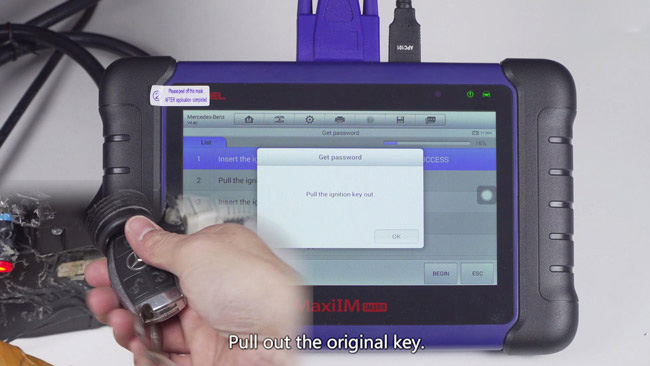
And next you need to pull out the ignition key.
Getting password–Establishing vehicle communication at the moment!!!
Again, insert the ignition key into the EIS and wait for 2 seconds

How-to-Use-Autel-IM508-&-XP400-Pro-to-Add-New-Mercedes-Benz-Key-13
How-to-Use-Autel-IM508-&-XP400-Pro-to-Add-New-Mercedes-Benz-Key-14
How-to-Use-Autel-IM508-&-XP400-Pro-to-Add-New-Mercedes-Benz-Key-15
How-to-Use-Autel-IM508-&-XP400-Pro-to-Add-New-Mercedes-Benz-Key-16

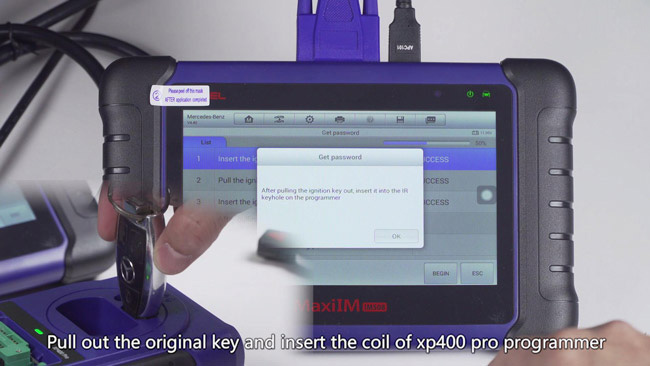
After pulling out the ignition key, insert it into the IR keyhole on the Autel Scanner XP400 Pro.
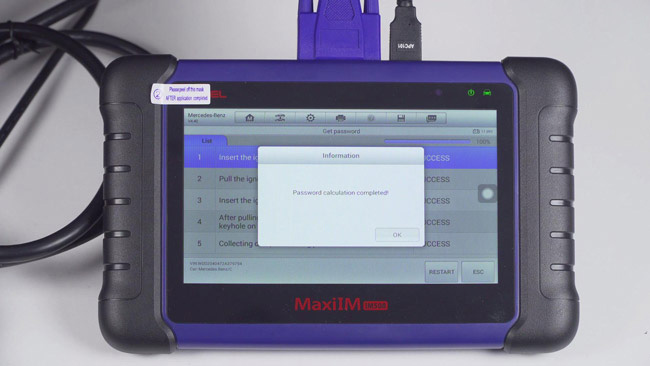
Wait for the password calculation, it takes about 10-30 minutes.
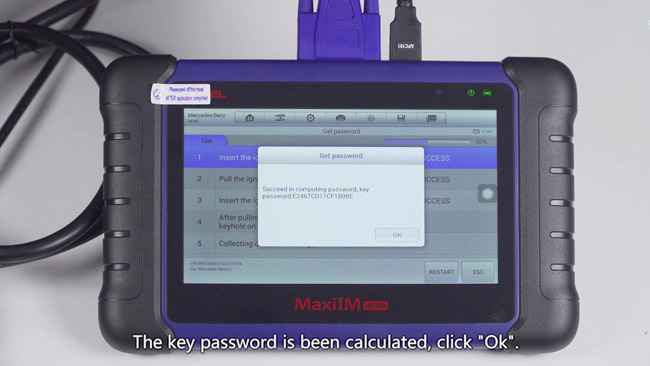
Key password has been calculated successfully, click “OK”.
Once again, insert the ignition key into the EIS and wait for 30s.
Password calculation completed!

How-to-Use-Autel-IM508-&-XP400-Pro-to-Add-New-Mercedes-Benz-Key-17
How-to-Use-Autel-IM508-&-XP400-Pro-to-Add-New-Mercedes-Benz-Key-18
How-to-Use-Autel-IM508-&-XP400-Pro-to-Add-New-Mercedes-Benz-Key-19
How-to-Use-Autel-IM508-&-XP400-Pro-to-Add-New-Mercedes-Benz-Key-20

Generate key file, please wait…
Insert the blank key into the IR keyhole of the programmer and click OK.
Detecting key file…Writing key file…Add key successfully…
According to the instructions, check if the new added key can be used normally.
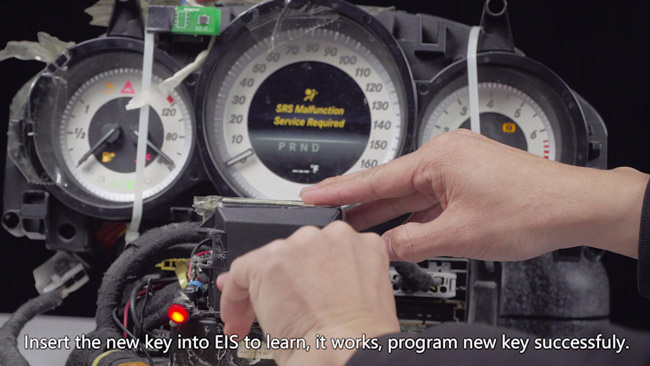
Insert the new key into vehicle’s EIS, the dashboard is lighted up as expected.
New key has been programmed successfully.

How-to-Use-Autel-IM508-&-XP400-Pro-to-Add-New-Mercedes-Benz-Key-21


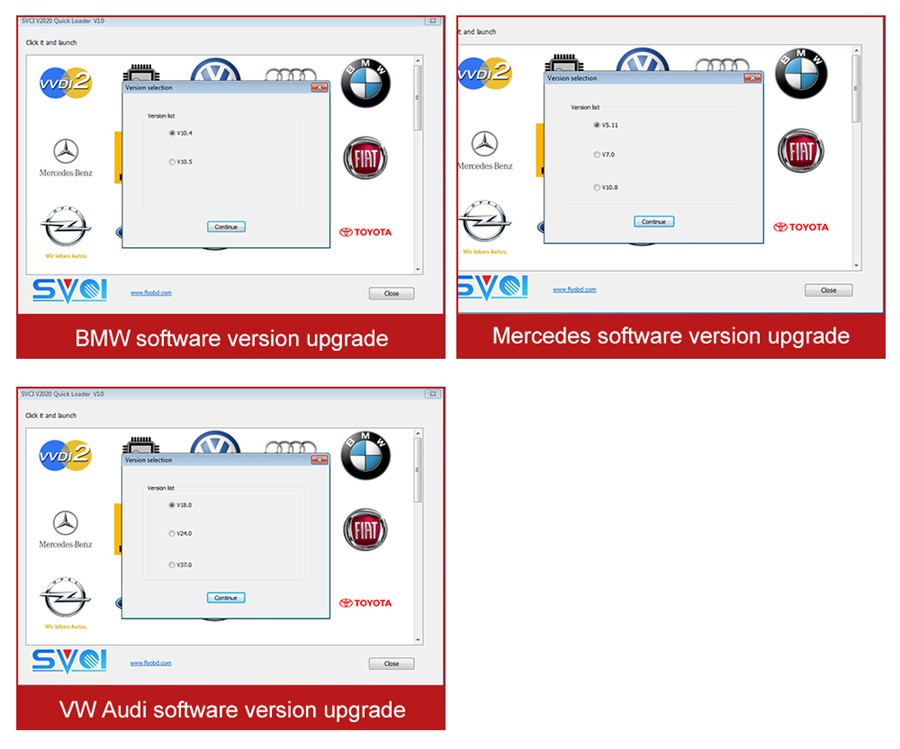
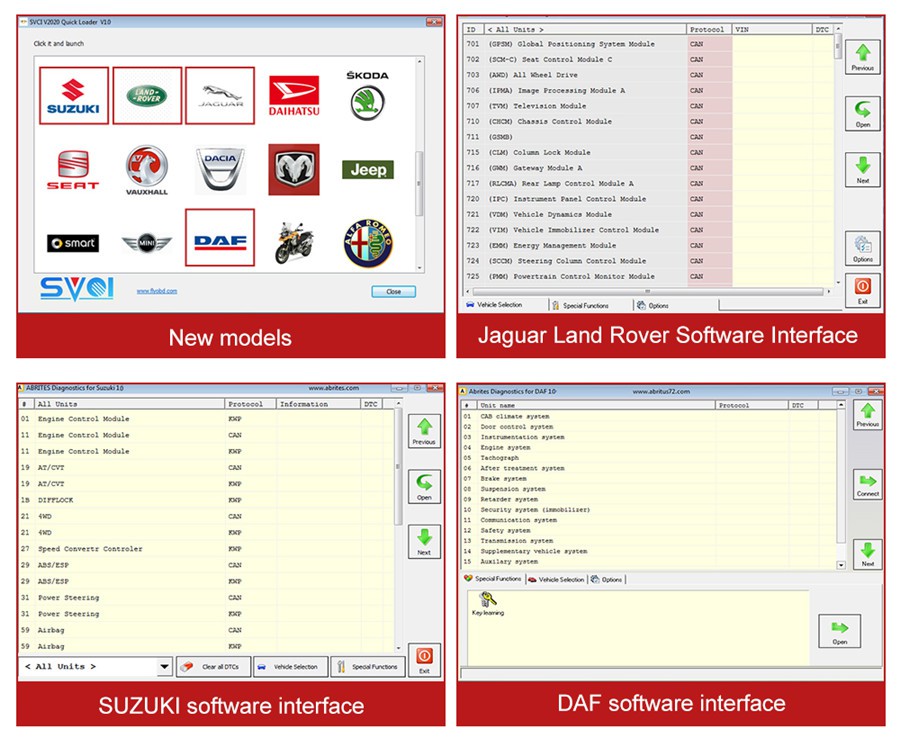
How to install SVCI 2020 Software


How-to-install-SVCI-2020-Software-1

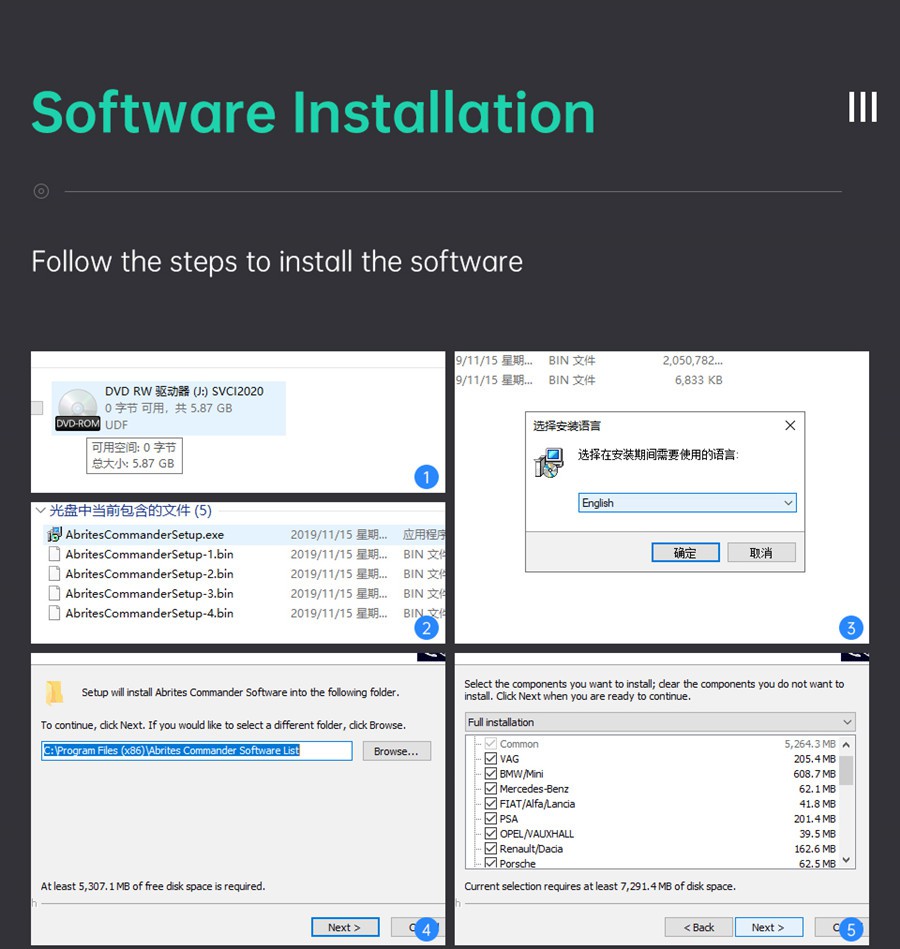
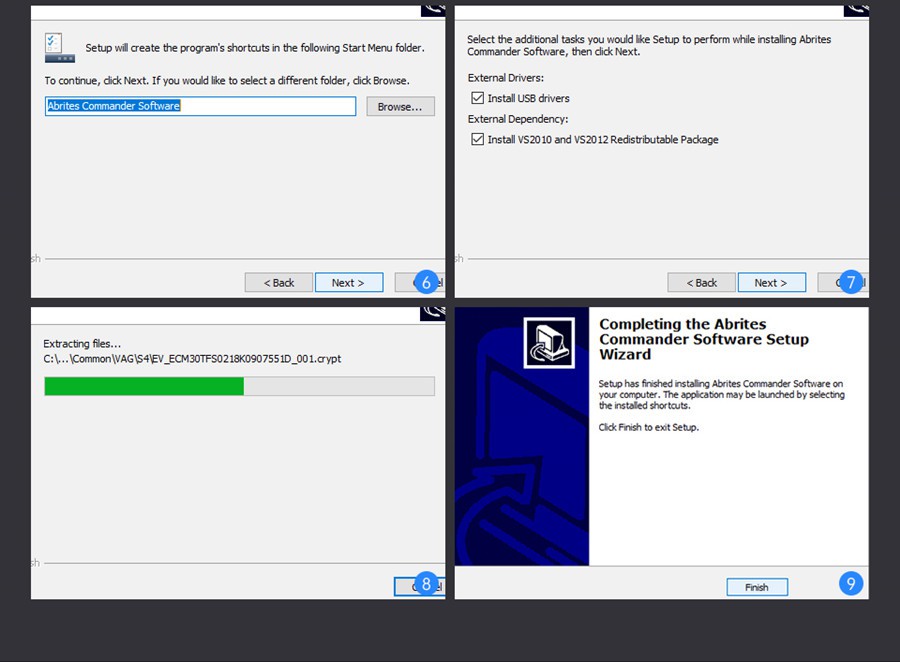
SVCI 2020 Software Installation:

•  There is only one executable file on the CD-ROM.
•  Double-click “AbritesCommanderSetup.exe” to start the installation.
•  Do not plug the USB into the computer during the installation.
•  After the installation is complete, connect the USB to the computer.

How-to-install-SVCI-2020-Software-1
How-to-install-SVCI-2020-Software-2
How-to-install-SVCI-2020-Software-3
How-to-install-SVCI-2020-Software-4


2021年6月25日星期五

How to Solve CGDI BMW FEM BDC Version is Not Supported

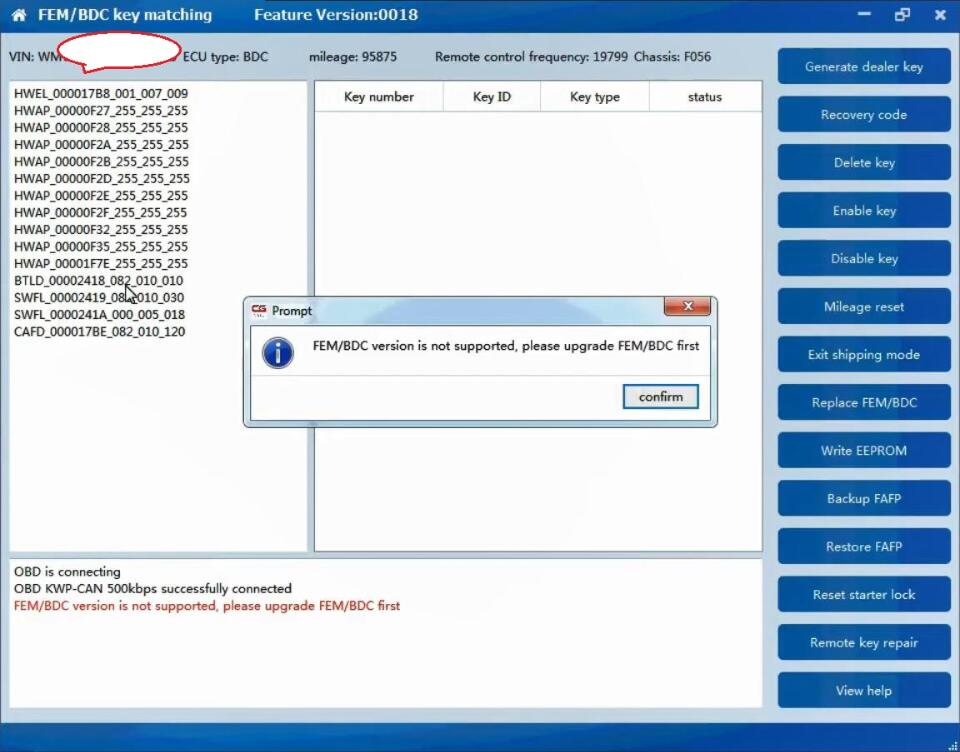
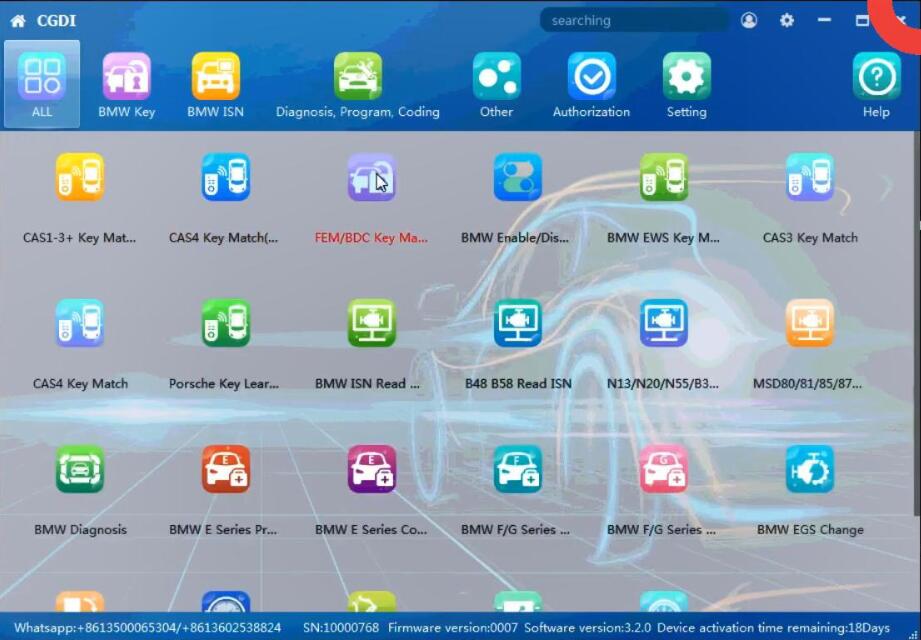
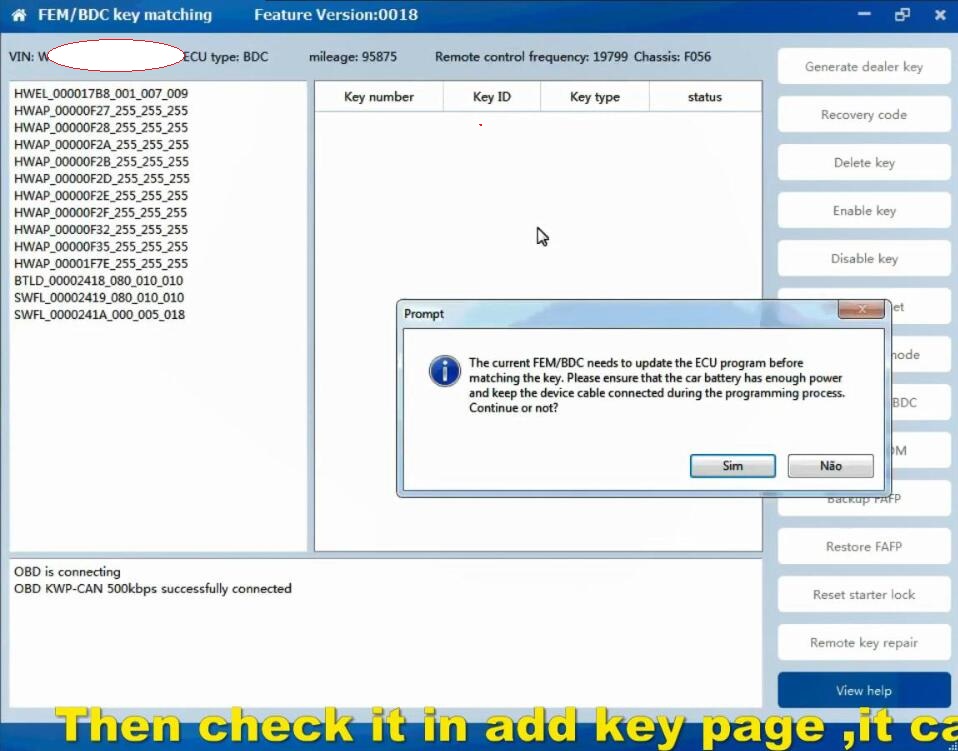
 Solution to CGDI BMW “FEM BDC Version is not supported, please upgrade FEM /BDC first“. if you have the same problem, please follow this article to fix it.


How-to-Solve-CGDI-BMW-“FEM-BDC-Version-is-not-Supported”-1    

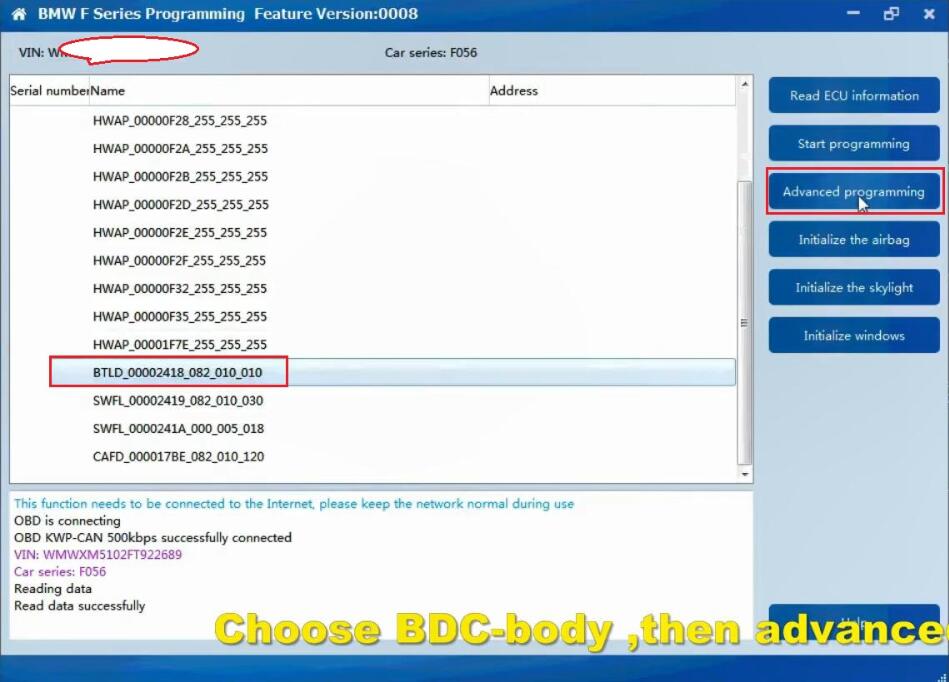
Please upgrade FEM /BDC first”, please Check the BTLD version, If it is 82 or 83 , you need to go to program page .advanced mode , program it (in this article). If it is other version , you need to go to program page, program it with default version (will make a manual ).

Choose BDC_Body, then “Advanced mode”.

Follow the prompt ” The ECU is about to be programmed. Please ensure that the car battery has enough power and keep the device cable connected during the programming process. Click on “Yes” to continue.

Click on “Yes” to backup the coded data.

The progress will be displayed in the box.

How-to-Solve-CGDI-BMW-“FEM-BDC-Version-is-not-Supported”-2

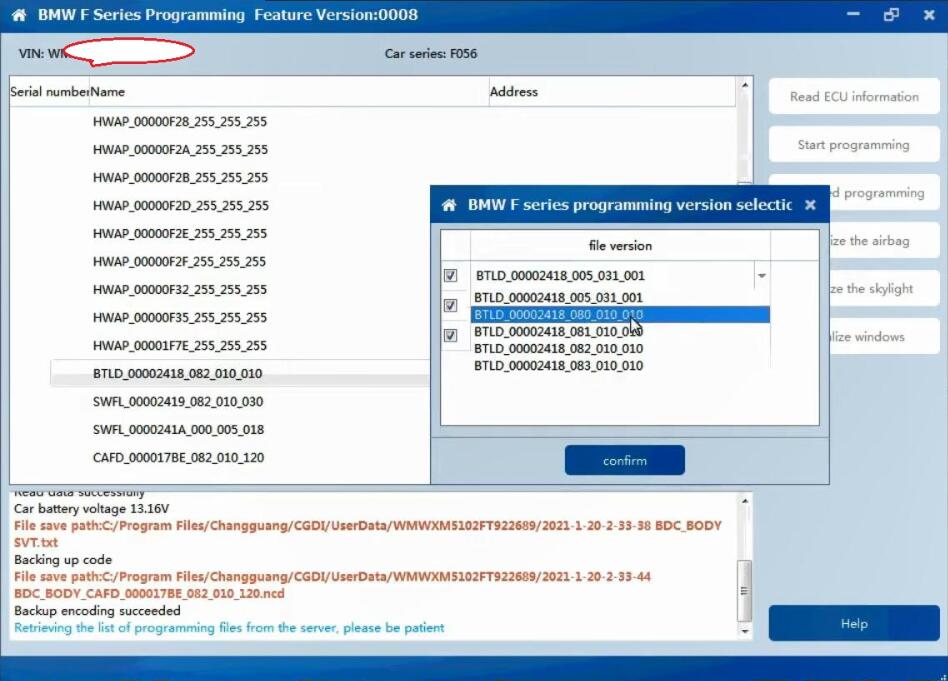
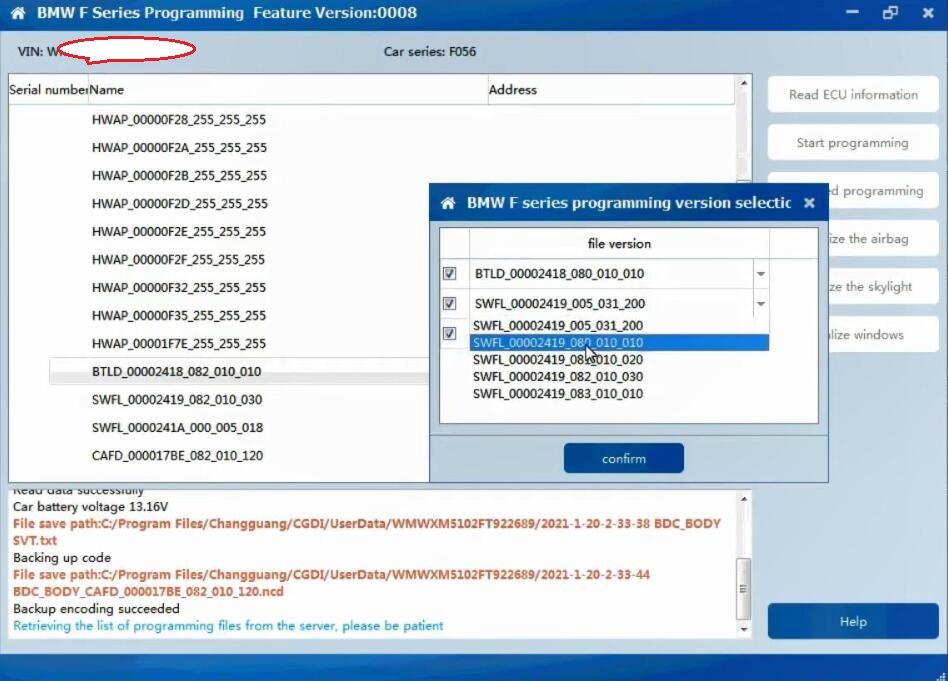
Next is BMW F series programming version selection, please choose “BTLD-80”, the next one is to choose “SWFL -80”.

Then click on “Confirm”.

How-to-Solve-CGDI-BMW-“FEM-BDC-Version-is-not-Supported”-3
How-to-Solve-CGDI-BMW-“FEM-BDC-Version-is-not-Supported”-4

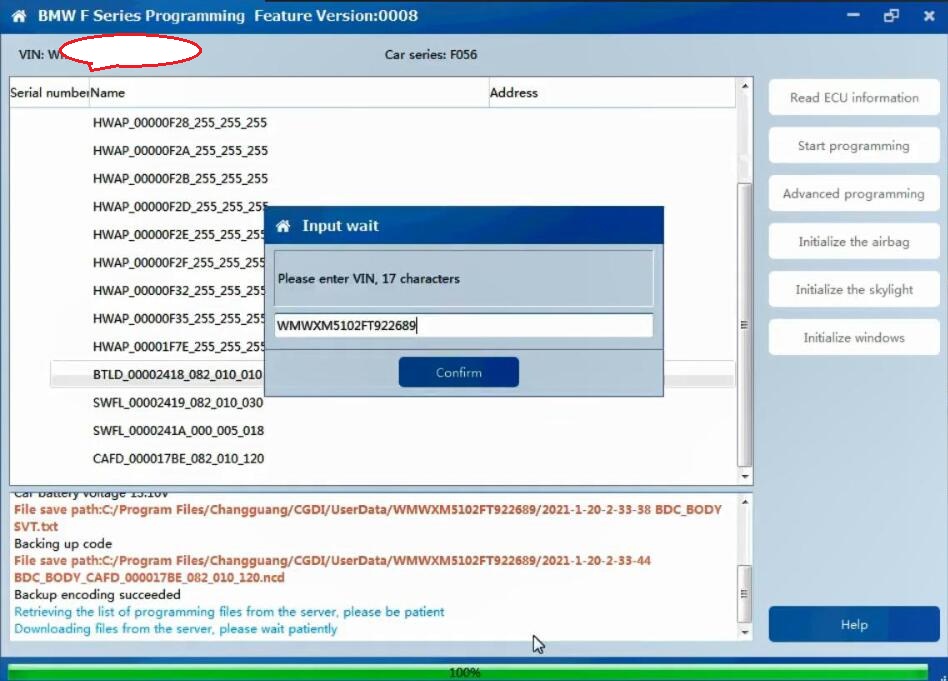
Retrieving and downloading the list of programming files from the server, please be patient, how much time to cost, it will depend on your internet speed.

When it shows 100%, you will be asked to enter VIN 17 characters.

How-to-Solve-CGDI-BMW-“FEM-BDC-Version-is-not-Supported”-5

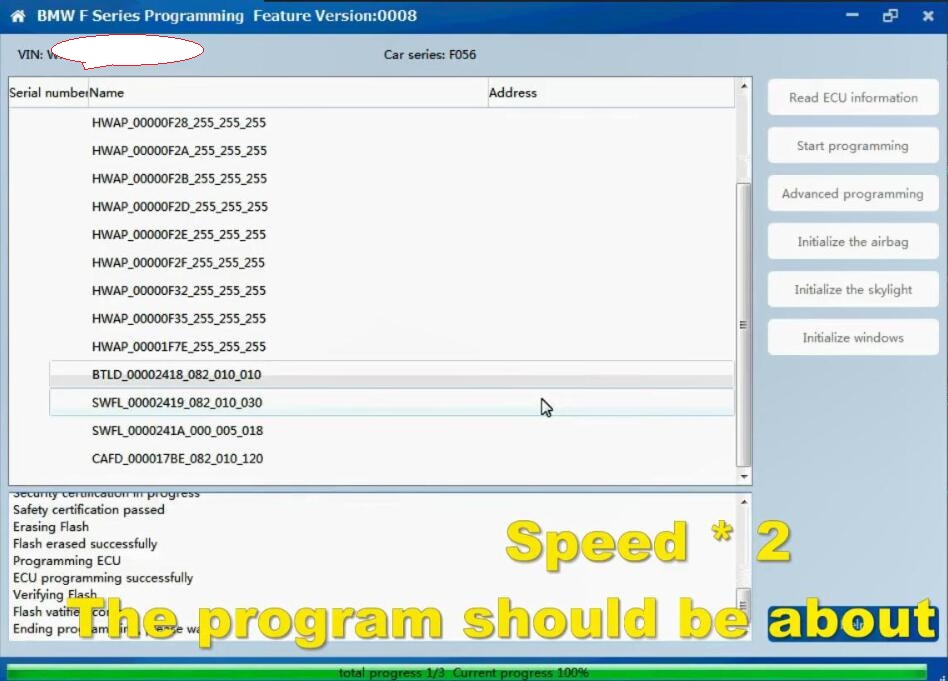
Ready to program ECU…It will take about 8 minutes.

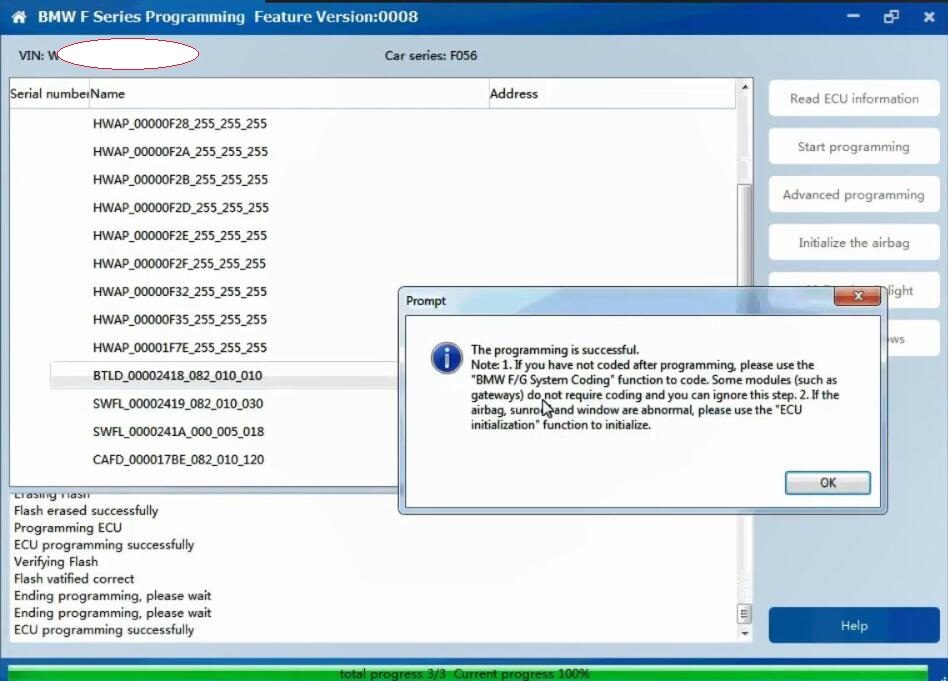
When it shows 100%, it means ECU programming successfully.

How-to-Solve-CGDI-BMW-“FEM-BDC-Version-is-not-Supported”-6

Note 1. If you have not coded after programming, please use the “BMW F/G system Coding” function to code. Some modules (such as gateways) do not require coding and you can ignore this step.

Note 2. If the airbag, sunroof and window are abnormal, please use the “ECU initialization” function to initialize.

How-to-Solve-CGDI-BMW-“FEM-BDC-Version-is-not-Supported”-7 
How-to-Solve-CGDI-BMW-“FEM-BDC-Version-is-not-Supported”-8

Then check it in the Add Key page, it can work now.

How-to-Solve-CGDI-BMW-“FEM-BDC-Version-is-not-Supported”-9

CGDI BMW Key Programmer tech support: www.obd2tool.com


https://obd2-key-programmer.blogspot.com/2021/06/how-to-solve-cgdi-bmw-fem-bdc-version.html

Ford vcm ids 3 error “Can not load the software”? Solved!

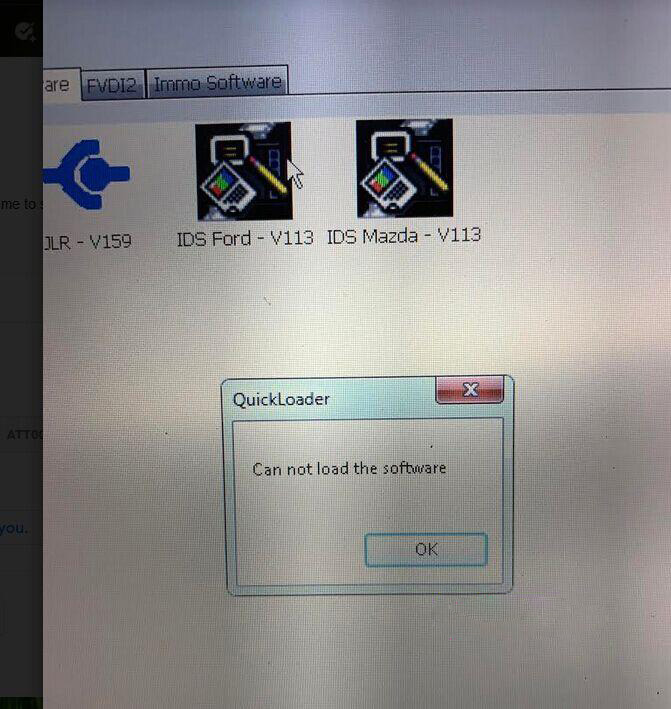
 If you are using the Ford VCM IDS 3 V113, and the software quickloader displayed error “can not load the software”.

Ford-vcm-ids-3-error-“Can-not-load-the-software”

Possible reason and solution:
You didn’t install IDS Ford – V113.
https://mega.nz/#!rvZVBIiJ!UXjd-5H8o0p14qXPnI8PEwmpn_32IrChcJo8nbtHc2s
Size: 698.3 MB
Contributor: www.obd2tool.com engineer
Security: 100% yes
OS: Win7 Win8 Win10
Language: multi-lingual
Ids Ford V113 02

https://fordtroublerepair.blogspot.com/2021/05/ford-vcm-ids-3-error-can-not-load.html

2021年5月13日星期四

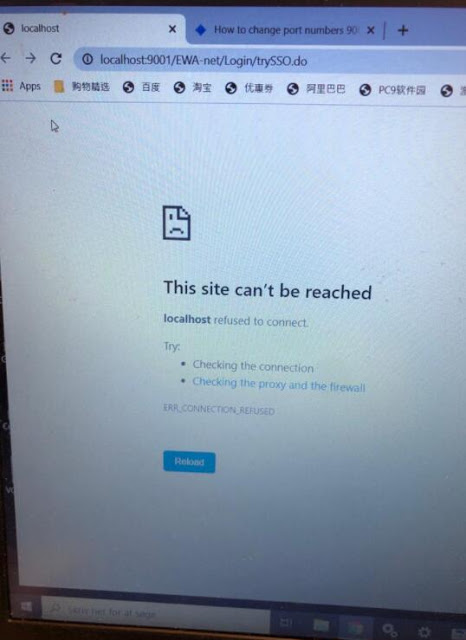
How to Solve MB SD C4 EWA Local Host Can’t be reached


Problem:

I tried to enter local host in MB SD Connect C4 EWS software, it failed me and reported error “This site cannot be reached”

mb-sd-c4-ews-This-site-cannot-be-reached-1

Solution:
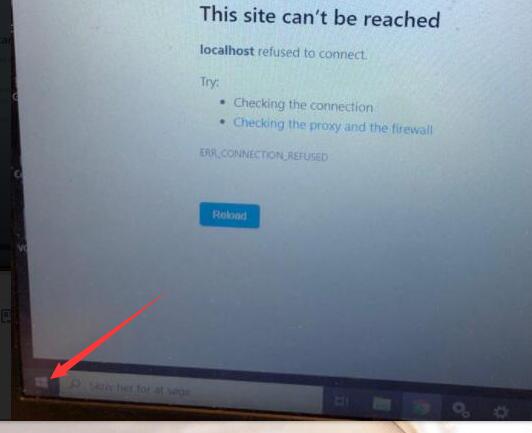
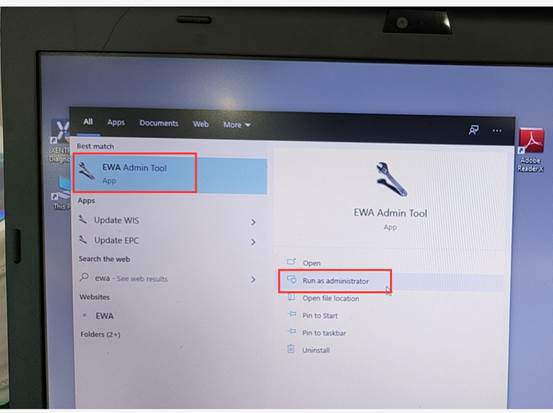
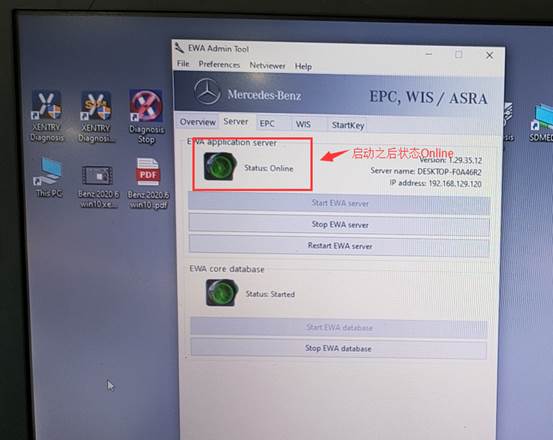
Press windows icon on the tool bar. Find EWS program
Right click to open EWA as administrator
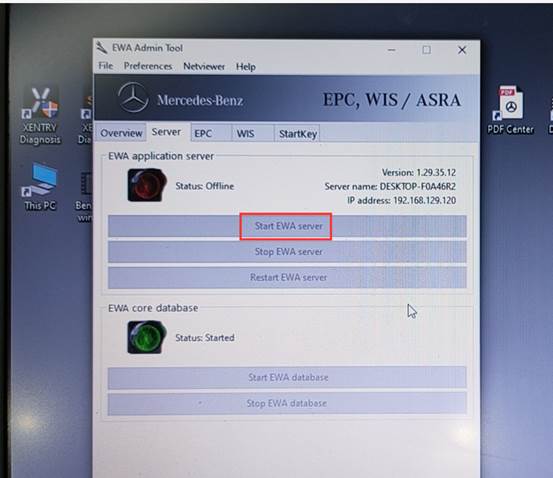
Then Started EWS server

It will show online status if it is working.
mb-sd-c4-ews-This-site-cannot-be-reached-2
mb-sd-c4-ews-This-site-cannot-be-reached-3
mb-sd-c4-ews-This-site-cannot-be-reached-4
mb-sd-c4-ews-This-site-cannot-be-reached-5