2020年11月29日星期日

AUTEL IM608 BENZ W204 ALL KEYS LOST PROGRAMMING SUCCESSFULLY

 2009 Benz C class w204 all keys lost, I got the EIS file on bench from IR adaptor with FAST adaptor on VVDI MB, I wanted to read the EIS data to get password or key files while xhorse server is down for calculations, and I was supposed to wait some hours until it recover.

Because the time is too urgent, I managed to sort it by using Autel MaxiIM IM608, I put Autel onto car, read EIS, went to expert mode and selected generate key file from EIS data, and it generated my key files!

I purchased Autel IM608 at good price on uobdii, please make sure it comes with XP400.
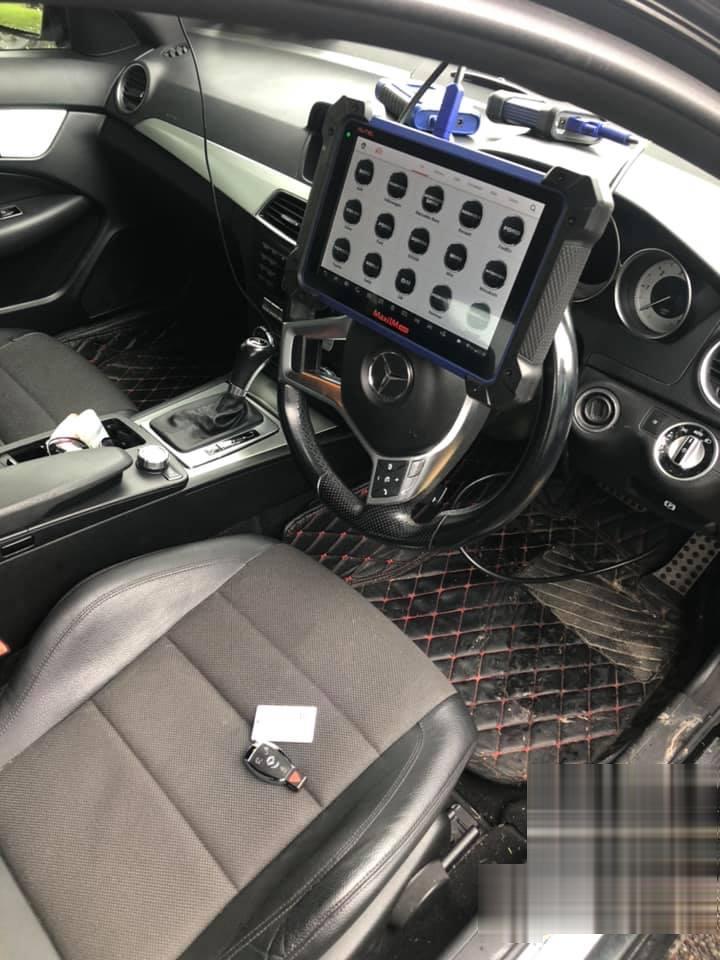
autel-im608-w204-all-keys-lost-programming-01 (2)

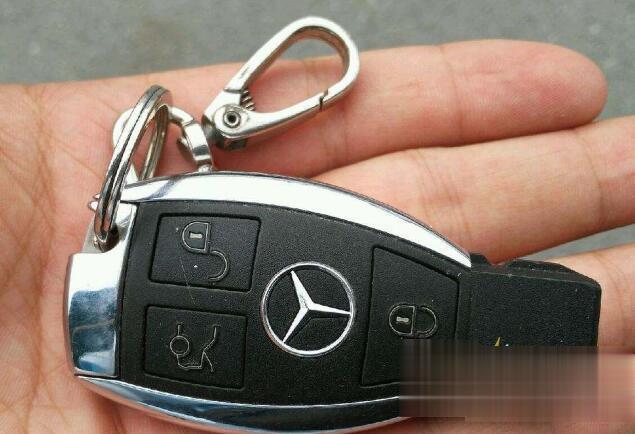
You can purchase Xhorse VVDI BE Key and one extra smart key shell with 3 button:
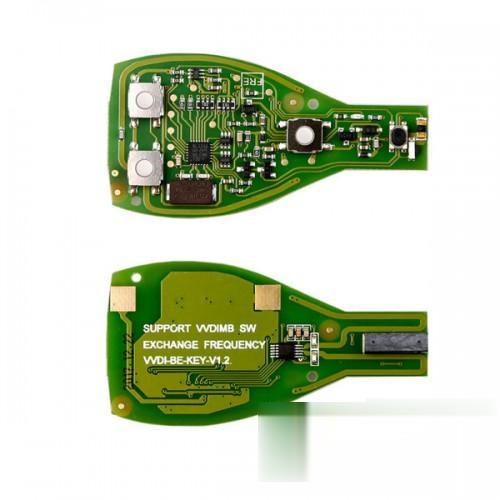
autel-im608-w204-all-keys-lost-programming-02 (2)

autel-im608-w204-all-keys-lost-programming-03 (2)

For 24.99usd here:

https://www.uobdii.com/wholesale/xhorse-vvdi-be-key-pro-improved-version-with-smart-key-shell-3-button.html

Okay, I’d like to write down the whole procedure of using Autel IM608 to program 2009 C class w204 when all keys lost:

Let’s put Autel IM608 onto W204 and to start, the following steps are also applicable to W172 W204 W207 all keys lost programming:

Step 1. Put Autel IM608 onto W204 to read car info.

On vehicle -> Vehicle information (Model type, Model chassis, EIS type, Model year)
autel-im608-w204-all-keys-lost-programming-04 (2)

autel-im608-w204-all-keys-lost-programming-05 (2)

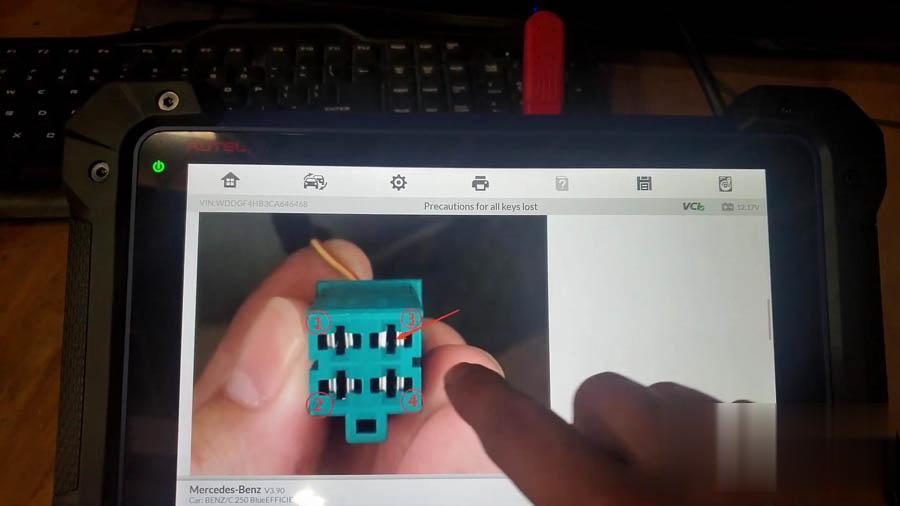
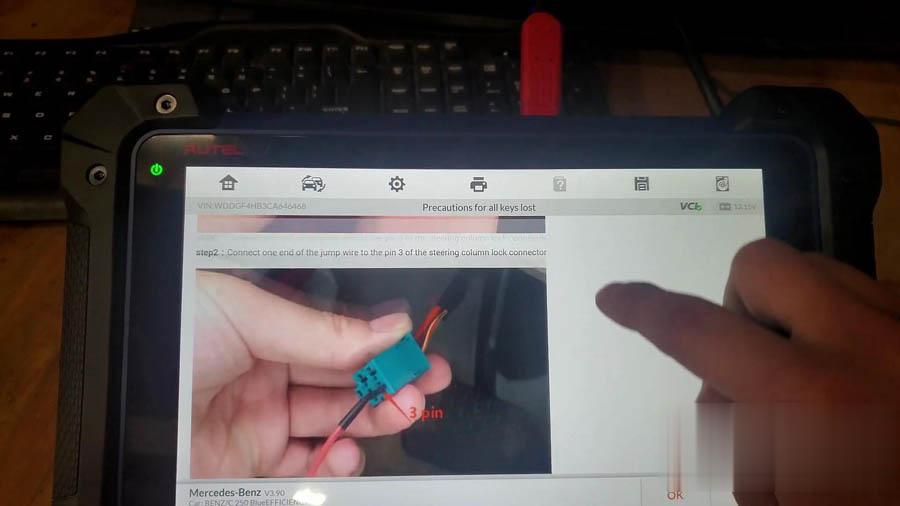
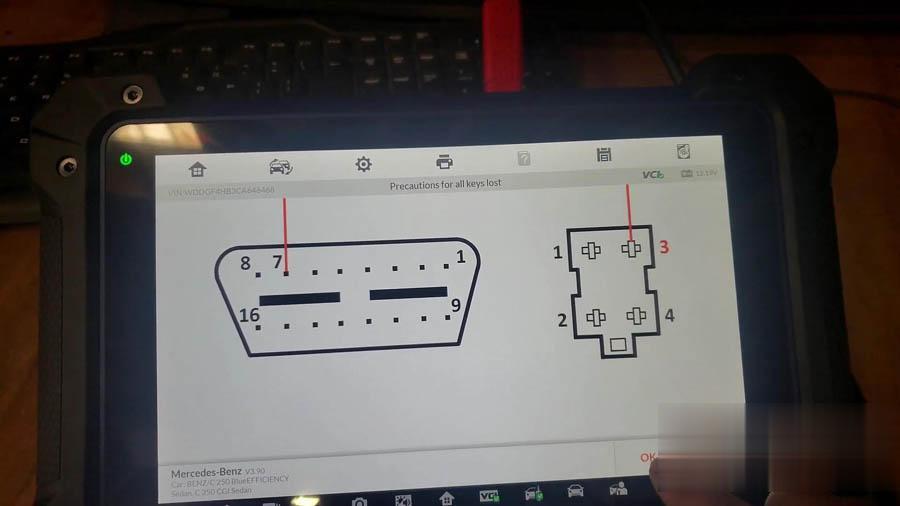
Before continuing, you are supposed to read carefully the “Precautions for all keys lost (Benz W172 /W204 / W207)”, especially if you are not very familiar with IM608. As you can see, it displays the steps with images,
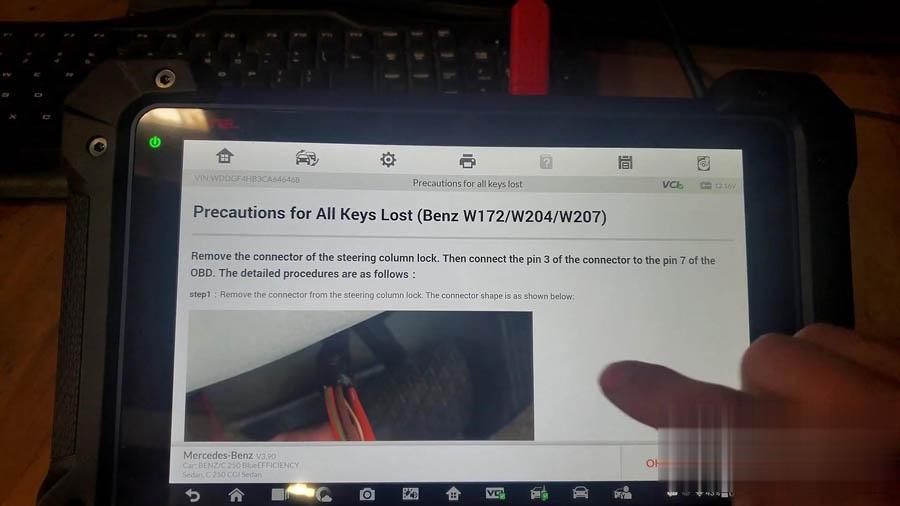
autel-im608-w204-all-keys-lost-programming-06 (2)

autel-im608-w204-all-keys-lost-programming-07 (2)
autel-im608-w204-all-keys-lost-programming-08 (2)

autel-im608-w204-all-keys-lost-programming-09 (2)

autel-im608-w204-all-keys-lost-programming-10 (2)

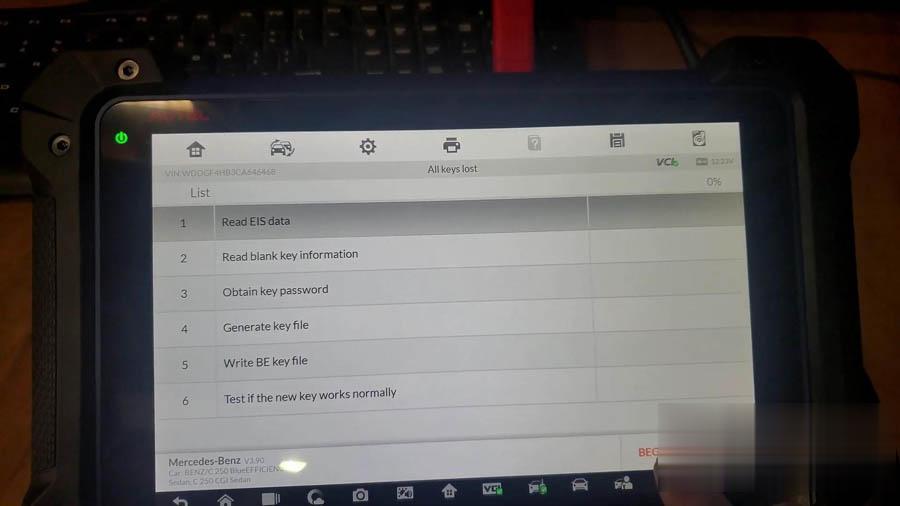
Step 2. Read EIS data.

Go on selecting “Read EIS data”, then “Begin”, it will pop up a window message ” Please insert the blank key into the IR keyhole on the programmer (Autel IM608), and press OK.

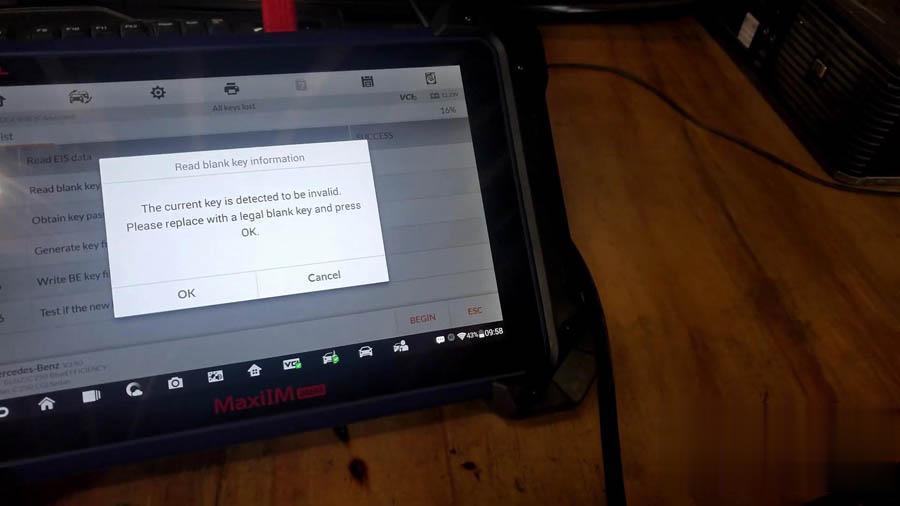
After doing so, a new window pops up” The current key is detected to be invalid, please replace with a legal blank key and press OK”.
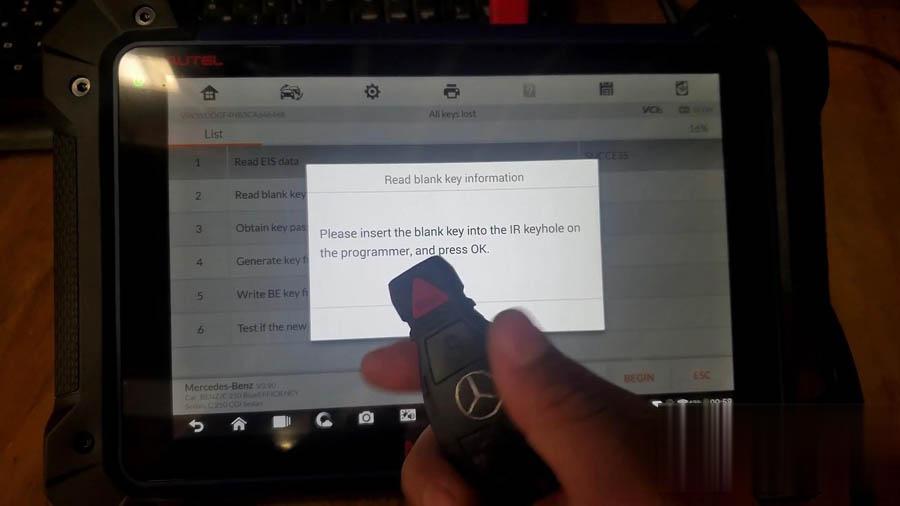
autel-im608-w204-all-keys-lost-programming-11 (2)
autel-im608-w204-all-keys-lost-programming-12 (2)

autel-im608-w204-all-keys-lost-programming-13 (2)

autel-im608-w204-all-keys-lost-programming-14 (2)

Go on, it says “Is there a key password?”, I don’t have it, so I click on “NO”.
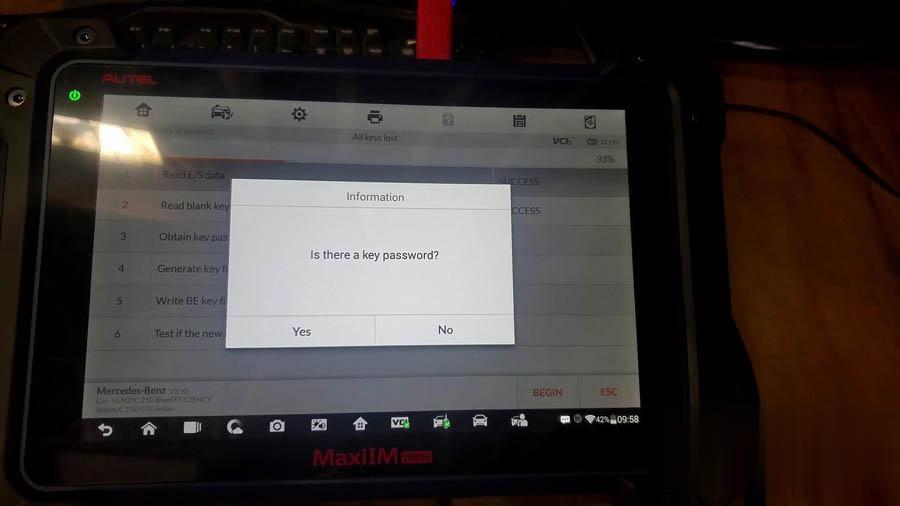
autel-im608-w204-all-keys-lost-programming-15 (2)

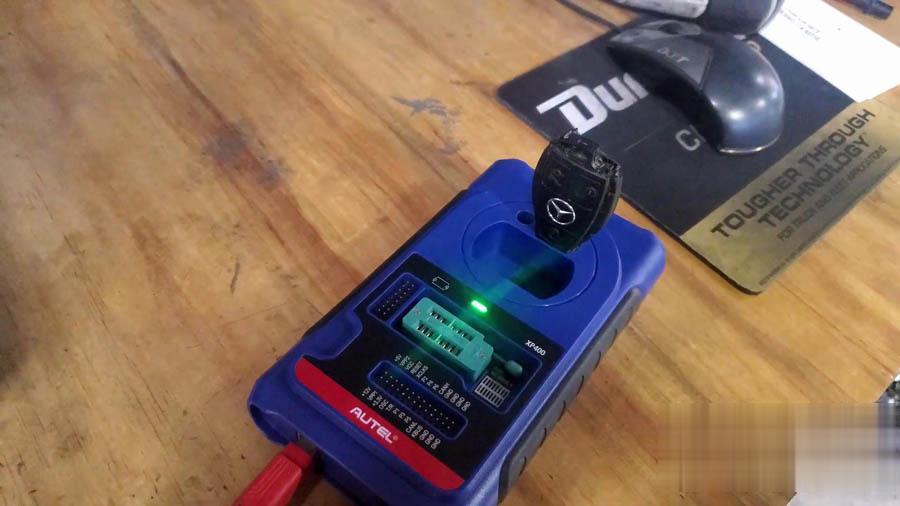
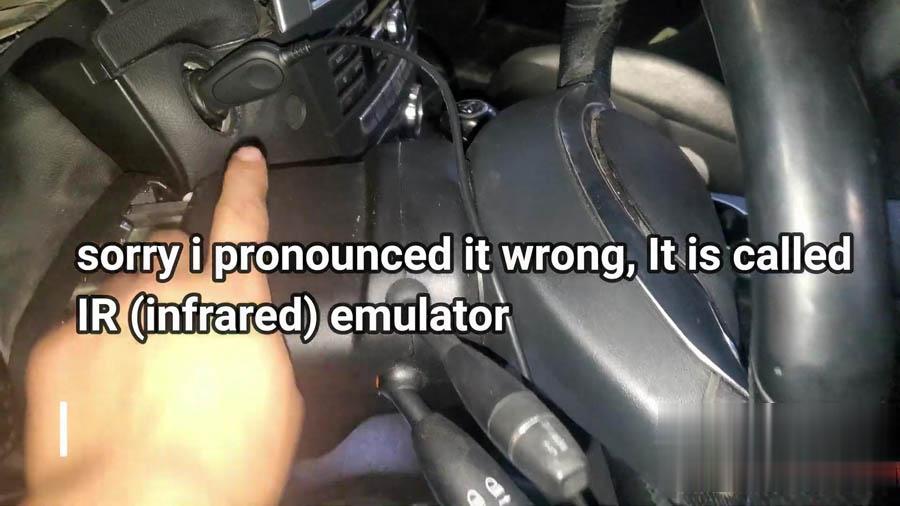
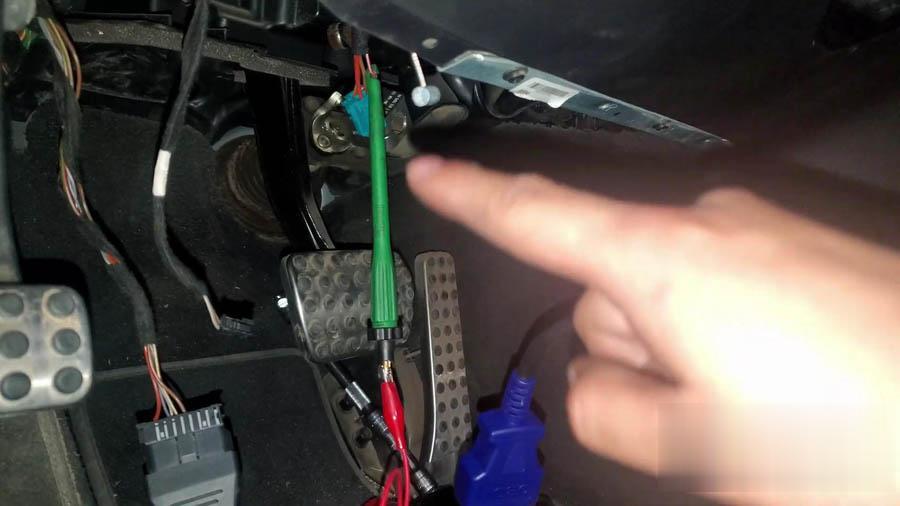
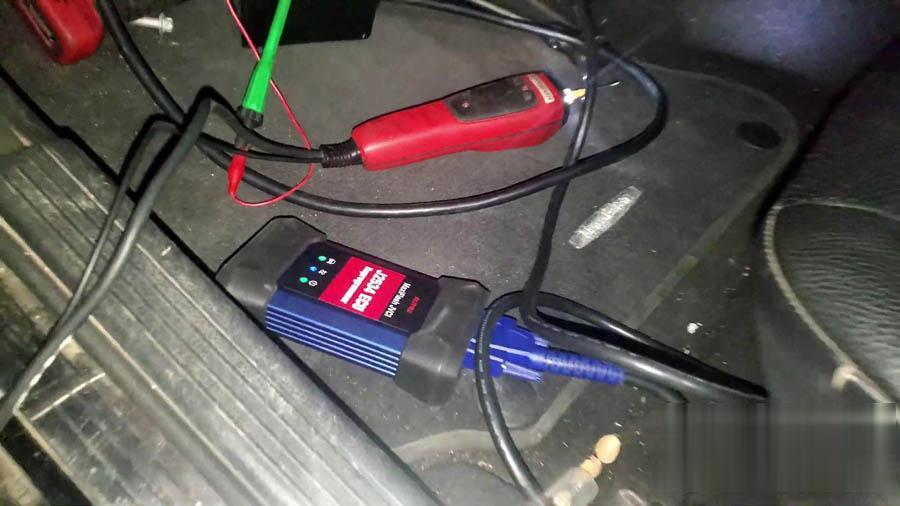
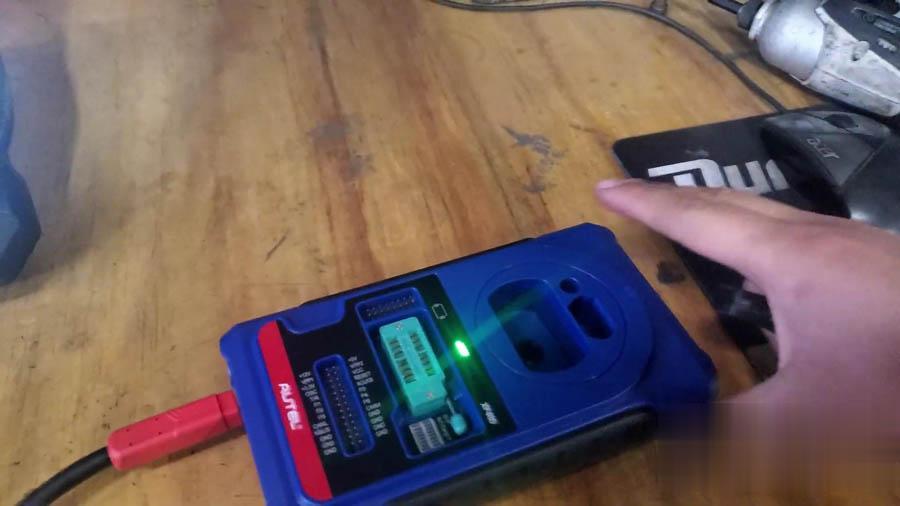
I’m getting the code, and I connected it like the picture below: the key into the slot of XP400, the IR emulator is inserted, jump the cable from the electronic steering module.
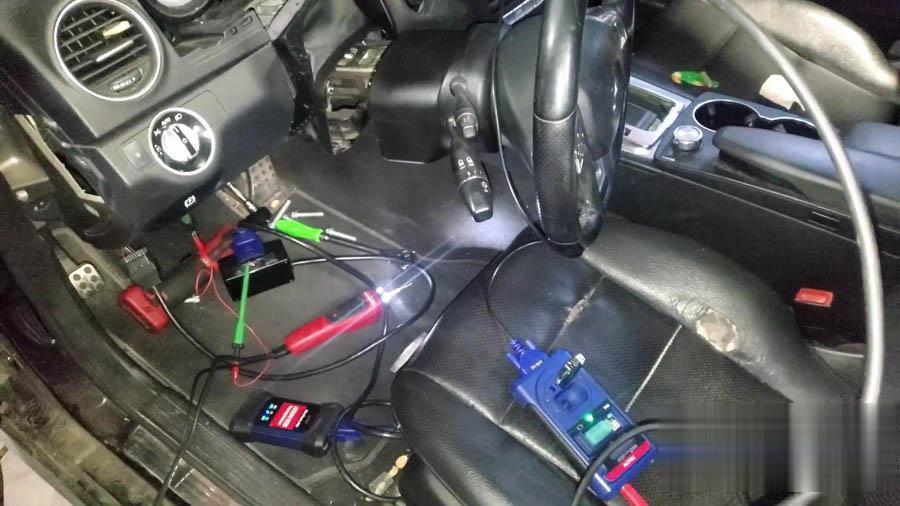
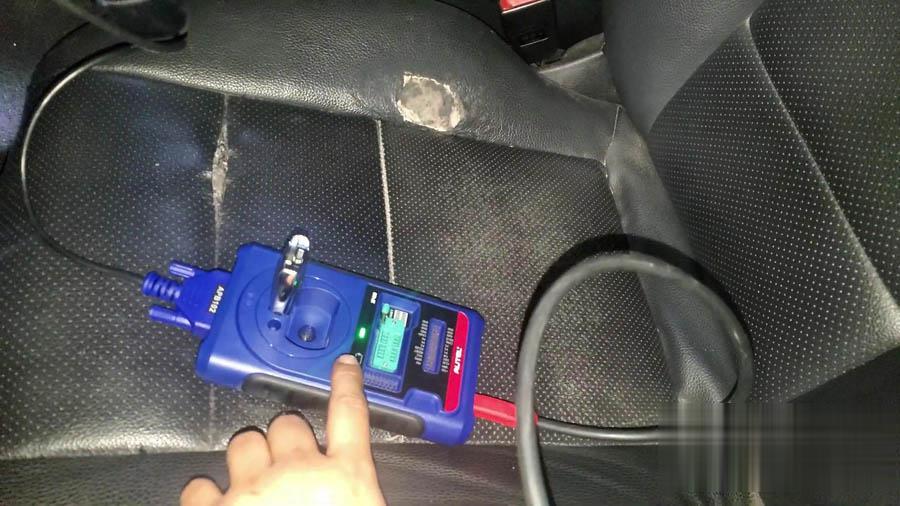
autel-im608-w204-all-keys-lost-programming-16 (2)

autel-im608-w204-all-keys-lost-programming-17 (2)

autel-im608-w204-all-keys-lost-programming-18 (2)

autel-im608-w204-all-keys-lost-programming-19 (2)

autel-im608-w204-all-keys-lost-programming-20 (2)

Step 3. Next is to get password:

It will takes 20 – 420 mins (it takes longer for part vehicles) to collect data and calculate password. Please ensure that the device (IM608) and vehicle battery are stable and sufficient.

One it successfully in computing the password, you will receive a message.

FYI: the password is free if you have a valid subscription on Autel IM608, and this tool comes with 1yr free updates and subscription.
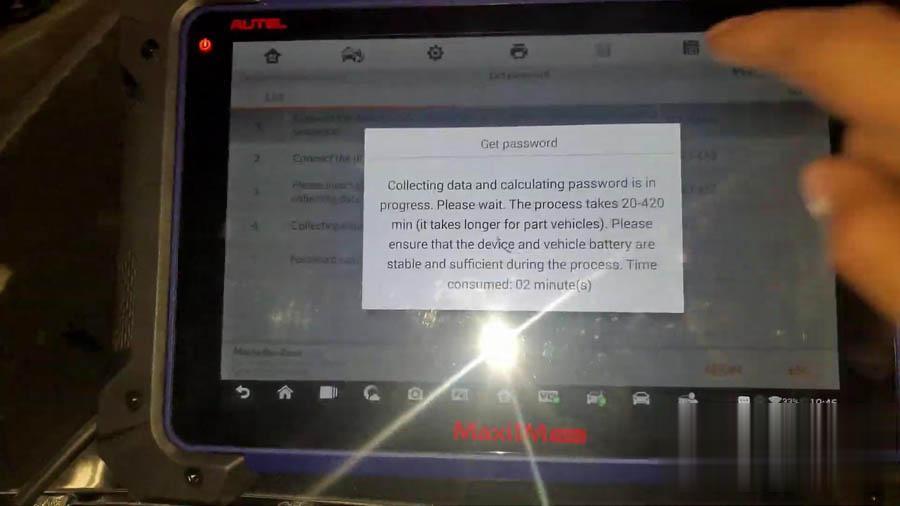
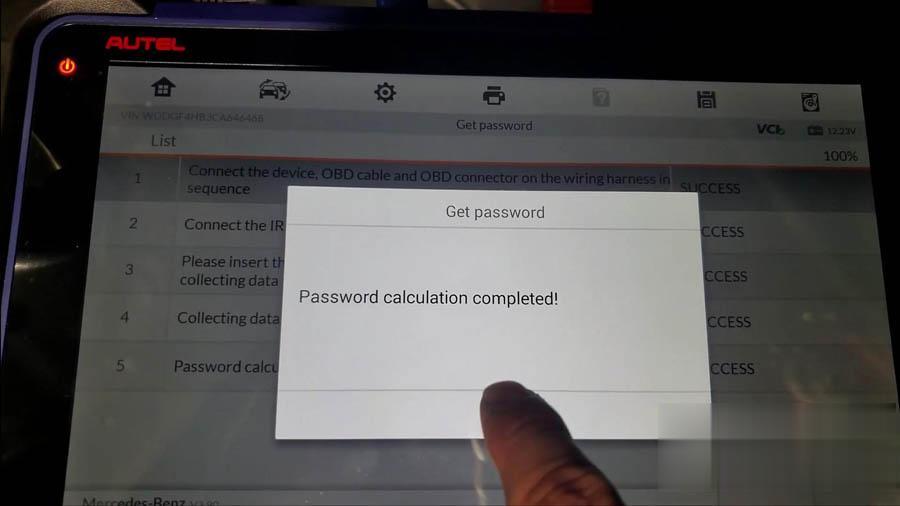
autel-im608-w204-all-keys-lost-programming-21 (2)

autel-im608-w204-all-keys-lost-programming-22 (2)

Step 4. Write BE key file

Please insert the blank key into the IR keyhole on the programmer (XP400), and press OK to complete.
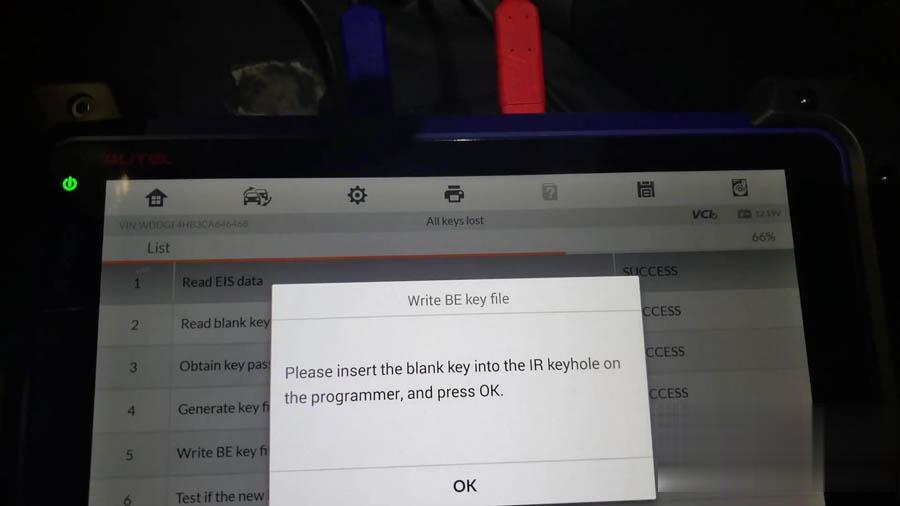
autel-im608-w204-all-keys-lost-programming-23 (2)

I am using the IR emulator to read the data from the electronic module switch and calculate the password via internet.
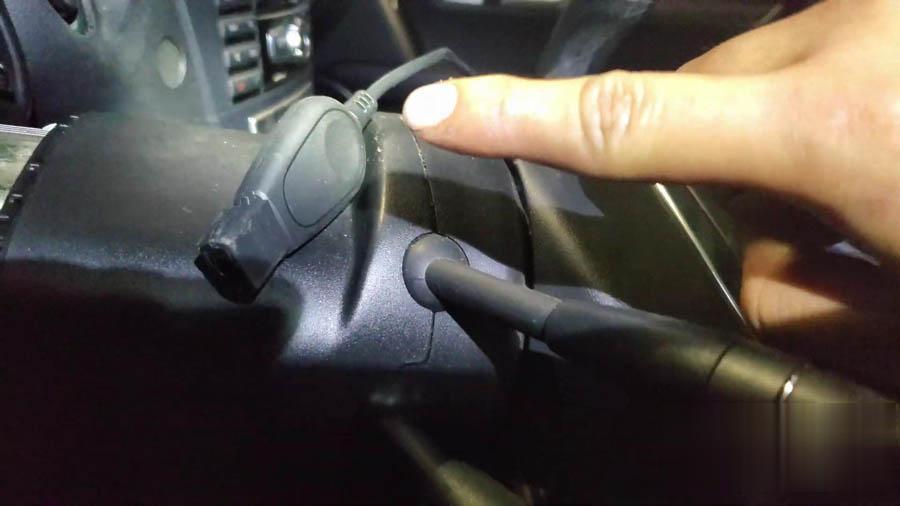
autel-im608-w204-all-keys-lost-programming-24 (2)

Step 5. All keys lost procedure completed.

All keys lost completed, I will press OK to check if the new key can be used normally.

I will do as written on the screen.
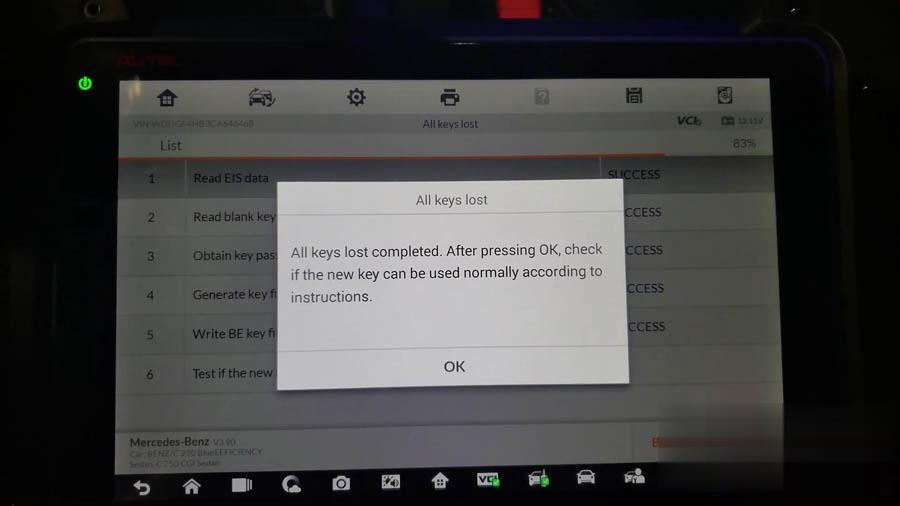
autel-im608-w204-all-keys-lost-programming-25 (2)

autel-im608-w204-all-keys-lost-programming-26 (2)

Step 6. Check if the new key can start the car, yeah, it can work.
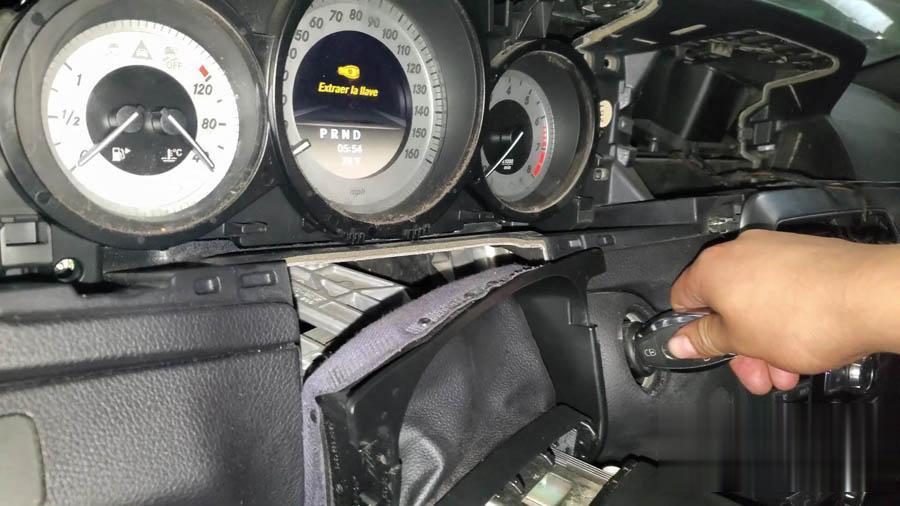
autel-im608-w204-all-keys-lost-programming-27 (2)

That’s wonderful with Autel IM608 and Xhorse BE key.

2020年11月18日星期三

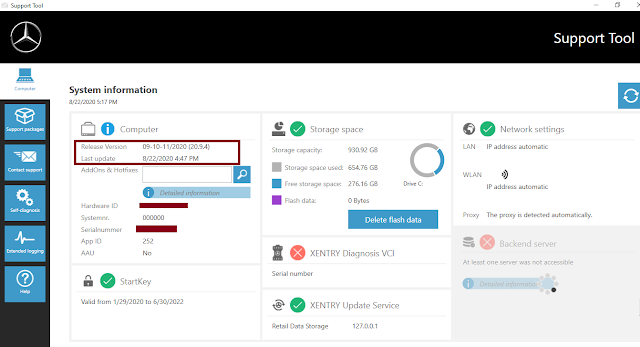
Free download XENTRY Diagnostics OpenShell 09 2020 XDOS_20.9.4


XENTRY Diagnostics OpenShell – PassThru (OpenShell 09/2020 Final – XDOS 20.9.4 ) – MEGA – Torrent.

XENTRY Diagnostics OpenShell 09/2020 (20.9.4) – final version –

XENTRY Diagnostics PassThru 09/2020 (20.9.3) – final version –

XDOS_2020.06_(20.6.4)_direct_link

XDOS 2020.09 (20.9.4) direct_link – Final Version

XDOS OpenShell 2020-09  ( 20.9.4 )

https://mega.nz/file/hmoHXKoS#HYXsIOV4alSoZ7onsasz1GYWH-TMfgpeonyNwgVn1TE

XDOS 2020-09 Win7 Fixed Solution

https://mega.nz/file/tmYhEKhL#ZuvICMC0sW50KHcjdQYw7vAGr0dfitdpgf9e0KoEJyU

Background_XDPad_2020-09.rar

XDOS_09.2020_Missing_Pics_Fixed_x64.rar

Xentry Passthru 06.2020 [20.9.3] – Torrent.rar

Using sdconnect c4 plus clone to access to Mercedes car model SL300-24 Dec 1990.

Trying to interrogate MB WDB1290612Fxxxxxx

Every time I try to get diagnostics this happens “Switch ignition on”

Free-download-XENTRY-Diagnostics-OpenShell-09-2020-XDOS_20.9.4-1

No 1 black masses should earth?  no 8 yellow LS Can_H no 16 12V B+

Is this correct should there be any other cables connected instead of these?

Free-download-XENTRY-Diagnostics-OpenShell-09-2020-XDOS_20.9.4-2

It only has 16 individual pins see photo above. There isn’t one too old.

Obd2tool engineer replied:

Please change a new MB 38pin cable to connect the DLC on the car.

Free-download-XENTRY-Diagnostics-OpenShell-09-2020-XDOS_20.9.4-3

Another case:

I have a Chinese clone SD connect c4 from YANHUA factory, self test without any errors, all the firmware updates can be applied without any troubles at all, batteries fully charged, tried several OBD cables BUT i still get the “turn ignition on” and furthermore it cannot recognize the VIN of the connected car.

Free-download-XENTRY-Diagnostics-OpenShell-09-2020-XDOS_20.9.4-4

Solution by @JarsaR:

It is easy to test cable with other one.

i just had Yanhua mux which has been in use for years, selftest was ok, Software was ok. But did not connect to car. Mux has the round connector pcb, which pins are soldered to pcb pads, they were loosen in heavy use. Some of cheaper clones has pins go thru the other pcb also, and soldered to pcb, i think Yanhua is more sensitive with her pads. I resoldered all pads and Mux is now perfect.

Confirmed: this solution is working perfect. Change obd socket, my sd connect worked %100..

How to fix V03/2020 MB SD C4 XENTRY “The data are faulty” problem


How to fix V03/2020 MB SD C4 Sofware “The data are faulty” problem in XENTRY

Solution:

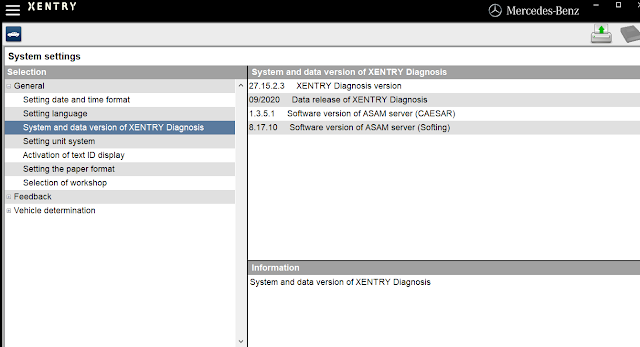
1.The error may be caused by clicking the upgrade icon to update the software.

xentry-1 (2)

Please follow the instructions to fix it.
Step 1: Free download a file from the following link.
Xentrypatch202003: https://share.weiyun.com/5uIxwgI
Password:eswr9a
Size: 2GB
Security: No risk!

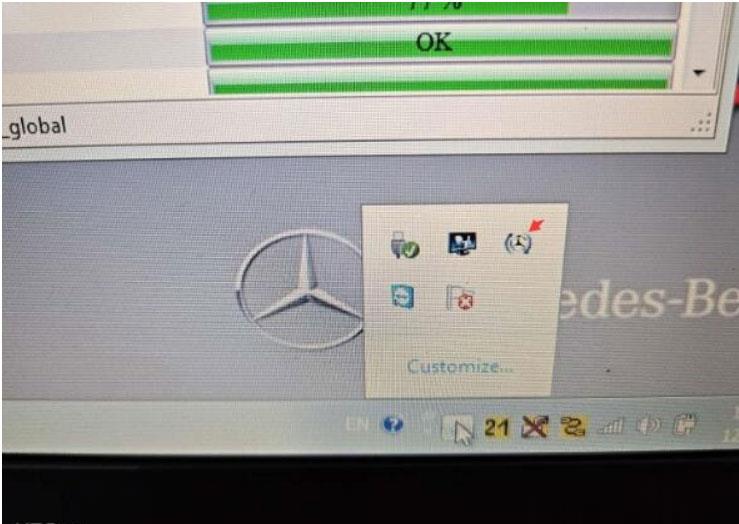
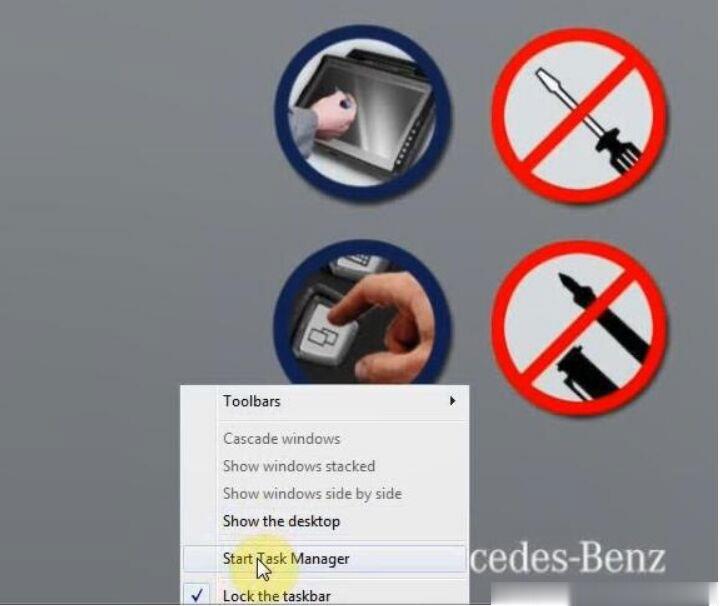
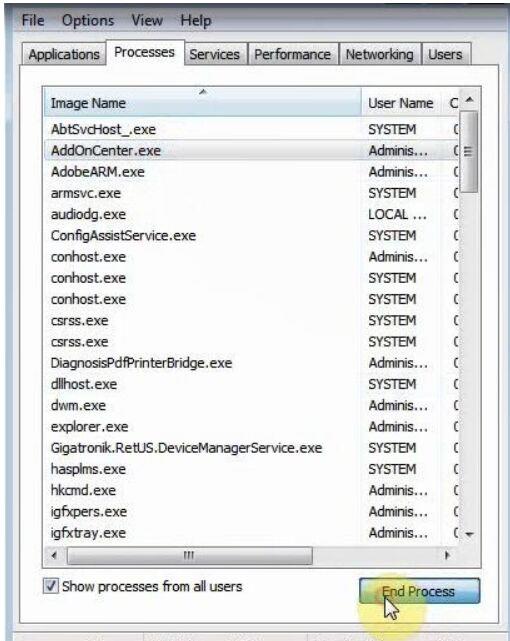
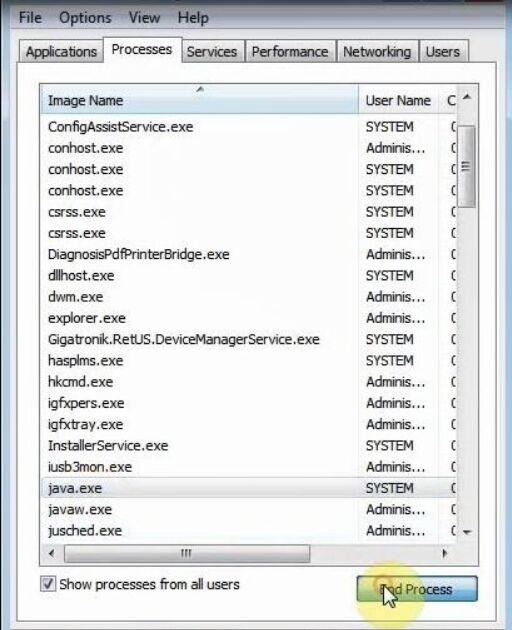
Step 2: Star Task Manager to end these processes such as “AddOnCenter.exe”, “Java.exe”, “Javaw.exe”

xentry-2 (2)
xentry-3 (2)
xentry-4 (2)
xentry-5 (2)

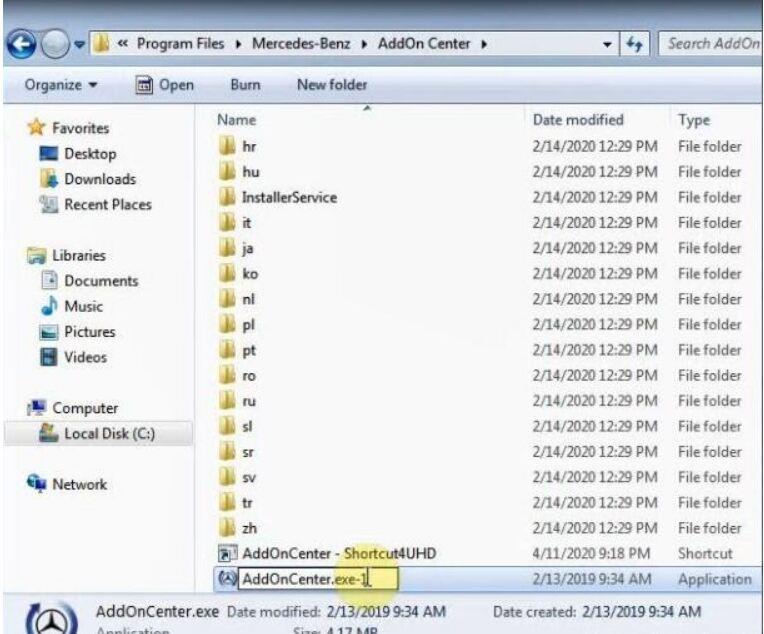
Step 3:Open Local Disk (C:) to find “AddOnCenter.exe”
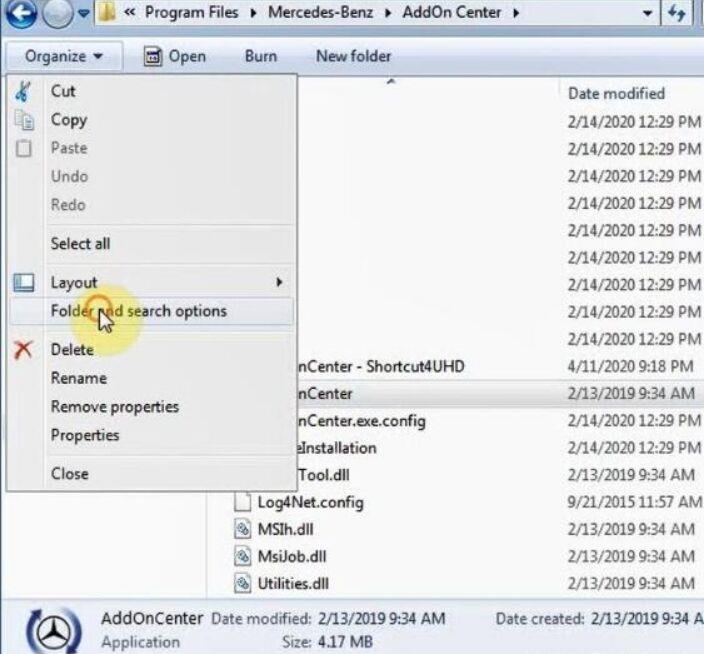
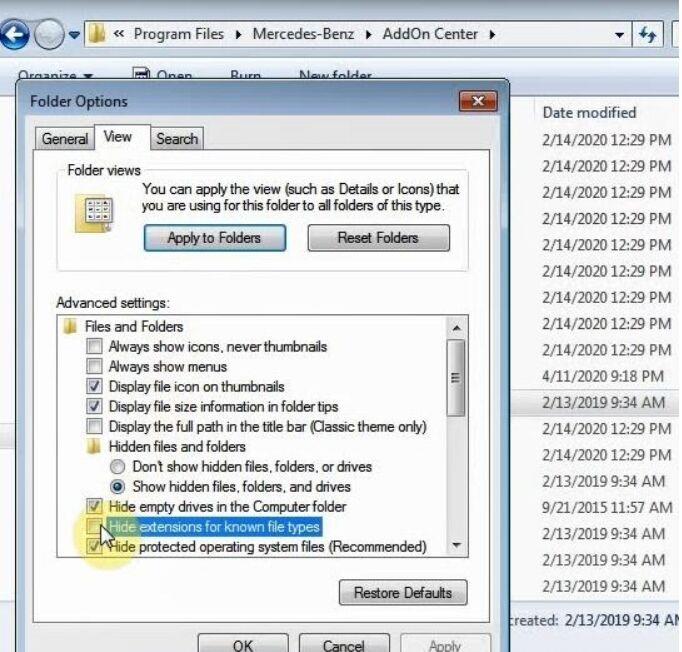
If you can only see “AddOnCenter.exe” as below, please open “Organize”->select “Folder and search options”->select “View”->remove the tick of “Hide extensions for known file types” and click “Apply”

xentry-6 (2)
xentry-7 (2)
xentry-8 (2)

Then “AddOnCenter.exe” appears on the screen
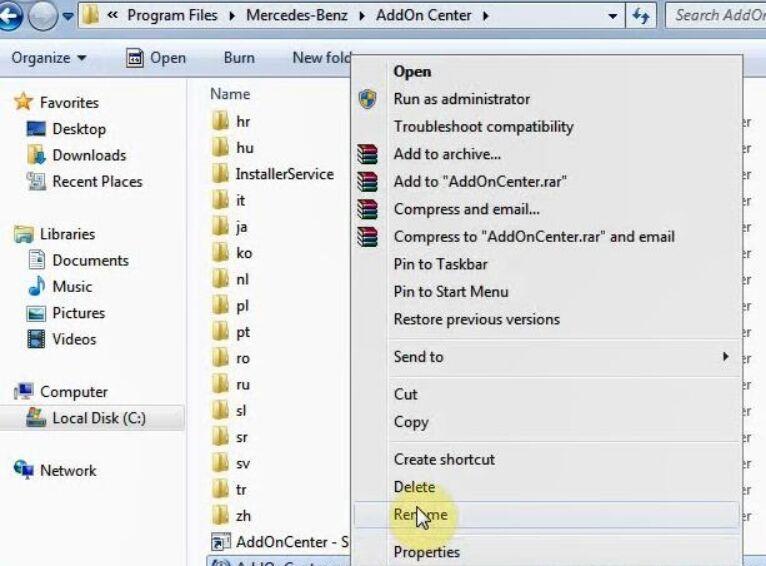
Step 4: Change the file name “AddOnCenter.exe” to “AddOnCenter.ex-1”, then it will not update automatically.
xentry-9 (2)
xentry-10 (2)

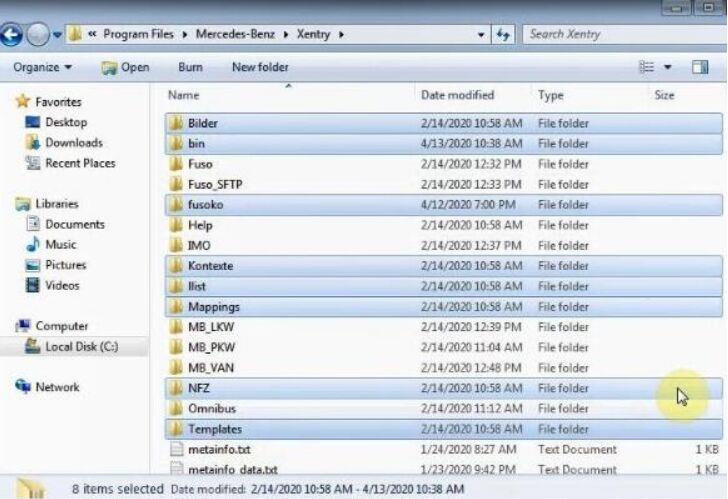
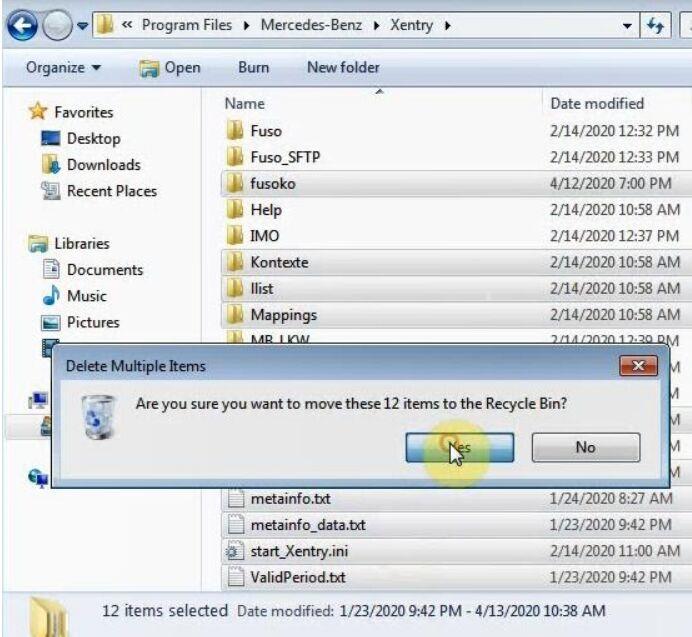
Step 5: To Delete these 12 items from Local Disk(C:)

xentry-11 (2)
xentry-12 (2)
xentry-13 (2)

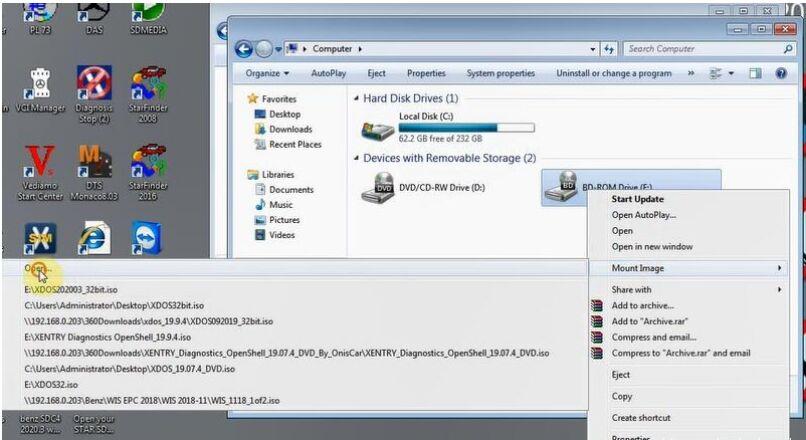
Step 6: Open BD-ROM Drive(F:)->click “Mount Image”->open

xentry-14 (2)

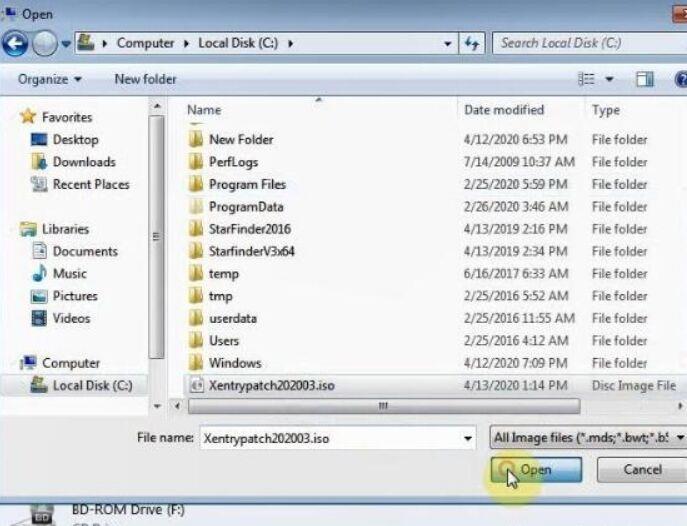
Step 7: Select “Xentrypatch202003.iso” installed in Local Disk (C:) and lick “Open”

xentry-15 (2)
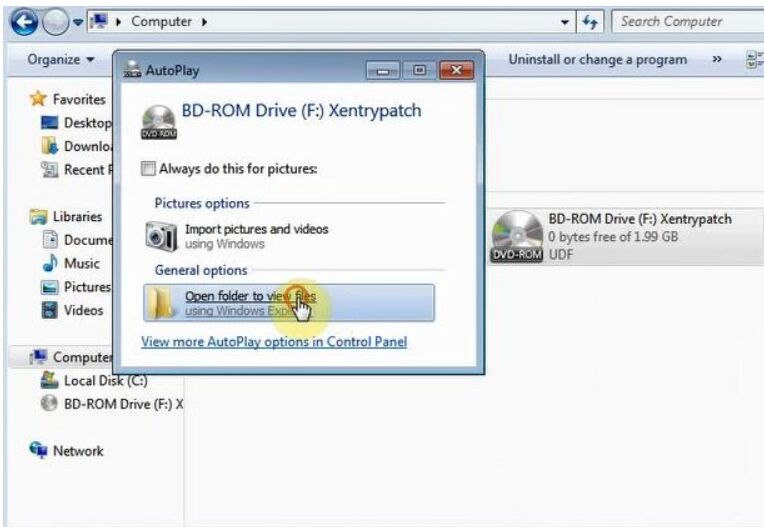
Step 8: Click “Open folder to view files”

xentry-16 (2)

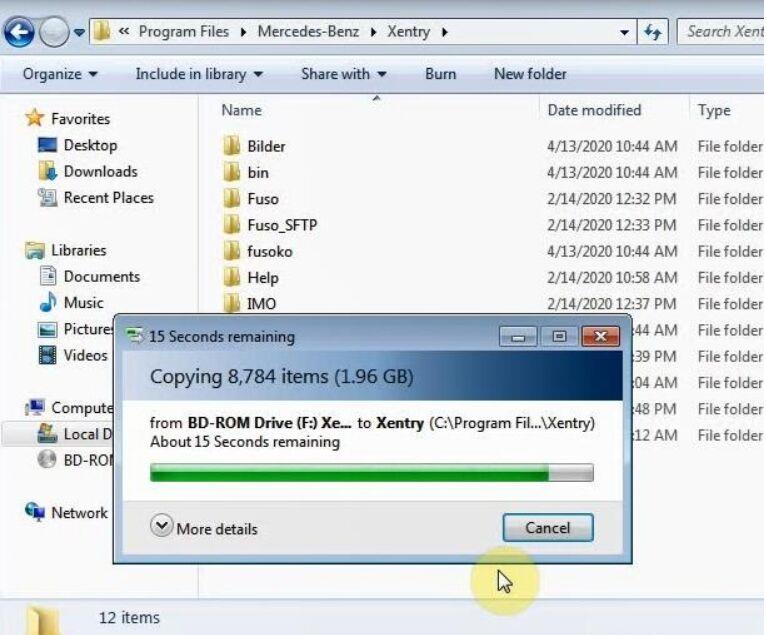
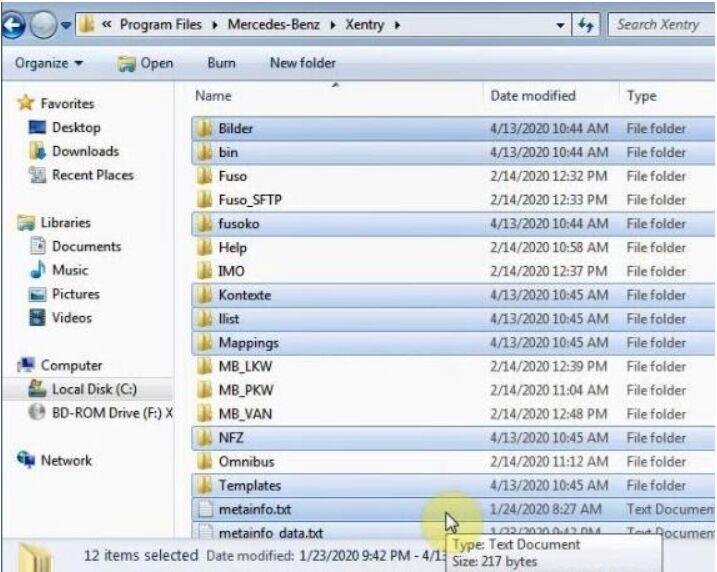
Step 9: Copy all the items in the Xentryparch folder to Local Disk (C:) XENTRY folder

xentry-17 (2)
xentry-18 (2)
xentry-19 (2)

Step 10: Restart the computer

2020年10月6日星期二

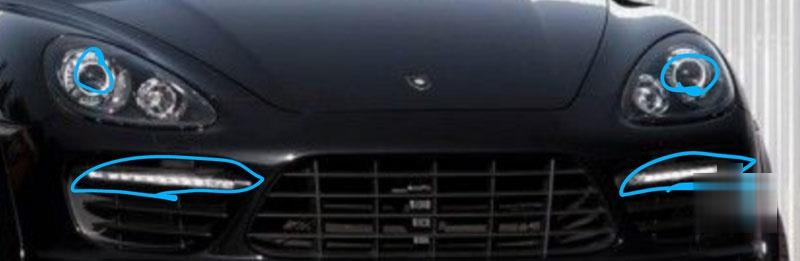
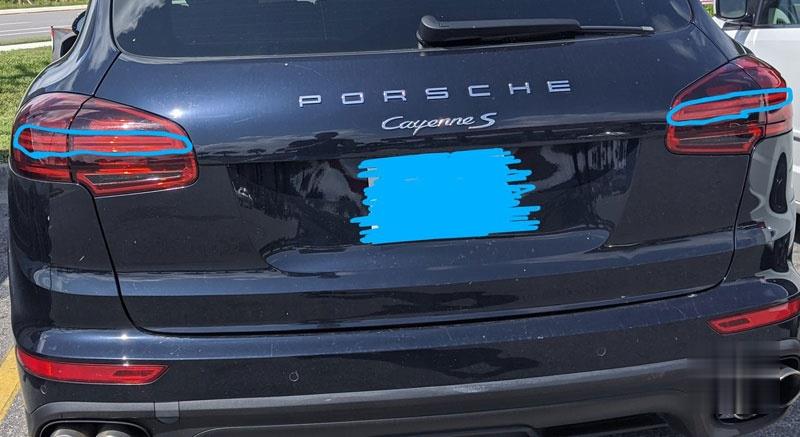
Solve Porsche 958 Cayenne Exterior Lighting Issue with PIWIS III

 Car model: Porsche 958 Cayenne

Issue:

Standing outside vehicle with car off I press lock on the fob and everything happens as I expect: lights flash and turn off… Chirp chirp… Car locks… AntiTheft light starts blinking…
Same results when locking manually.
But exactly 20 seconds later something unexpected occurs. Exterior lights start coming on!

Solve-Porsche-958-Cayenne-Exterior-Lighting-Issue-with-PIWIS-III-1 (2)

Then 10 seconds later more lights come on!

Solve-Porsche-958-Cayenne-Exterior-Lighting-Issue-with-PIWIS-III-2 (2)

And all these lights stay on until the battery dies.
The battery was completely dead upon purchase and they swapped it out before I left the lot.

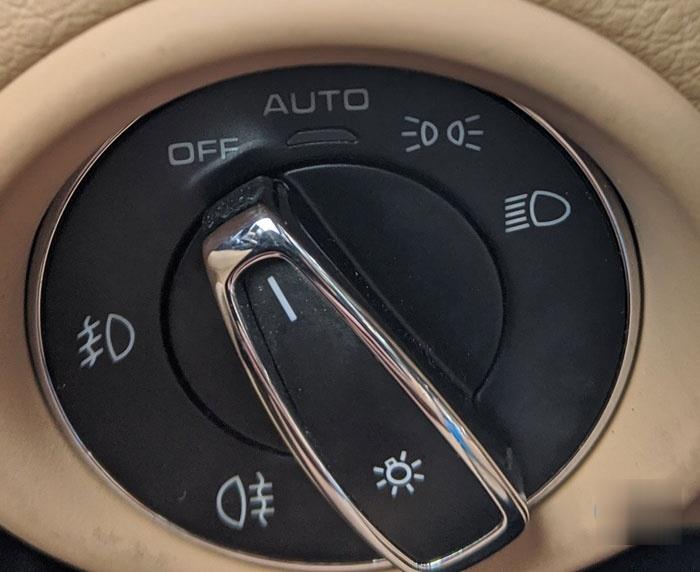
Issue reproduces for various positions of light selector switch.

Solve-Porsche-958-Cayenne-Exterior-Lighting-Issue-with-PIWIS-III-3 (2)

If I walk away from the car with the car unlocked then eventually (couple of minutes?) the front lights come on but I think not the rear lights.
??????

Solution:

I went ahead and ordered a pre-owned ballast for $26 hoping that might be it. Just ordered a Porsche PIWIS tester as well.
Good call on a thorough visual inspection I’ll do that.

Let’s hone in on what stood out most from PIWIS diagnostics:
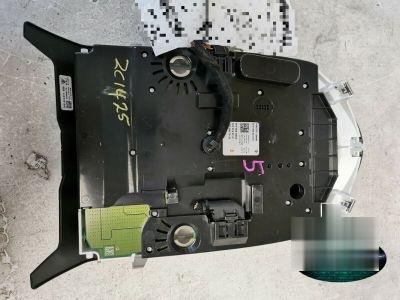
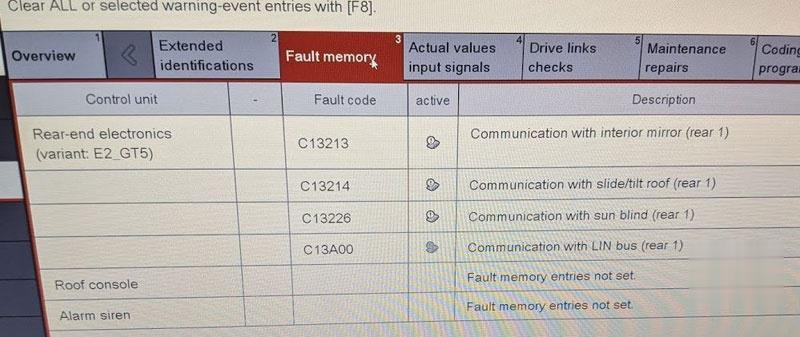
1. The roof console is a sub-section of the rear electronics module, but the roof console part number could not be read.
Possibilities I thought of: Wires are missing/incorrect; One or more wires are grounded; Rear BCM was replaced but as wrong revision or was coded incorrectly; Rear BCM was replaced but must be mated to the car via dealer online coding; Roof console is sort-of seen but needs to be taught
Evaluation: Unlikely that rear BCM would fail or be removed-even by a savvy thief-therefore unlikely that the BCM was replaced. Some features of rear BCM I could control via PIWIS so it is probably coded correctly. I verified all wires exist except that alarm horn wire but no evidence in harness of it being cut. Let’s focus on the idea that roof console cannot communicate and see what wires it shares with BCM.

2. Rear-end electronics board has one error: Communication with LIN bus.
Possibilities I thought of: Wire is missing; wire is damaged; wire is grounded; Board is bad; Board is coded incorrectly
Possibilities suggested by PIWIS Fault Finding: “Short circuit to B+/ground or open circuit in the line.” , “”Cancellation of communication due to bit error.”
Evaluation: I opened up the module and visually inspected the board for burn marks or melted components. I visually inspected the wires as well after popping the trays of wires out of the connectors. They have little tiny numbers printed on the connectors, the trays, and the sockets that need to be lined up.
I only have a couple hours a day where it was possible to work on car so I went ahead and ordered a replacement roof console for $70. I can always resell it if I don’t need it. It included the connectors chopped from the harness and those connectors came up clutch later.

Solve-Porsche-958-Cayenne-Exterior-Lighting-Issue-with-PIWIS-III-4 (2)

The console arrived yesterday so I connected to Porsche Piwis and got the same errors. I was unable to teach this roof console as well. This result further points to the wiring being the issue.

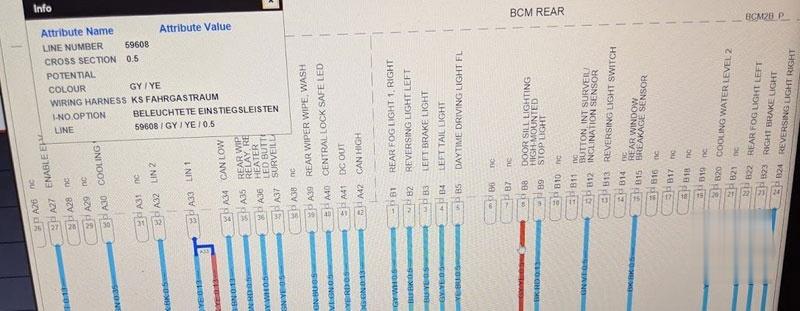
The wiring diagrams for PIWIS have an added advantage over those in the workshop manual in that you can click one terminal end and it will zip you over to the other end. I read all wires for the rear electronics module for relevance:

Solve-Porsche-958-Cayenne-Exterior-Lighting-Issue-with-PIWIS-III-5 (2)

Terminal 33 on connector A is titled “LIN 1”, which PIWIS told us cannot communicate. Scrolling down, I see that black/yellow wire has a few things spliced together.

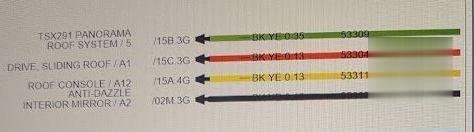
Solve-Porsche-958-Cayenne-Exterior-Lighting-Issue-with-PIWIS-III-6 (2)

We can see that the splices on that LIN1 wire from rear BCM are:
-Pin 5 on the panoramic roof connector (visible in roof console cavity)
-Pin 1 on connector A of the Sliding Roof (no idea where this is)
-Pin 12 of connector A of the Roof console
-Pin 2 of connector A for the interior mirror (rear view mirror).

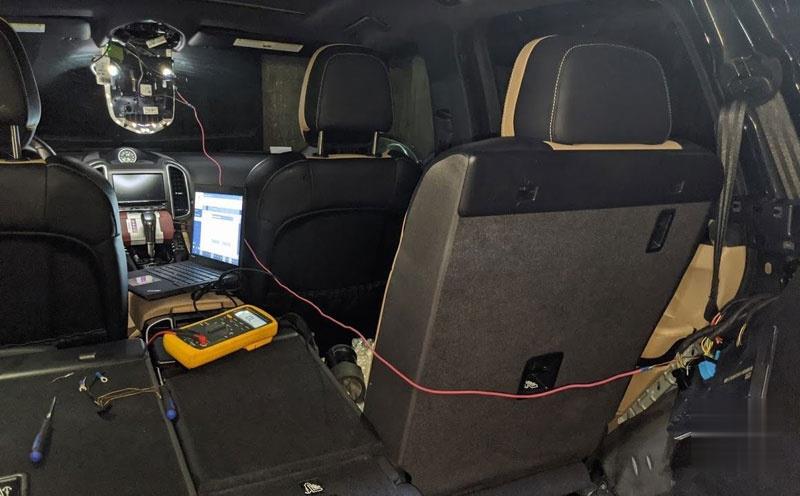
I set my multimeter to resistance to “tone out” the wires I know the location of and see if they are connected. I used a wire insulation piercing probe on LIN1 at the BCM connector black/yellow wire (if you don’t have one you should get one). Sure enough they are all connected, ringing and registering ~1 Ohm. I see what the resistance to ground is (expected to be infinite, aka open circuit) but the meter rings and says 60 Ohms! Might be onto something here! I see in wiring diagram that BCM has a LIN 2… I try to tone that with ground and get infinite resistance.

Next I wanted to re-run the wires directly. I didn’t want to cut any factory wires if I didn’t have to because there isn’t a whole lot of slack and I don’t have many of my proper tools on the road with me. I just had a $5 harbor freight cheap-o crimper set,
Three of the four wires I want to replace are the same type of pin; coincidentally and conveniently I have many spare of these already crimped to 4 inch strands of wire thanks to the connectors from used ebay item. I slide out the factory pins in question and run my own wires. The small pins could be removed fairly easily with a small flathead or pick tool.

Solve-Porsche-958-Cayenne-Exterior-Lighting-Issue-with-PIWIS-III-7 (2)

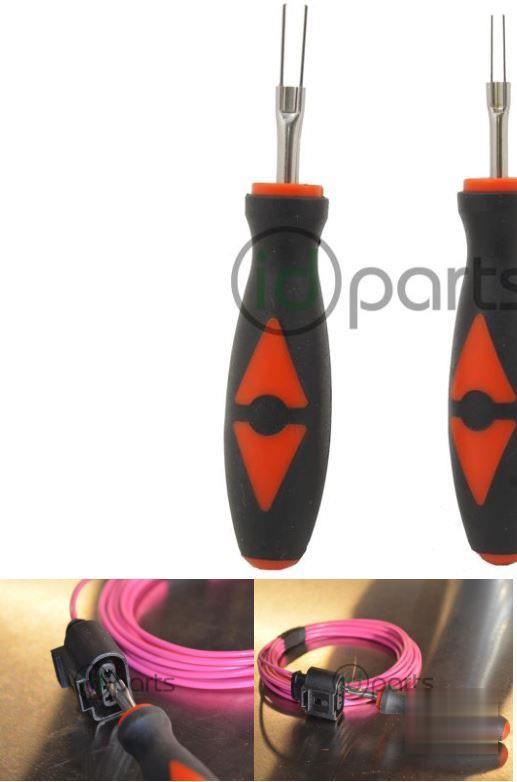
For the bigger wire with bigger pin in the panoramic roof connector I used my VW pin removal tool that I bought for changing the fuel flange plug on the 955 CTT.
Solve-Porsche-958-Cayenne-Exterior-Lighting-Issue-with-PIWIS-III-8 (2)

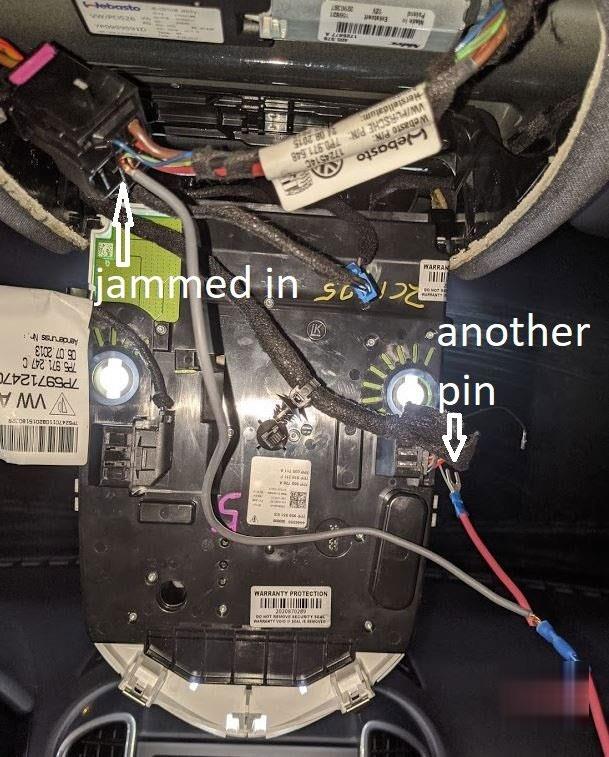
That way I could have connector connected but not that wire with the mystery ground on it. On the other side of connector I just shoved a spliced end of my ghetto wiring harness lol.

Solve-Porsche-958-Cayenne-Exterior-Lighting-Issue-with-PIWIS-III-9 (2)

Solve-Porsche-958-Cayenne-Exterior-Lighting-Issue-with-PIWIS-III-10 (2)

I double checked my work… popped in the key… and the dome light sprang to life! Great sign! I connected PIWIS and could read the roof console part number.

Solve-Porsche-958-Cayenne-Exterior-Lighting-Issue-with-PIWIS-III-11 (2)

I had new errors but probably because I couldn’t find the 5th wire in the splice so sunroof still not working yet. Time to plan the route of my new wiring harness (obviously I’ll make it much prettier, safer, protected, and well-labeled.

Thanks again to those following along and contributing ideas.
The experience makes me want to find a few dirt cheap Porsche or VW wiring harnesses that have crimp pins of various sizes to aid in any future electrical troubleshooting adventures.

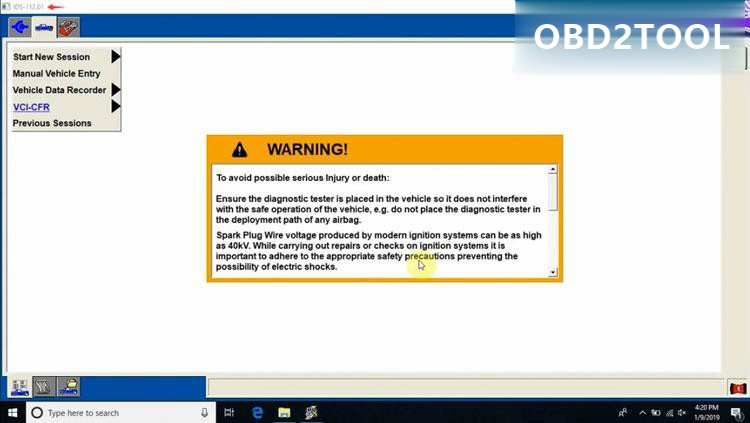
How to install Ford IDS V112/Mazda IDS V112 on native machine


VXDIAG VCX Nano for Ford/Mazda 2 in 1 Diagnostic and Programming Tool installation instruction

One device support both Ford and Mazda and it can support vehicle 2005- 2018 year.
Note: VXDIAG VCX NANO for Ford/Mazda not support F150, F250, F350, F450, F550, F650, F750 before 2010
Requirement on computer:
1.Computer has at least 4GB Memory
2.Computer need produced after 2000 year, too old computer can not run the software.
3.Operating system: Win7/Win8/Win10 (free to try yourself)

How to install Ford IDS V112/Mazda IDS V112 on native machine?
The diagnostic software must be installed first, and the device driver must be installed.

1.Free Download IDS V116 software fro VXDIAG Ford IDS V116
https://mega.nz/#F!fcoVnYZT!jpEjr4HHXU5Ifg8Hm0xERg Mazda IDS V116
https://mega.nz/#F!bMg1ECzT!BjEMSq1TUvdgn2aT2CKTEg Ford_Mazda IDS Patch (No need VMware)

https://mega.nz/#F!OV4RRC6B!seCWP6UCzOPWEDYlQxZ1iQ


2.Here is the installation steps:

Step 1: Install IDS setup:
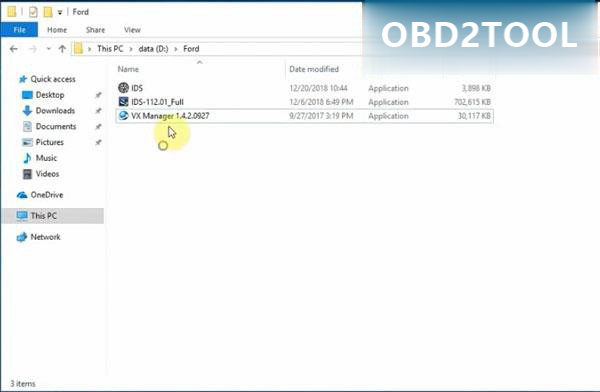
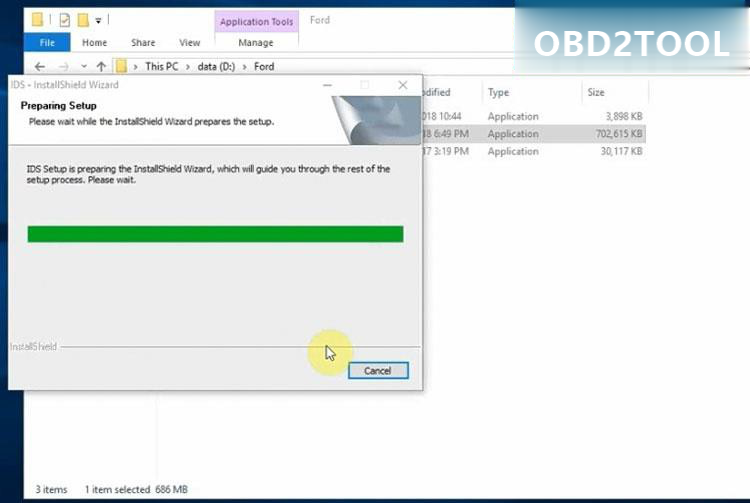
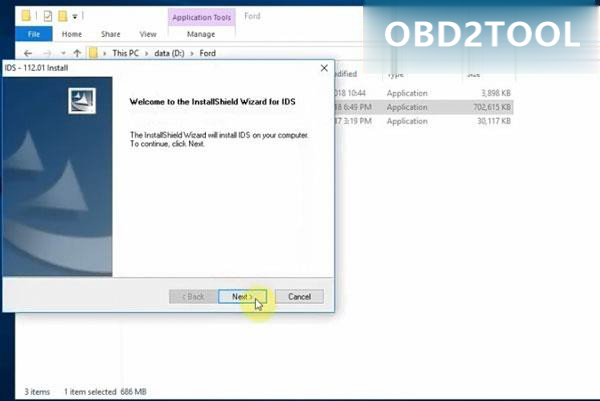
A.Install IDS-112.01_Full setup


B.Accept license agreement Select destination folder
Click on Instal

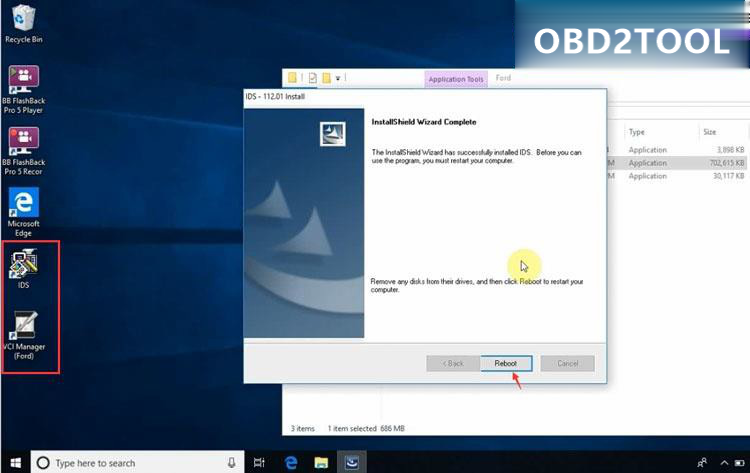
C.Install IDS 112.01 installshield wizard until completed

D:Restart computer after installing setup

Step 2: Install VX Manager

A:Open VX Manager

Accept license agreement Press Next

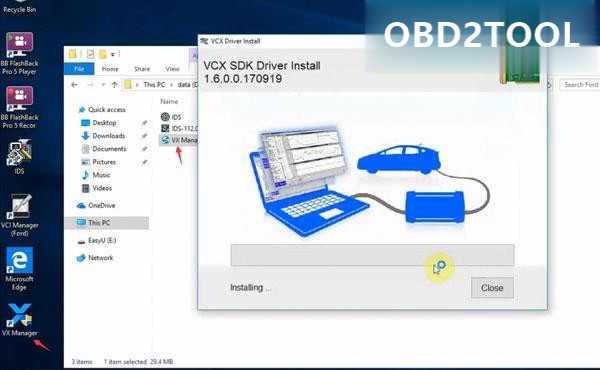
B:Installing VCX SDK Driver

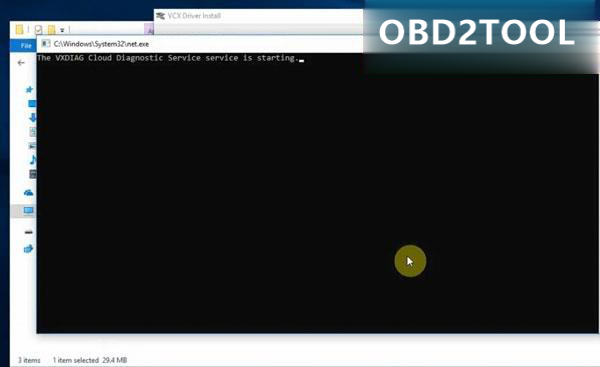
C:This will also start VXDIAG Cloud Diagnostic Service

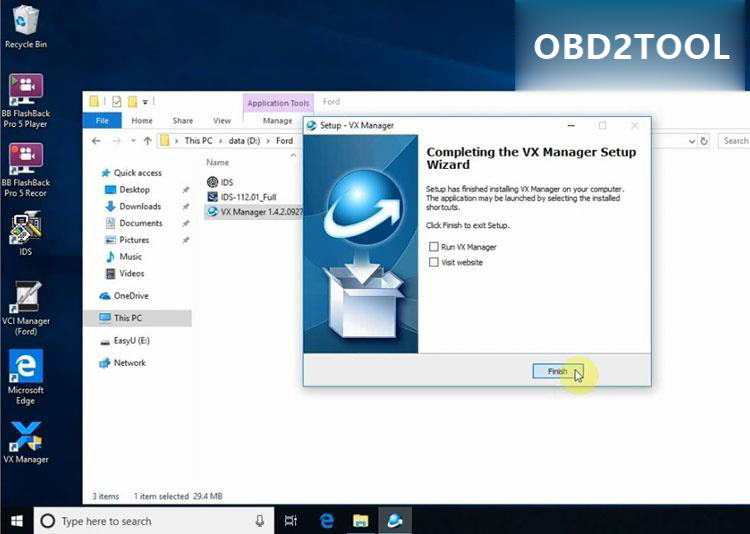
D:VX Manager installation completed

Connect the VXDIAG Ford interface with laptop

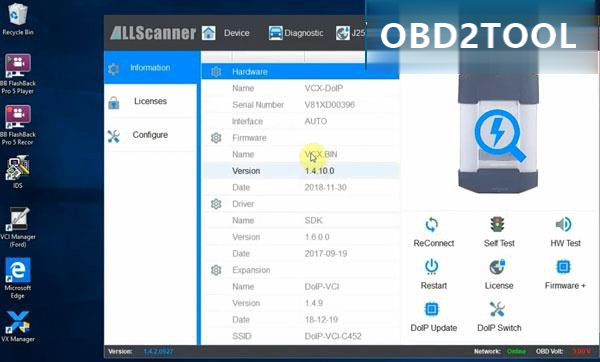
F:Open VX Manager to check connection status (If use VCX-DoIP interface, it will auto detect and connect to laptop)

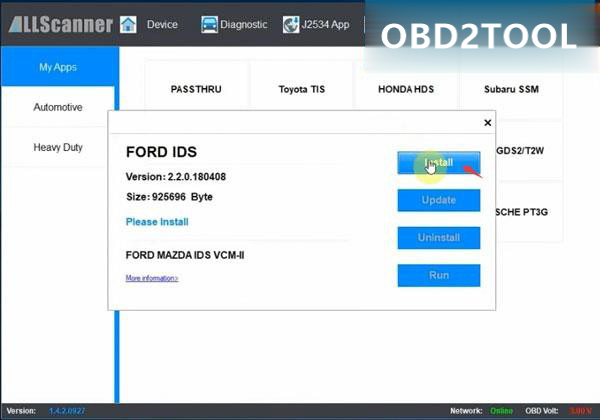
G:Select Diagnostic Software: Ford IDS


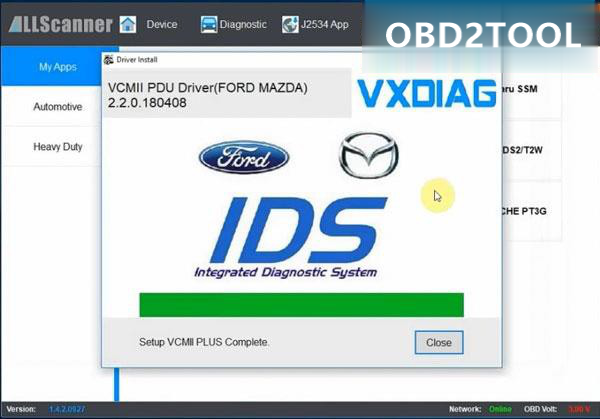
H:Install Ford IDS driver

Step 3: Install Patch & Run IDS

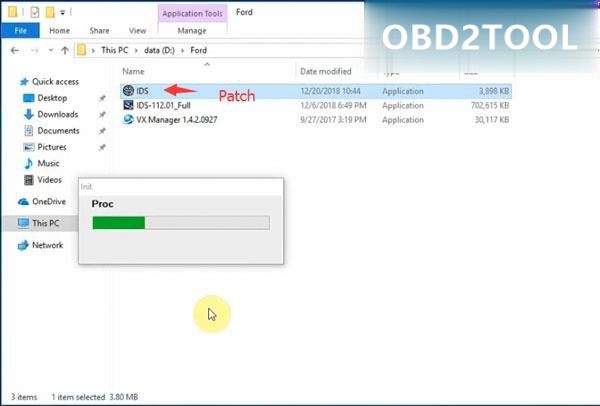
A:Open IDS patch

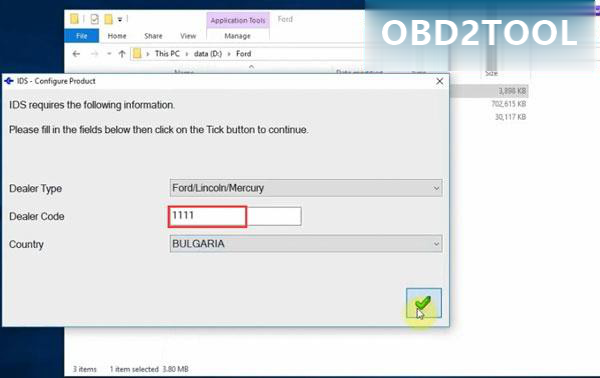
Ford IDS requires teh following information: dealer type

(Ford/Lincoln/Mercury),Dealer code (1111) and country Press tick icon to continue

Auto starts IDS software and diagnose vehicle.

Done.