2020年11月29日星期日

How to Solve VAS6154 Interface Cannot Appear on ODIS 5.1.6 Software

 Customer problem: I have received the VAS 6154 device. I install ODIS 5.1.6 on Win7/ 64 bit, but I have a problem connecting to the vehicle (all 3 devices work identically). The first time I connect to a vehicle, it recognizes the vas6154 interface. If I disconnect and reconnect the interface then the interface is no longer visible in ODIS. This appears on USB or WIFI and appears every time. After that I have to shut down ODIS and restart. I’m asking for help!!!vas6154 original vas 6154a

Obd2tool.com engineer solution:

The VCX Manager and ODIS 5.1.6 software cannot be opened at the same time. If you restart the ODIS software and can connect well, it indicates that it can use normally.
VAS6154-ODIS-5.2.6-ODS9011E-&-Checksum-Error-Solution-1 (2)
VAS6154-ODIS-5.2.6-ODS9011E-&-Checksum-Error-Solution-2 (2)

AUTEL IM608 BENZ W204 ALL KEYS LOST PROGRAMMING SUCCESSFULLY

 2009 Benz C class w204 all keys lost, I got the EIS file on bench from IR adaptor with FAST adaptor on VVDI MB, I wanted to read the EIS data to get password or key files while xhorse server is down for calculations, and I was supposed to wait some hours until it recover.

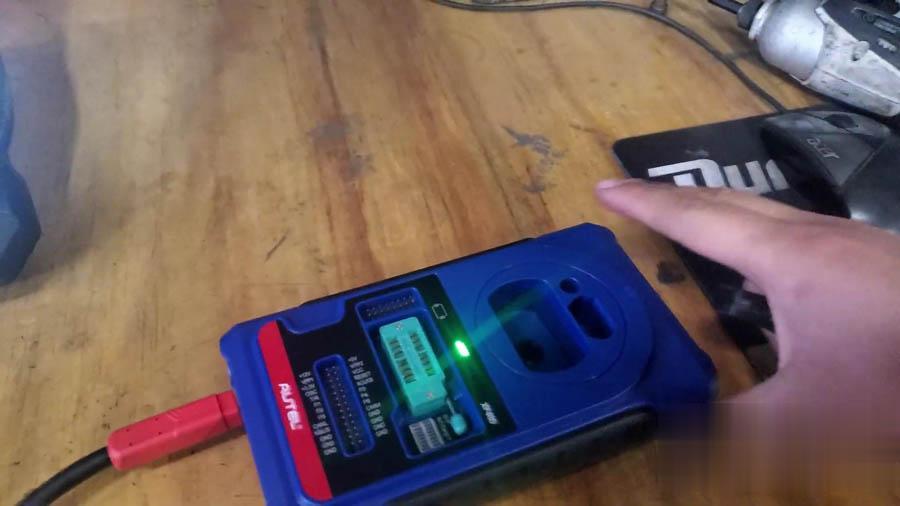
Because the time is too urgent, I managed to sort it by using Autel MaxiIM IM608, I put Autel onto car, read EIS, went to expert mode and selected generate key file from EIS data, and it generated my key files!

I purchased Autel IM608 at good price on uobdii, please make sure it comes with XP400.

autel-im608-w204-all-keys-lost-programming-01 (2)

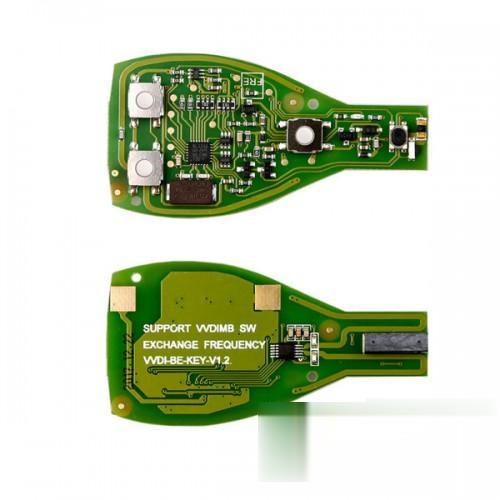
You can purchase Xhorse VVDI BE Key and one extra smart key shell with 3 button:

autel-im608-w204-all-keys-lost-programming-02 (2)

autel-im608-w204-all-keys-lost-programming-03 (2)

For 24.99usd here:

https://www.uobdii.com/wholesale/xhorse-vvdi-be-key-pro-improved-version-with-smart-key-shell-3-button.html

Okay, I’d like to write down the whole procedure of using Autel IM608 to program 2009 C class w204 when all keys lost:

Let’s put Autel IM608 onto W204 and to start, the following steps are also applicable to W172 W204 W207 all keys lost programming:

Step 1. Put Autel IM608 onto W204 to read car info.

On vehicle -> Vehicle information (Model type, Model chassis, EIS type, Model year)

autel-im608-w204-all-keys-lost-programming-04 (2)

autel-im608-w204-all-keys-lost-programming-05 (2)

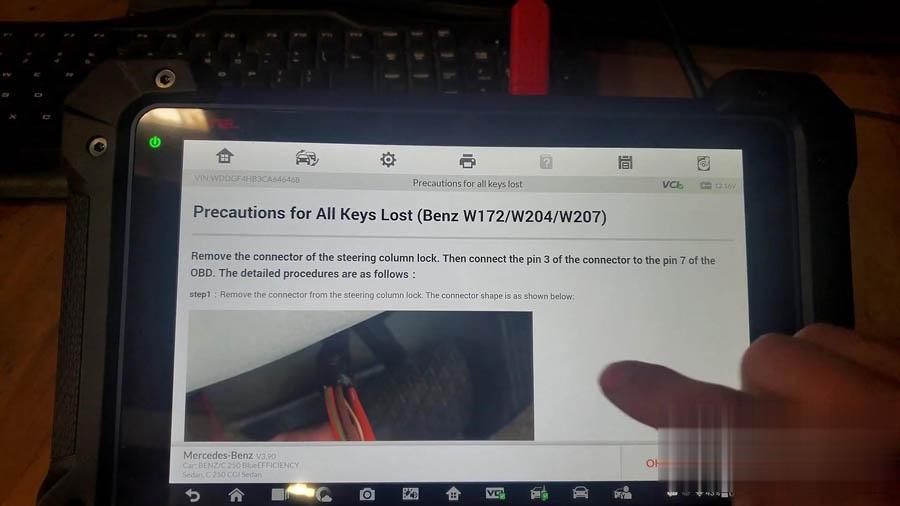
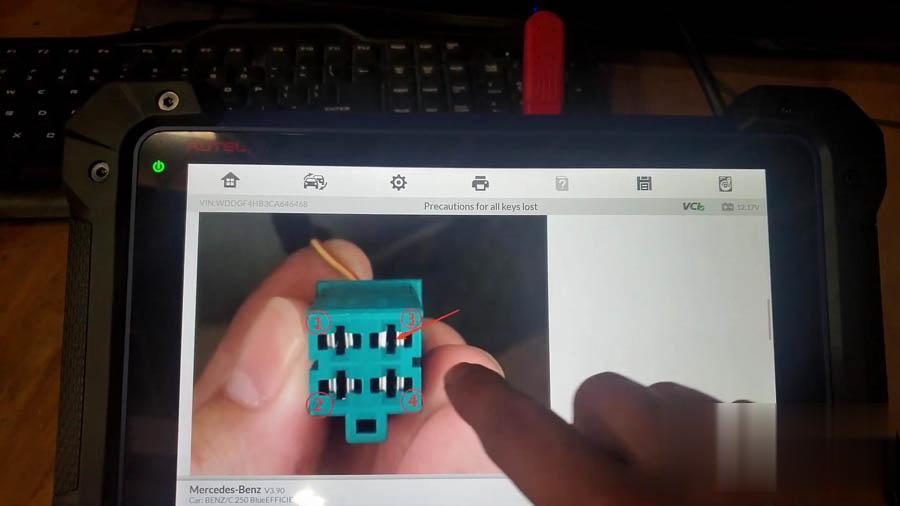
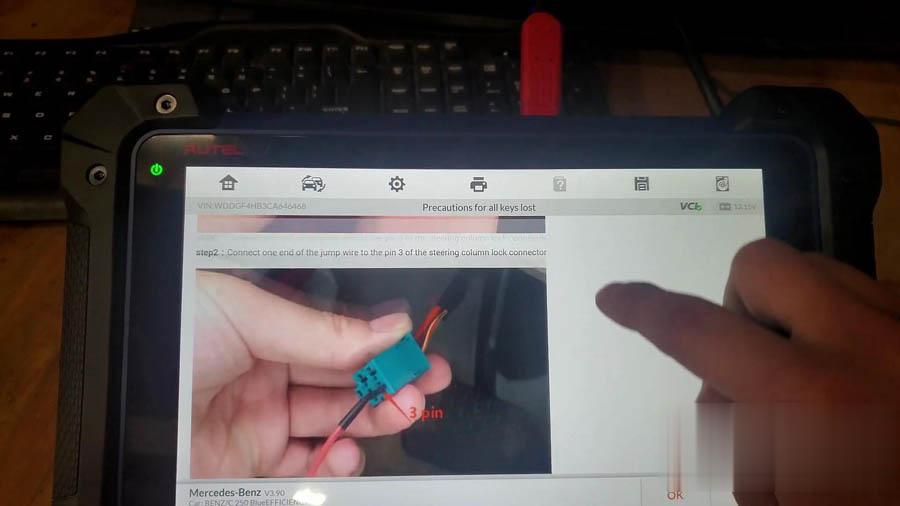
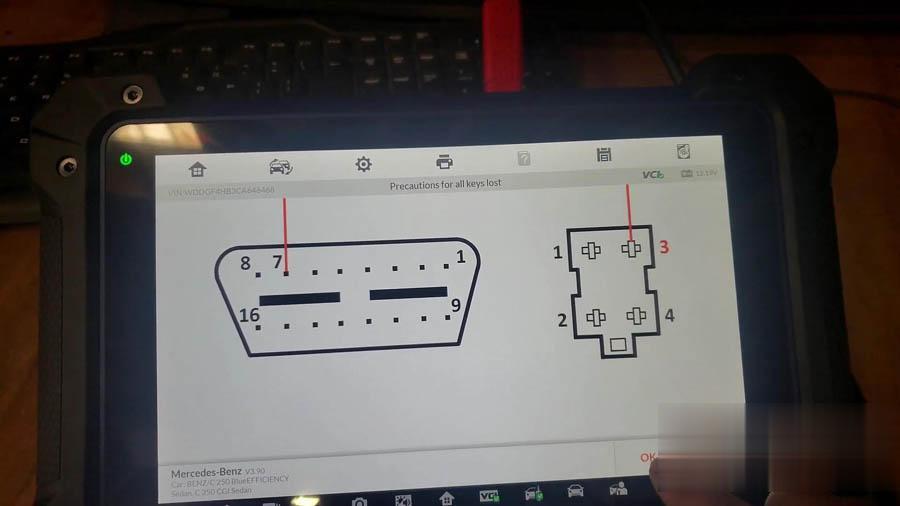
Before continuing, you are supposed to read carefully the “Precautions for all keys lost (Benz W172 /W204 / W207)”, especially if you are not very familiar with IM608. As you can see, it displays the steps with images,

autel-im608-w204-all-keys-lost-programming-06 (2)

autel-im608-w204-all-keys-lost-programming-07 (2)
autel-im608-w204-all-keys-lost-programming-08 (2)

autel-im608-w204-all-keys-lost-programming-09 (2)

autel-im608-w204-all-keys-lost-programming-10 (2)

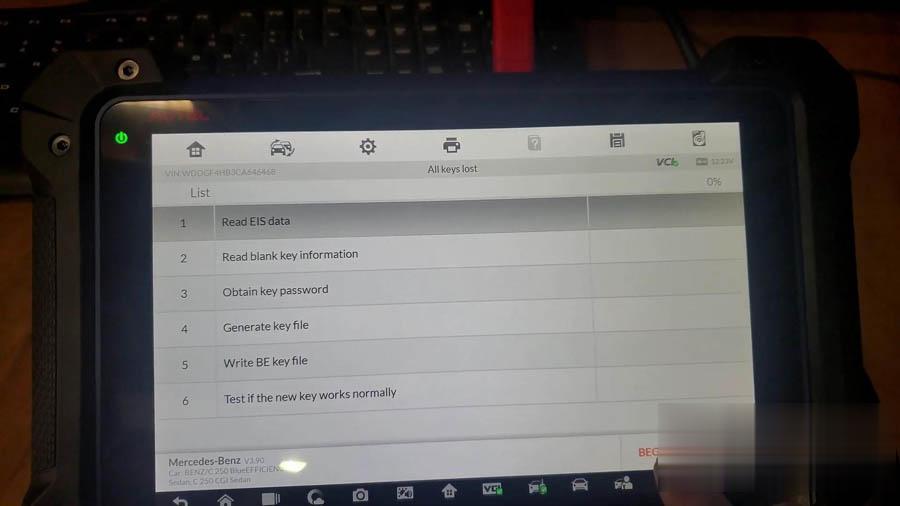
Step 2. Read EIS data.

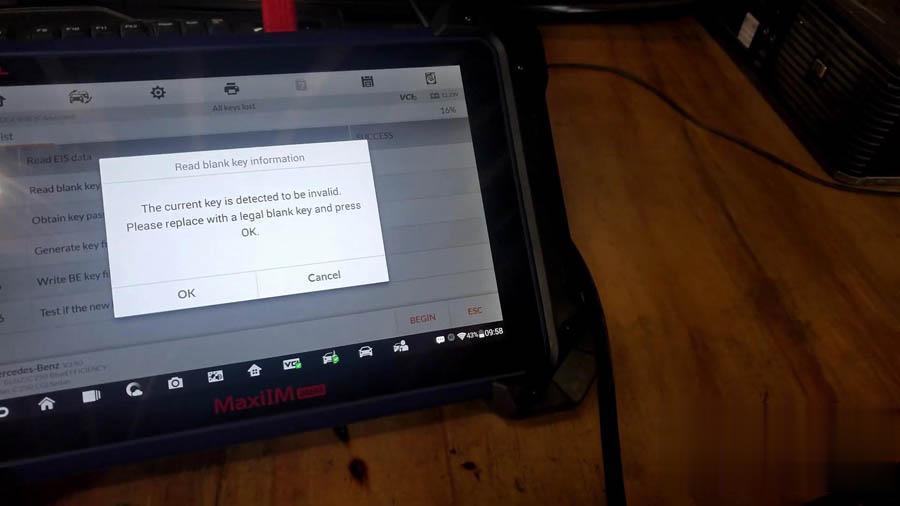
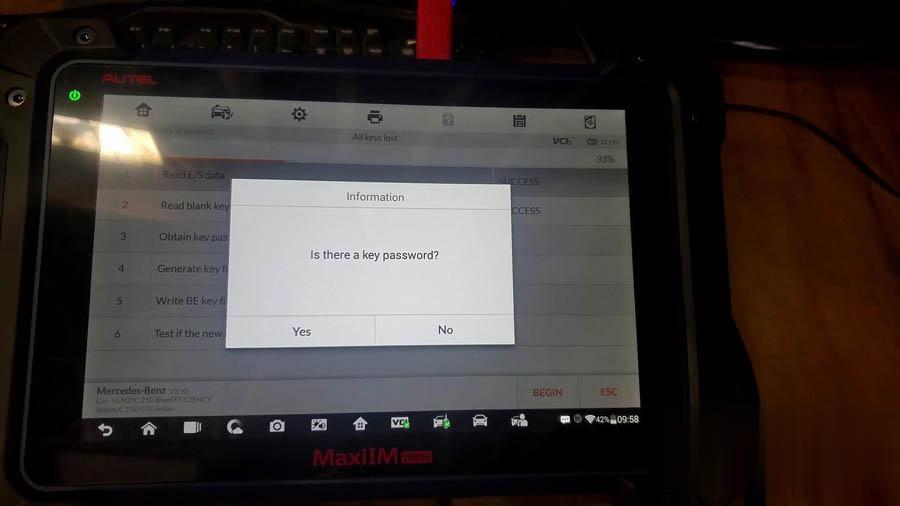
Go on selecting “Read EIS data”, then “Begin”, it will pop up a window message ” Please insert the blank key into the IR keyhole on the programmer (Autel IM608), and press OK.

After doing so, a new window pops up” The current key is detected to be invalid, please replace with a legal blank key and press OK”.

autel-im608-w204-all-keys-lost-programming-11 (2)
autel-im608-w204-all-keys-lost-programming-12 (2)

autel-im608-w204-all-keys-lost-programming-13 (2)

autel-im608-w204-all-keys-lost-programming-14 (2)

Go on, it says “Is there a key password?”, I don’t have it, so I click on “NO”.

autel-im608-w204-all-keys-lost-programming-15 (2)

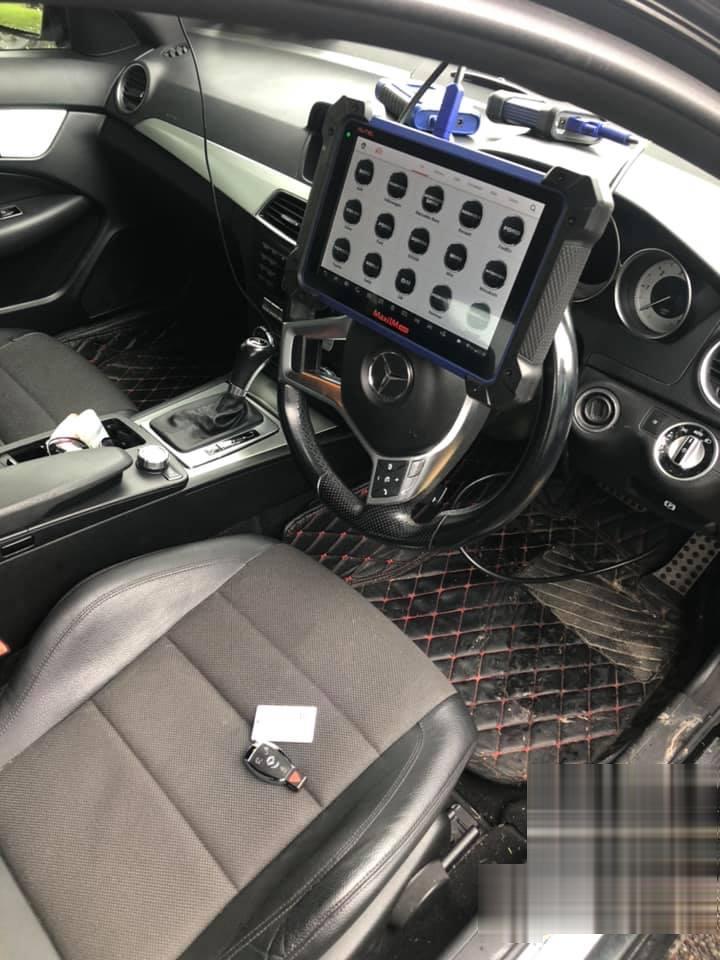
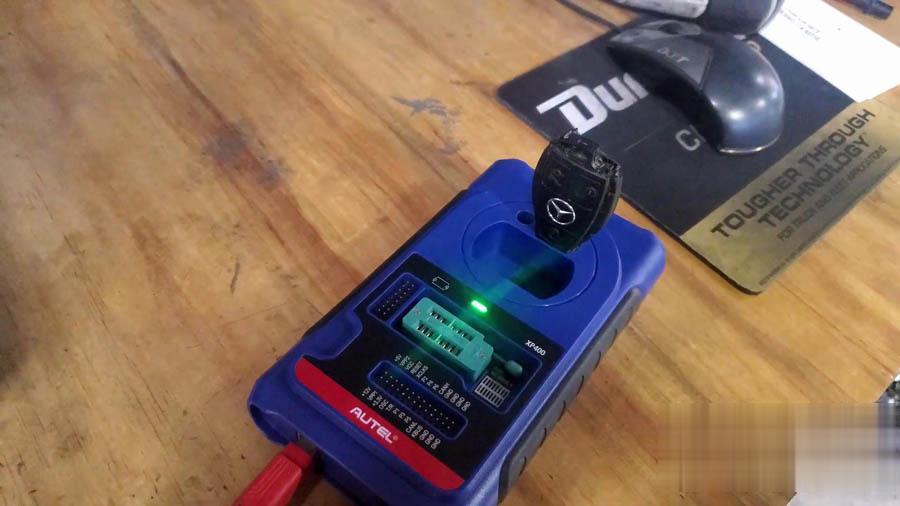
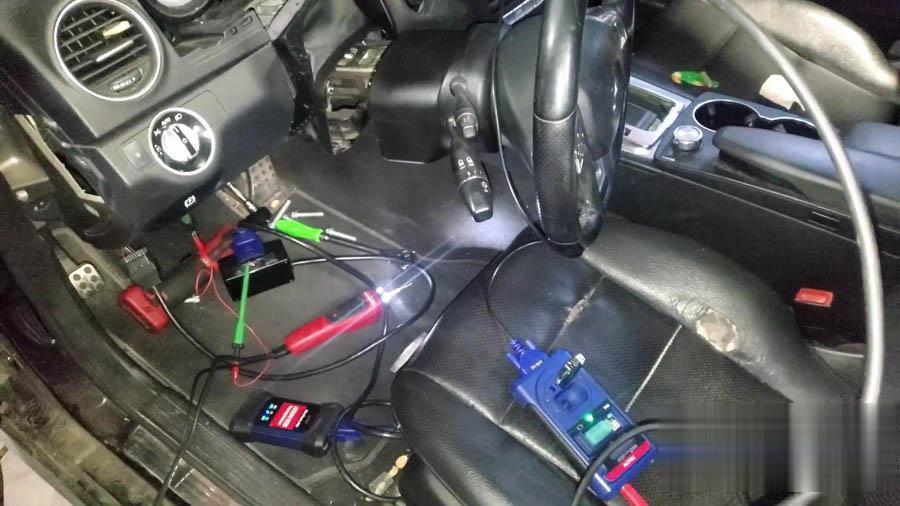
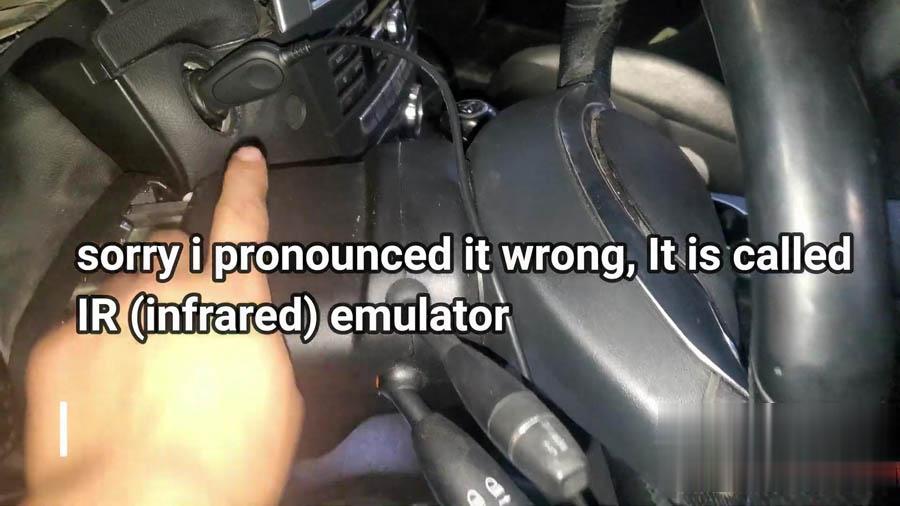
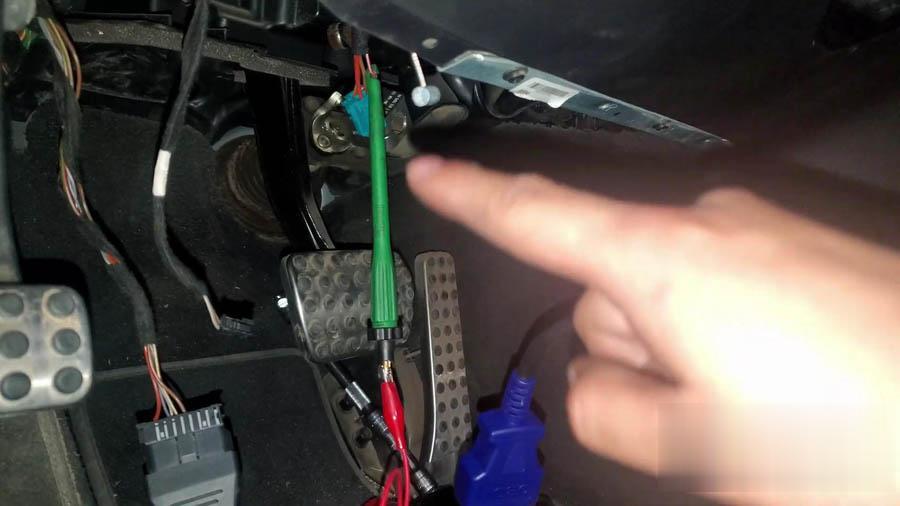
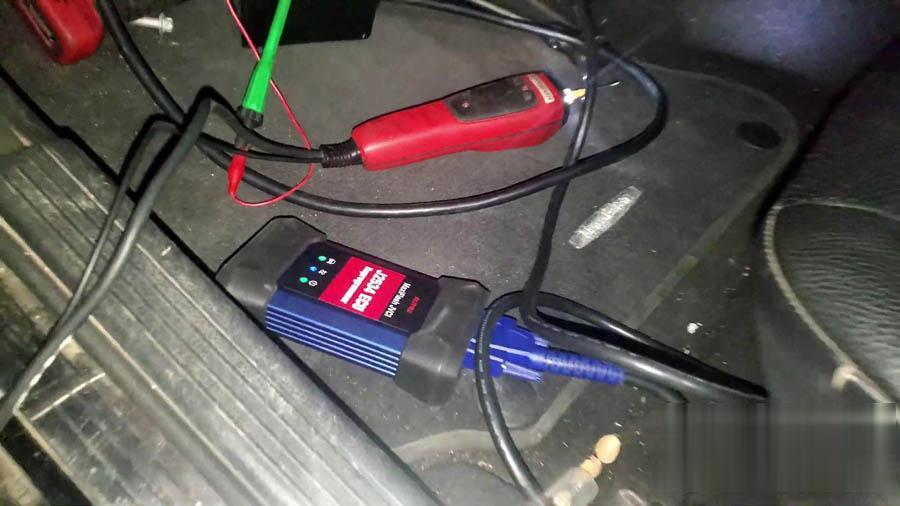
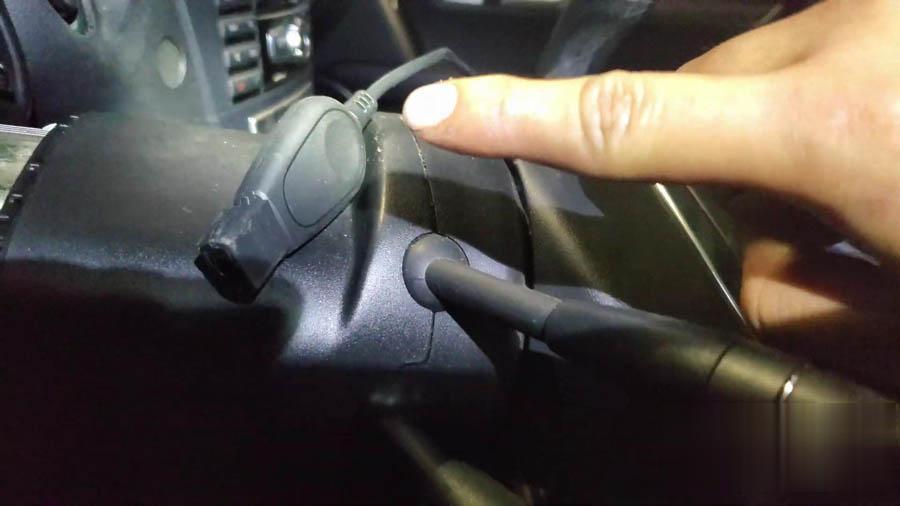
I’m getting the code, and I connected it like the picture below: the key into the slot of XP400, the IR emulator is inserted, jump the cable from the electronic steering module.

autel-im608-w204-all-keys-lost-programming-16 (2)

autel-im608-w204-all-keys-lost-programming-17 (2)

autel-im608-w204-all-keys-lost-programming-18 (2)

autel-im608-w204-all-keys-lost-programming-19 (2)

autel-im608-w204-all-keys-lost-programming-20 (2)

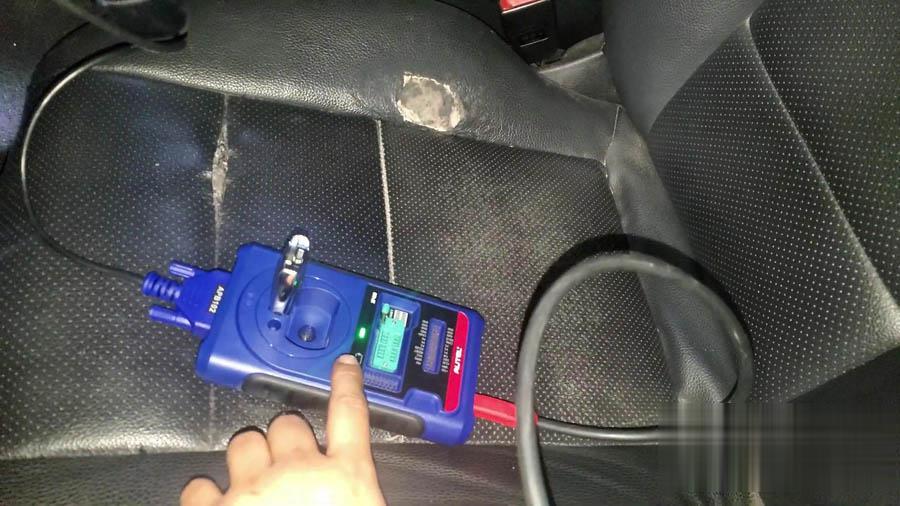
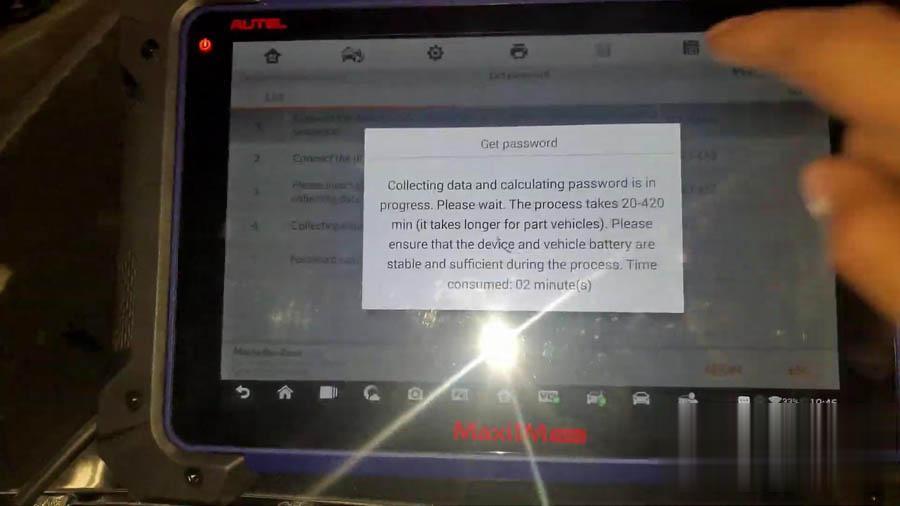
Step 3. Next is to get password:

It will takes 20 – 420 mins (it takes longer for part vehicles) to collect data and calculate password. Please ensure that the device (IM608) and vehicle battery are stable and sufficient.

One it successfully in computing the password, you will receive a message.

FYI: the password is free if you have a valid subscription on Autel IM608, and this tool comes with 1yr free updates and subscription.

autel-im608-w204-all-keys-lost-programming-21 (2)

autel-im608-w204-all-keys-lost-programming-22 (2)

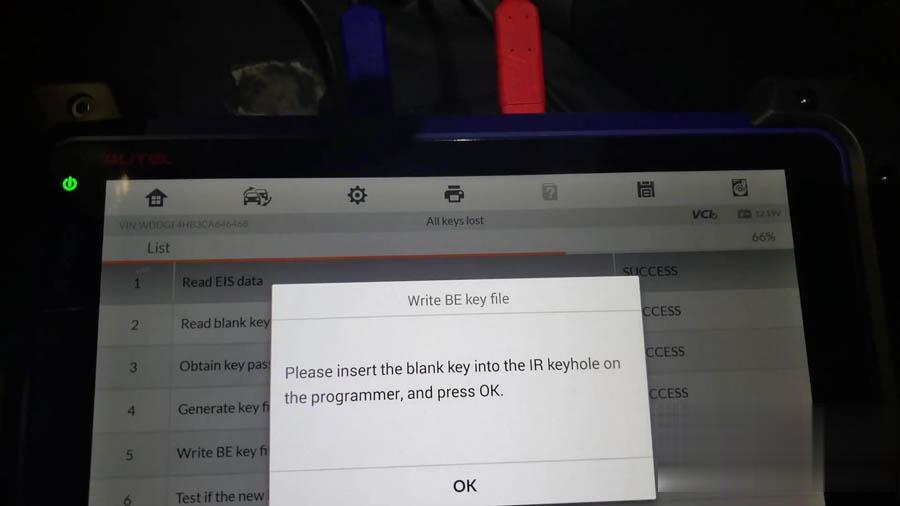
Step 4. Write BE key file

Please insert the blank key into the IR keyhole on the programmer (XP400), and press OK to complete.

autel-im608-w204-all-keys-lost-programming-23 (2)

I am using the IR emulator to read the data from the electronic module switch and calculate the password via internet.

autel-im608-w204-all-keys-lost-programming-24 (2)

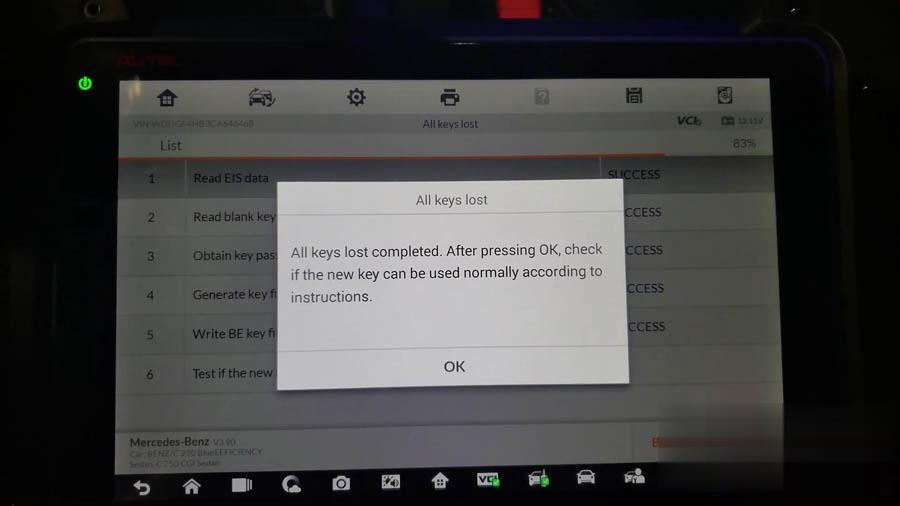
Step 5. All keys lost procedure completed.

All keys lost completed, I will press OK to check if the new key can be used normally.

I will do as written on the screen.

autel-im608-w204-all-keys-lost-programming-25 (2)

autel-im608-w204-all-keys-lost-programming-26 (2)

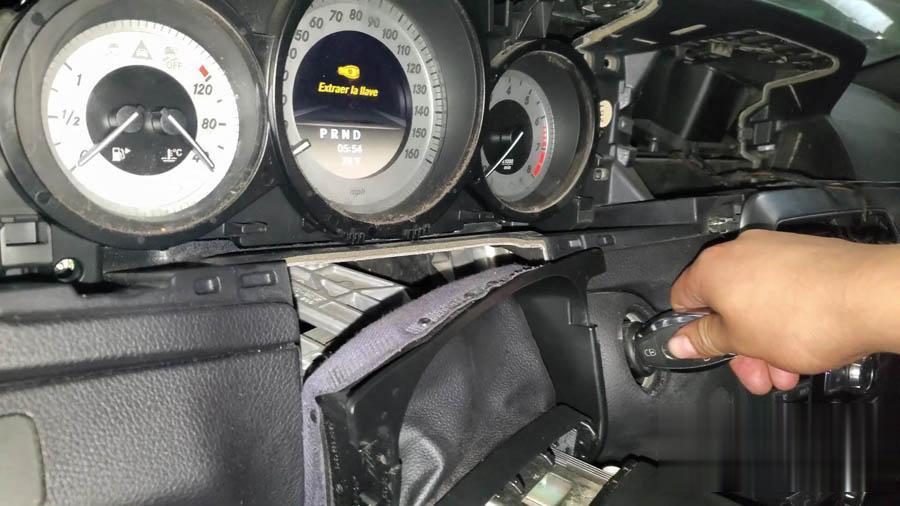
Step 6. Check if the new key can start the car, yeah, it can work.

autel-im608-w204-all-keys-lost-programming-27 (2)

That’s wonderful with Autel IM608 and Xhorse BE key.

2020年11月18日星期三

Free download XENTRY Diagnostics OpenShell 09 2020 XDOS_20.9.4


XENTRY Diagnostics OpenShell – PassThru (OpenShell 09/2020 Final – XDOS 20.9.4 ) – MEGA – Torrent.

XENTRY Diagnostics OpenShell 09/2020 (20.9.4) – final version –

XENTRY Diagnostics PassThru 09/2020 (20.9.3) – final version –

XDOS_2020.06_(20.6.4)_direct_link

XDOS 2020.09 (20.9.4) direct_link – Final Version

XDOS OpenShell 2020-09  ( 20.9.4 )

https://mega.nz/file/hmoHXKoS#HYXsIOV4alSoZ7onsasz1GYWH-TMfgpeonyNwgVn1TE

XDOS 2020-09 Win7 Fixed Solution

https://mega.nz/file/tmYhEKhL#ZuvICMC0sW50KHcjdQYw7vAGr0dfitdpgf9e0KoEJyU

Background_XDPad_2020-09.rar

XDOS_09.2020_Missing_Pics_Fixed_x64.rar

Xentry Passthru 06.2020 [20.9.3] – Torrent.rar

Using sdconnect c4 plus clone to access to Mercedes car model SL300-24 Dec 1990.

Trying to interrogate MB WDB1290612Fxxxxxx

Every time I try to get diagnostics this happens “Switch ignition on”

Free-download-XENTRY-Diagnostics-OpenShell-09-2020-XDOS_20.9.4-1

No 1 black masses should earth?  no 8 yellow LS Can_H no 16 12V B+

Is this correct should there be any other cables connected instead of these?

Free-download-XENTRY-Diagnostics-OpenShell-09-2020-XDOS_20.9.4-2

It only has 16 individual pins see photo above. There isn’t one too old.

Obd2tool engineer replied:

Please change a new MB 38pin cable to connect the DLC on the car.

Free-download-XENTRY-Diagnostics-OpenShell-09-2020-XDOS_20.9.4-3

Another case:

I have a Chinese clone SD connect c4 from YANHUA factory, self test without any errors, all the firmware updates can be applied without any troubles at all, batteries fully charged, tried several OBD cables BUT i still get the “turn ignition on” and furthermore it cannot recognize the VIN of the connected car.

Free-download-XENTRY-Diagnostics-OpenShell-09-2020-XDOS_20.9.4-4

Solution by @JarsaR:

It is easy to test cable with other one.

i just had Yanhua mux which has been in use for years, selftest was ok, Software was ok. But did not connect to car. Mux has the round connector pcb, which pins are soldered to pcb pads, they were loosen in heavy use. Some of cheaper clones has pins go thru the other pcb also, and soldered to pcb, i think Yanhua is more sensitive with her pads. I resoldered all pads and Mux is now perfect.

Confirmed: this solution is working perfect. Change obd socket, my sd connect worked %100..

How to fix V03/2020 MB SD C4 XENTRY “The data are faulty” problem


How to fix V03/2020 MB SD C4 Sofware “The data are faulty” problem in XENTRY

Solution:

1.The error may be caused by clicking the upgrade icon to update the software.

xentry-1 (2)

Please follow the instructions to fix it.
Step 1: Free download a file from the following link.
Xentrypatch202003: https://share.weiyun.com/5uIxwgI
Password:eswr9a
Size: 2GB
Security: No risk!

Step 2: Star Task Manager to end these processes such as “AddOnCenter.exe”, “Java.exe”, “Javaw.exe”

xentry-2 (2)
xentry-3 (2)
xentry-4 (2)
xentry-5 (2)

Step 3:Open Local Disk (C:) to find “AddOnCenter.exe”
If you can only see “AddOnCenter.exe” as below, please open “Organize”->select “Folder and search options”->select “View”->remove the tick of “Hide extensions for known file types” and click “Apply”

xentry-6 (2)
xentry-7 (2)
xentry-8 (2)

Then “AddOnCenter.exe” appears on the screen
Step 4: Change the file name “AddOnCenter.exe” to “AddOnCenter.ex-1”, then it will not update automatically.

xentry-9 (2)
xentry-10 (2)

Step 5: To Delete these 12 items from Local Disk(C:)

xentry-11 (2)
xentry-12 (2)
xentry-13 (2)

Step 6: Open BD-ROM Drive(F:)->click “Mount Image”->open

xentry-14 (2)

Step 7: Select “Xentrypatch202003.iso” installed in Local Disk (C:) and lick “Open”

xentry-15 (2)
Step 8: Click “Open folder to view files”

xentry-16 (2)

Step 9: Copy all the items in the Xentryparch folder to Local Disk (C:) XENTRY folder

xentry-17 (2)
xentry-18 (2)
xentry-19 (2)

Step 10: Restart the computer